Are you tired of dealing with a leaky bathtub spout? Well, you’re not alone.
Did you know that approximately 20% of households in the United States have experienced issues with their bathtub spouts?
But fear not, because replacing your bathtub spout is easier than you might think.
In this article, we will guide you through the step-by-step process of replacing your bathtub spout, so you can finally enjoy a leak-free bathing experience.
So let’s get started!
Key Takeaways
- Visually evaluate the condition of the spout, checking for cracks, rust, and secure attachment.
- Determine if the damage can be easily repaired or if the spout needs to be replaced.
- Gather the necessary tools and materials before starting the replacement process.
- Turn off the water supply to prevent leaks or flooding during the replacement and test for leaks after installation.
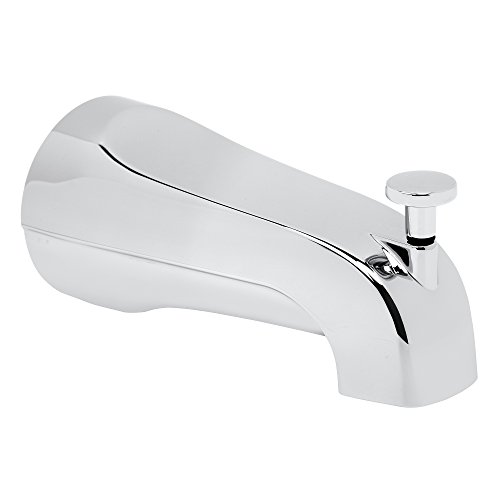
American Standard 8888026.002 Bath Slip-On Diverter Tub Spout, 4 in, Polished Chrome
Metal Construction
As an affiliate, we earn on qualifying purchases.
Assessing the Condition of Your Bathtub Spout
You should start by examining the condition of your bathtub spout to determine if it needs replacement.
Begin by visually evaluating the spout for any visible damage, such as cracks or rust. Check if the spout is securely attached to the wall and if there are any leaks present.
If the damage is minor and can be easily repaired, such as a loose screw or a worn-out gasket, you can opt for repairing the spout instead of replacing it.
However, if the damage is extensive, such as a cracked or broken spout, or if there are recurring leaks that cannot be fixed, it is advisable to replace the entire spout.
Gathering the Necessary Tools and Materials
To gather all the necessary tools and materials, start by checking your local hardware store for a plumbing tool kit. This kit should include essential items such as a pipe wrench, adjustable pliers, Teflon tape, and a screwdriver. Assess the tools in the kit to ensure they are in good condition and functioning properly.
Additionally, gather the required materials for replacing the bathtub spout, which may include a new spout, plumber’s putty, and a caulking gun. It is important to have all the tools and materials on hand before beginning the replacement process to avoid any delays or interruptions.
Once you have gathered everything, you can proceed confidently with replacing your bathtub spout.
Turning Off the Water Supply
When it comes to shutting off the water valve and preventing water damage, it’s crucial to know the exact location of the valve in your home. Typically, the main water shut-off valve is located near the water meter, basement, or crawl space.
By turning off this valve, you can effectively stop the water flow and minimize any potential damage caused by leaks or bursts.
It’s important to familiarize yourself with this process beforehand to ensure quick action in case of emergencies.
Shutting off Water Valve
First, locate the water valve to shut off the water flow before replacing the bathtub spout. This is an essential step to ensure a smooth and hassle-free replacement process. Here’s how to do it:
-
Start by assessing the water pressure in your bathroom. Turn on the faucet and check if the water flows smoothly or if it’s weak and inconsistent. This will help you troubleshoot any potential issues with the water supply.
-
Once you’ve assessed the water pressure, it’s time to locate the water valve. Look for the shut-off valve near the bathtub or in the basement. It is usually a lever or a knob that you can turn clockwise to shut off the water flow.
-
Carefully turn the valve until the water stops flowing. This will prevent any leaks or water damage while you work on replacing the bathtub spout.
Preventing Water Damage
By shutting off the water valve, you can ensure that no water damage occurs during the replacement process. This is an important step to prevent any potential leaks or flooding while working on replacing the bathtub spout. To further enhance water damage prevention and ensure a smooth replacement, here are some maintenance tips to keep in mind:
| Maintenance Tips | Description |
|---|---|
| Inspect for leaks | Check for any existing leaks or signs of water damage before starting the replacement process. This will help identify any underlying issues that need to be addressed. |
| Use plumber’s tape | Apply plumber’s tape to the threads of the new spout before installation. This will create a watertight seal and prevent any water from leaking out. |
| Tighten connections | Ensure that all connections are properly tightened using the appropriate tools. Loose connections can lead to water leakage, so it’s important to secure them adequately. |
| Test for leaks | Once the new spout is installed, turn on the water valve and test for any leaks. Run the water for a few minutes and check for any drips or signs of water damage. If any leaks are found, address them promptly to prevent further damage. |
| Regular maintenance checks | Perform regular maintenance checks on your bathtub spout to identify and address any potential issues before they escalate. This will help prevent water damage and prolong the lifespan of your spout. |
Follow these maintenance tips to ensure water damage prevention and a successful bathtub spout replacement process.
Removing the Old Bathtub Spout
When it comes to removing the old bathtub spout, there are certain techniques you should follow to ensure proper removal.
First, you will need a few essential tools such as a pipe wrench and a screwdriver to help with the removal process.
However, there are common challenges that you may face, such as rusted or stuck spouts. But don’t worry, there are solutions available to help overcome these obstacles.
Proper Spout Removal Techniques
To properly remove the bathtub spout, you’ll want to locate the set screw underneath the spout. This screw is usually located on the bottom side of the spout, near the wall. Once you’ve found the set screw, follow these steps for a successful spout removal:
- Gather the necessary tools: a screwdriver and an adjustable wrench.
- Use the screwdriver to loosen and remove the set screw.
- Grip the spout firmly and twist it counterclockwise to unscrew it from the pipe.
- If the spout is stuck, apply a small amount of lubricant to loosen it.
- Use the adjustable wrench to provide extra leverage if needed.
- Once the spout is unscrewed, pull it straight out to remove it completely.
- Inspect the pipe for any damage or debris that may hinder the installation of the new spout.
Tools Needed for Removal
Make sure you have a screwdriver and an adjustable wrench ready for the spout removal process. These tools are essential for a successful removal. The screwdriver will help you loosen any screws or fasteners holding the spout in place, while the adjustable wrench will allow you to grip and turn the spout if necessary.
")
To begin the removal process, locate the set screw or mounting nut on the underside of the spout. Use the screwdriver to remove the set screw, or the adjustable wrench to loosen and remove the mounting nut. Once the fastener is removed, you can gently pull the spout away from the wall.
Remember to follow these step-by-step instructions carefully and be cautious when handling the removal tools. With the right tools and a bit of patience, you’ll be able to successfully remove your bathtub spout.
Common Challenges and Solutions
One common challenge that homeowners may encounter when removing a bathtub spout is rusted or corroded screws or nuts, which can make the removal process more difficult. When faced with this challenge, there are several solutions you can try to overcome it:
-
Apply penetrating oil: Start by spraying a generous amount of penetrating oil onto the rusted screws or nuts. Allow the oil to sit for a few minutes to penetrate the rust and loosen it up.
-
Use a wrench or pliers: If the screws or nuts are still stubborn, try using a wrench or pliers to apply more force. Make sure to use the appropriate size and type of tool to avoid damaging the spout or surrounding area.
-
Heat the area: In some cases, applying heat to the rusted area can help loosen the screws or nuts. You can use a hairdryer or heat gun to warm up the metal, making it easier to remove.
Cleaning the Spout Connection
You’ll need to grab a small brush and some vinegar to clean the spout connection. Cleaning the spout connection is an essential part of bathtub spout maintenance. Over time, mineral deposits and dirt can build up in the connection, leading to reduced water flow and potential leaks. By following these cleaning techniques and maintenance tips, you can ensure that your spout connection remains in optimal condition.
| Cleaning Techniques | Maintenance Tips |
|---|---|
| Use a small brush | Inspect the spout regularly |
| Dip the brush in vinegar | Clean the spout connection |
| Scrub the connection | Replace any worn-out parts |
| Rinse with water | Apply plumber’s tape |
| Dry the connection | Maintain proper water pressure |
To clean the spout connection, first, dip the small brush in vinegar and scrub the connection thoroughly. Make sure to reach all the nooks and crannies to remove any built-up deposits. Once you’ve scrubbed the connection, rinse it with water to remove any leftover vinegar. Finally, dry the connection completely to prevent any moisture-related issues. By regularly cleaning and maintaining the spout connection, you can ensure optimal performance and longevity for your bathtub spout.
Choosing the Right Replacement Spout
When it comes to choosing the right replacement spout for your bathtub, there are a few key points to consider:
-
Material and design: The material of the spout is important as it determines its durability and resistance to corrosion. You should choose a material that will last and not easily wear down over time. The design of the spout should also be selected based on your personal preferences and the overall aesthetic of your bathroom.
-
Installation requirements: Understanding the installation requirements is crucial to ensure a proper fit and functionality of the replacement spout. You need to know what tools and techniques are needed to install the spout correctly. This will help avoid any issues or complications during the installation process.
Taking these factors into consideration will help you make an informed decision when selecting a replacement spout for your bathtub. It’s important to choose a spout that not only meets your functional needs but also enhances the overall look of your bathroom.
Material and Design
To choose the right material and design for your bathtub spout, consider factors such as durability and aesthetic preference.
When it comes to material selection, you have a few options:
- Brass: This sturdy metal is resistant to corrosion and provides a timeless look.
- Stainless Steel: Known for its durability and sleek appearance, stainless steel is a popular choice for modern bathrooms.
- Plastic: Lightweight and affordable, plastic spouts come in a variety of colors and designs, making it easy to find the perfect match for your bathroom decor.
In terms of design, you can choose from:
- Wall-mounted spouts: These spouts are attached directly to the wall and provide a clean and minimalist look.
- Deck-mounted spouts: These spouts are installed on the edge of the bathtub and can be a focal point of your bathroom design.
- Waterfall spouts: These unique spouts create a waterfall effect, adding a touch of luxury to your bathing experience.
Consider these factors and options to find the perfect material and design for your bathtub spout.
Installation Requirements
Installing a new bathtub spout may require specific tools and knowledge of plumbing techniques. To ensure a successful installation, there are a few tips to keep in mind.
First, gather the necessary tools such as an adjustable wrench, pipe cutter, and plumber’s tape.
Before starting the installation, shut off the water supply to the bathtub.
Next, remove the old spout by unscrewing it counterclockwise. Be careful not to damage the pipe while doing so.
One common mistake is forgetting to apply plumber’s tape to the threads of the new spout before screwing it on. This tape helps create a watertight seal.
Finally, make sure to test the new spout by turning on the water and checking for any leaks.
With these installation tips in mind, you can confidently proceed to installing the new bathtub spout.
Installing the New Bathtub Spout
Now that you’ve removed the old bathtub spout, it’s time to install the new one. Follow these installing techniques and troubleshooting tips to ensure a smooth and successful installation:
-
Gather the necessary tools: adjustable wrench, plumber’s tape, and the new bathtub spout.
-
Begin by wrapping plumber’s tape around the threads of the pipe to create a watertight seal.
-
Carefully thread the new spout onto the pipe, using your hands at first to ensure it is aligned properly.
-
Use an adjustable wrench to tighten the spout securely, being careful not to over-tighten and damage the fittings.
-
Turn on the water supply to check for any leaks. If you spot any, try re-tightening the spout or applying more plumber’s tape as needed.
-
If the leaks persist, it may be necessary to consult a professional plumber for further assistance.
Securing the Spout in Place
Once the plumber’s tape is securely wrapped around the threads, you can carefully thread on the new spout and tighten it with an adjustable wrench.
To secure the spout in place, make sure it is aligned properly with the water pipe. Gently turn the spout in a clockwise direction until it is snug against the wall. Be cautious not to overtighten, as it may cause damage to the spout or the plumbing connections.
Once the spout is securely in place, use the adjustable wrench to give it a final tightening. This will ensure a strong and leak-free connection.
Now that the spout is securely fastened, it’s time to move on to testing the water flow.
Testing the Water Flow
To check if the water is flowing properly, turn on the faucet and observe the stream. Testing the water flow is an important step in troubleshooting your bathtub spout. Here are some techniques to help you determine if there are any issues:
-
Look for a strong, steady stream of water: A healthy flow indicates that water is reaching the spout without any obstructions.
-
Check for any sputtering or irregularities: If the water stream is inconsistent or sputters, there may be a blockage or air trapped in the pipes.
-
Observe the temperature: Ensure that both hot and cold water are flowing correctly. If one temperature is lacking, there could be a problem with the valve or mixing system.
Checking for Leaks
Check for any leaks by examining the surrounding area for signs of water damage, such as damp spots or discoloration.
Start by closely inspecting the walls, ceiling, and floor near the bathtub. Look for any visible water stains or areas that feel damp to the touch.
If you notice any discoloration or moisture, it is a clear indication of a leak.
To find the source of the leak, carefully check the bathtub spout, faucet handles, and any nearby pipes for any signs of water dripping or pooling.
Once you have identified the source, it is important to take immediate action to repair the leak.
Depending on the severity of the leak, you may need to tighten loose connections, replace worn-out washers, or even call a professional plumber for assistance.
Finishing Touches and Cleanup
Now that you’ve successfully replaced your bathtub spout and checked for leaks, it’s time to add the finishing touches and clean up. Here are some important cleanup techniques and post-installation maintenance tips to ensure a polished and functional result:
-
Remove debris: Use a damp cloth or sponge to wipe away any dust, dirt, or grime that may have accumulated during the installation process.
-
Polish the surface: Apply a mild cleaning solution to a non-abrasive cloth and gently wipe down the entire surface of the bathtub spout to remove any fingerprints or smudges.
-
Inspect for damage: Take a close look at the spout to ensure there are no scratches, dents, or other signs of damage. If you notice any issues, contact the manufacturer or a professional plumber for further assistance.
Frequently Asked Questions
How Often Should I Replace My Bathtub Spout?
You should replace your bathtub spout when you notice signs such as leaks, rust, or a decrease in water pressure. To remove the old spout, follow the steps outlined in how to remove bathtub spout guides.
Can I Replace My Bathtub Spout Without Turning off the Water Supply?
You can replace your bathtub spout without turning off the water supply, but it is not recommended. Alternative installation methods may exist, but the potential risks of causing water damage or leaks are high.
What Tools Do I Need to Remove the Old Bathtub Spout?
To remove the old bathtub spout, you’ll need a few tools. Get yourself an adjustable wrench, a screwdriver, and some plumber’s tape. With these in hand, you’ll be ready for a successful bathtub spout removal and installation.
How Do I Choose the Right Replacement Spout for My Bathtub?
To choose the right bathtub spout, consider the type (slip-on or threaded), the material (brass or plastic), and the style (diverter or non-diverter). Troubleshoot common spout issues like leaks and low water pressure to determine the appropriate replacement.
Is It Normal to Experience Reduced Water Flow After Installing a New Bathtub Spout?
After replacing the bathtub spout, reduced water flow can be normal. Troubleshooting low water pressure includes checking for clogs, valve issues, or incorrect installation. Ensure the new spout is compatible and properly installed.
Conclusion
Now that you’ve successfully replaced your bathtub spout, take a moment to appreciate the satisfying sound of water flowing smoothly through your newly installed fixture.
Picture yourself relaxing in a warm bath, the stress of the day melting away as you soak in the comfort of your upgraded bathroom.
With your new spout securely in place, you can trust that your bathing experience will be enhanced for years to come.
Enjoy the peace of mind knowing that you have the skills and knowledge to tackle any future plumbing projects with confidence.