In this piece, we’re going to demonstrate the methods for addressing the task of swapping out components in the toilet tank.
Think of us as your trusty DIY plumbers, ready to guide you through each step with precision and expertise.
From flapper and fill valve replacements to float and flush handle replacements, we’ve got you covered.
Get ready to master the art of toilet repair and keep your plumbing in top-notch condition.

Let’s dive in and get those toilet parts replaced!
Key Takeaways
- Flapper maintenance is essential for proper toilet function.
- Troubleshooting flapper issues can help identify the need for replacement.
- Fill valve replacement may be necessary if troubleshooting doesn’t work.
- Proper float adjustment is important for controlling water level in the tank.

Korky Ultra Standard 2-Inch Universal Toilet Flapper – Long Lasting Rubber – Easy to Install – Made in USA, 100BP
TOILET FLAPPER VALVE FITS MOST POPULAR 2 inch toilet brands including, but not limited to: American Standard, Kohler,…
As an affiliate, we earn on qualifying purchases.
As an affiliate, we earn on qualifying purchases.
Flapper Replacement
We can easily replace the flapper in our toilet tank by following a few simple steps.
Flapper maintenance is essential to ensure that our toilet functions properly. Troubleshooting flapper issues can help us identify the need for replacement.
To begin, turn off the water supply to the toilet and flush to drain the tank. Next, detach the flapper chain from the flush lever and remove the old flapper by unhooking it from the overflow tube.

Before installing the new flapper, inspect the sealing surface and clean any debris or mineral buildup. Attach the new flapper to the overflow tube and reconnect the chain to the flush lever.
Finally, turn on the water supply and check for any leaks.

Fluidmaster 400H-002 Performax Universal Toilet Fill Valve High Performance Tank and Bowl Water Control, 1-Pack, Multicolor
Fix noisy, or slow filling fill valves with the quietest, most powerful toilet fill valve available
As an affiliate, we earn on qualifying purchases.
As an affiliate, we earn on qualifying purchases.
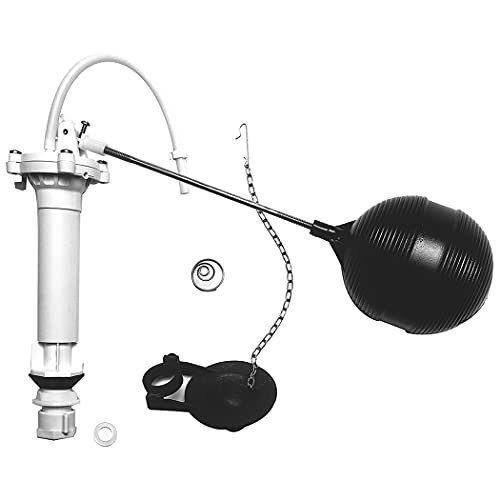
Fill Valve Replacement
To ensure the proper functioning of our toilet, it’s important to address any issues with the fill valve. The fill valve is responsible for controlling the water level in the toilet tank after each flush.
If you notice that your toilet isn’t filling properly or is running continuously, it may be due to a faulty fill valve. Fill valve troubleshooting involves checking for leaks, adjusting the float height, and cleaning any debris that may be obstructing the valve.

If these steps don’t resolve the issue, it may be necessary to replace the fill valve. Fill valve replacement is a relatively straightforward process that involves turning off the water supply, disconnecting the old valve, and installing a new one.
With the right fill valve adjustment techniques, you can restore your toilet’s proper functioning without the need for professional assistance.
Danco Complete Toilet Repair Kit, Fill Valve, Flapper, Rod, Float Replacement (80816), White
TOILET REPAIR KIT: The Danco Toilet Repair Kit includes replacement parts for the most common toilet parts that…
As an affiliate, we earn on qualifying purchases.
As an affiliate, we earn on qualifying purchases.
Float Replacement
Now let’s talk about float replacement in the toilet tank.
Float adjustment techniques and common float issues are important aspects to consider when replacing the float.

We’ll delve into the specific techniques for adjusting the float and address common problems that may arise with the float mechanism.
Float Adjustment Techniques
Occasionally, we may need to replace the float in the toilet tank in order to adjust its height and ensure proper water level control. When it comes to float adjustment techniques, here are four important steps to follow:
- Turn off the water supply: Before replacing the float, it’s crucial to shut off the water supply to the toilet. This prevents any water from flowing into the tank during the adjustment process.
- Drain the tank: To safely replace the float, the tank needs to be emptied. Flush the toilet and hold down the handle to drain the water completely.
- Remove the old float: Disconnect the float from the fill valve assembly by unscrewing or unclipping it. Take note of how it was attached for reference when installing the new float.
- Install the new float: Attach the new float to the fill valve assembly and make sure it’s properly secured. Adjust the float’s height as needed to achieve the desired water level.
Common Float Issues
When replacing the float in the toilet tank, we may encounter common issues that require float replacement.
One of the most common problems is when the float stops working properly. This can cause water level issues, such as the toilet tank not filling up or overfilling. If the float isn’t working correctly, it may need to be replaced.

To determine if the float is the issue, check if it’s stuck in the down position or if it’s damaged. If so, it’s recommended to replace the float with a new one.

Fluidmaster Universal Install/Uninstall Toilet Repair Tool
Fluidmaster’s universal install and uninstall toilet tool makes any toilet repair job simple
As an affiliate, we earn on qualifying purchases.
As an affiliate, we earn on qualifying purchases.
Flush Handle Replacement
We can easily replace the flush handle in a toilet tank. If you’re experiencing issues with your flush handle, such as it not flushing properly or getting stuck, it may be time for a replacement.
Here are four steps to help you troubleshoot and replace your flush handle:
- Determine the problem: Check if the handle is loose, not aligned properly, or if the chain is disconnected.
- Purchase the correct replacement: Measure the length of your current flush handle and ensure you buy a compatible replacement.
- Remove the old handle: Disconnect the chain from the flapper, unscrew the nut or bolt holding the handle in place, and remove the old handle.
- Install the new handle: Insert the new handle into the hole and tighten the nut or bolt. Reconnect the chain to the flapper.
By following these steps, you’ll have a functioning flush handle in no time.

Now, let’s move on to discussing the next topic: overflow tube replacement.
Overflow Tube Replacement
When it comes to replacing the overflow tube in a toilet tank, there are a couple of important points to consider.
First, it’s crucial to ensure that you select the correct tube size to fit your specific toilet model.
Secondly, you need to decide whether you want to tackle this task yourself or hire a professional plumber.

Correct Tube Size
To ensure proper functioning of your toilet, it’s essential to select the correct size for the replacement overflow tube. This small but crucial component plays a vital role in preventing water from overflowing the tank and causing damage. Here are four key points to consider when choosing the correct tube size for your toilet:
- Measure the existing tube: Before purchasing a replacement tube, measure the length and diameter of the current overflow tube in your toilet tank. This will help you determine the correct size needed for the replacement.
- Check compatibility: Ensure that the replacement tube is compatible with your toilet model and brand. Different toilets may require specific tube sizes or designs.
- Consider water pressure: Take into account the water pressure in your plumbing system. Higher water pressure may require a sturdier and more robust tube to prevent leaks and potential damage.
- Consult a professional: If you’re unsure about the correct tube size or installation process, it’s best to consult a professional plumber. They can provide expert guidance and ensure a proper fit.
DIY or Professional?
After considering the correct tube size for your toilet, the next step is to decide whether to replace the overflow tube yourself or hire a professional.
When it comes to DIY vs hiring, there are a few factors to consider.
First and foremost, DIY can save you money. Purchasing the necessary replacement parts and doing the work yourself can be significantly cheaper than hiring a professional.

However, it’s important to note that replacing the overflow tube requires some technical knowledge and skills. If you’re confident in your abilities and have experience with plumbing repairs, DIY might be a viable option.
On the other hand, if you’re unsure or uncomfortable tackling this task, it’s best to hire a professional to ensure the job is done correctly.
Ultimately, the decision comes down to your level of expertise and comfort, as well as the cost comparison between DIY and professional services.
Trip Lever Replacement
Our experience with replacing toilet parts in the tank has shown that the trip lever’s replacement is a straightforward process. Here are four key steps to successfully replace the trip lever:

- Identify the problem: Before replacing the trip lever, it’s important to troubleshoot and determine if it’s indeed the cause of the issue. Common problems include a loose handle or a trip lever that doesn’t flush properly.
- Gather the necessary tools: To replace the trip lever, you’ll need a pair of pliers, a screwdriver, and possibly an adjustable wrench. Having these tools ready will make the process smoother.
- Remove the old trip lever: Start by removing the tank lid and locating the trip lever assembly. Use the pliers or screwdriver to loosen and remove any screws or nuts securing the trip lever. Carefully pull out the old trip lever.
- Install the new trip lever: Insert the new trip lever into the hole in the tank and secure it with the screws or nuts. Ensure that it’s aligned properly and functions smoothly.
With the trip lever successfully replaced, it’s time to move on to the next step: gasket replacement.
Gasket Replacement
Now let’s move on to replacing the gasket, which is a crucial step in ensuring a leak-free toilet tank. Gaskets are essential components that provide a watertight seal between the tank and the bowl. Over time, gaskets can wear out or become damaged, leading to leaks and other issues. Regular gasket maintenance is important to prevent such problems.
Troubleshooting gasket issues involves inspecting the gasket for signs of wear or damage, such as cracks or tears. If any issues are detected, the gasket should be replaced promptly.
To replace the gasket, start by turning off the water supply and draining the tank. Remove the tank bolts and lift off the tank. Carefully remove the old gasket and replace it with a new one, ensuring a snug fit. Finally, reassemble the tank and turn on the water supply to test for leaks.

Chain Replacement
To continue with the maintenance of toilet tank parts, let’s now address the replacement of the chain. The float chain is an essential component that connects the flush lever to the flapper, allowing for the proper flushing mechanism. Over time, the chain may become rusty or stretched, resulting in a weak or incomplete flush.
Here are some chain replacement techniques to ensure optimal performance:
- Turn off the water supply: Shutting off the water valve located beneath the tank prevents any potential leaks during the replacement process.
- Remove the old chain: Disconnect the chain from the flush lever and the flapper by unhooking the links.
- Measure and cut the new chain: Use pliers to cut the new chain to the appropriate length, ensuring it has enough slack for smooth operation.
- Attach the new chain: Reattach the chain to the flush lever and the flapper, ensuring it’s properly secured.
Bolt Replacement
We will now address the process of replacing the bolts in the toilet tank.
Bolt replacement is necessary when the bolts become loose, corroded, or damaged.

To begin, turn off the water supply and flush the toilet to empty the tank.
Next, use a wrench to loosen and remove the nuts that secure the bolts to the toilet bowl.
Once the old bolts are removed, insert the new bolts through the holes in the tank and align them with the corresponding holes in the bowl.
Tighten the nuts securely using a wrench, ensuring that the bolts are straight and evenly tightened.

It’s also recommended to apply a small amount of bolt lubrication to prevent future corrosion and facilitate bolt tightening.
After completing the replacement, turn the water supply back on and check for any leaks.
Conclusion
In conclusion, replacing toilet parts in the tank is a straightforward process that can be done by following the steps outlined in this article.
By replacing the flapper, fill valve, float, flush handle, overflow tube, trip lever, gasket, chain, and bolts as necessary, you can ensure the proper functioning of your toilet.

Remember, a well-maintained toilet is like a smoothly flowing river, bringing comfort and convenience to your daily life.