
Did you know that a clogged bathtub drain can lead to water damage and costly repairs? Well, fear not! In this article, I’ll guide you through the process of changing your bathtub drain.
With just a few tools and some know-how, you’ll be able to tackle this project with confidence. So let’s get started and ensure your bathtub drain is functioning properly and free from any obstructions.
Key Takeaways
- The process of changing a bathtub drain involves using tools such as a screwdriver, pliers, and a drain removal tool, as well as having a new drain assembly and plumber’s putty.
- The steps for changing a bathtub drain include preparing the bathtub, removing the old drain, cleaning the bathtub surface, applying plumber’s putty, removing the old drain assembly, inspecting and cleaning the drain opening, troubleshooting common bathtub drain issues, choosing and installing the new drain assembly, and performing regular maintenance for a properly functioning bathtub drain.
- Regular maintenance is important for a properly functioning bathtub drain, and it includes testing for leaks and proper drainage, regularly inspecting and replacing corroded pipes and drain seals, cleaning the showerhead, avoiding harsh chemicals and excessive force during maintenance, and performing regular maintenance to prevent mineral buildup and reduce the risk of leaks and water damage.
- Additional tips for maintaining a properly functioning bathtub drain include regularly cleaning the drain stopper and using a drain strainer to catch hair and debris, flushing the drain with hot water and using homemade drain cleaners to remove buildup, and scheduling professional drain cleaning every few years to remove stubborn clogs.
Gathering the Necessary Tools and Materials
To start changing your bathtub drain, you’ll need a few tools and materials. First, gather your tools: a screwdriver, pliers, and a drain removal tool. These tools will help you easily remove the old drain and install the new one.
Next, gather your materials: a new drain assembly, plumber’s putty, and Teflon tape. The new drain assembly should match the specifications of your bathtub and be compatible with the type of drain you currently have. Plumber’s putty is necessary to create a watertight seal around the new drain, preventing leaks. Teflon tape is used to ensure a secure fit between the various components of the drain assembly.
By preparing these tools and materials, you’ll be ready to tackle any drain replacement task.
Additionally, troubleshooting common drain problems, such as clogs or slow drainage, can be done with simple tools like a plunger or a drain snake.
Preparing the Bathtub for Drain Replacement
When preparing the bathtub for drain replacement, there are three key points to focus on: removing the old drain, cleaning the bathtub surface, and applying plumber’s putty.
First, to remove the old drain, use a drain removal tool or pliers to unscrew it counterclockwise.
Next, thoroughly clean the bathtub surface using a mild abrasive cleaner to remove any dirt or grime.
Finally, apply plumber’s putty around the new drain before installing it to create a watertight seal.
These steps are crucial in ensuring a successful drain replacement and preventing any leaks or damage.
Removing Old Drain
Start by unscrewing the old drain using a drain key or pliers. This step is crucial in the process of replacing a bathtub drain. Once the drain is removed, you can inspect it for any signs of damage or blockage. Here are a few things to consider while inspecting the drain:
-
Look for hair buildup: Hair is one of the most common culprits of drain clogs. Check if there is any hair tangled around the drain or stuck in the pipe.
-
Examine for corrosion: Over time, drains can corrode due to exposure to water and chemicals. Look for any signs of rust or deterioration on the drain.
-
Check for leaks: Inspect the drain and surrounding pipes for any leaks or cracks. This can help identify potential issues that need to be addressed during the replacement process.
-
Clean the drain thoroughly: Remove any debris or hair from the drain using a wire brush or pipe cleaner.
Cleaning Bathtub Surface
Make sure you regularly clean the surface of your bathtub to remove any dirt or grime buildup. Keeping your bathtub clean not only enhances its appearance but also helps prevent the growth of mold and bacteria.
To clean your bathtub effectively, you’ll need some basic cleaning products and a DIY approach. Start by using a mild detergent or a mixture of baking soda and water to scrub the surface. For tough stains, you can try using vinegar or hydrogen peroxide.
Apply the cleaning solution to the stained area and let it sit for a few minutes before scrubbing with a brush or sponge. Rinse thoroughly with water and dry with a clean cloth.
Remember to always follow the manufacturer’s instructions and test any new cleaning product on a small, inconspicuous area before applying it to the entire surface of your bathtub.
Applying Plumber’s Putty
Applying plumber’s putty is a simple and effective way to create a watertight seal around fixtures in your bathroom. This can help prevent leaks and ensure that your fixtures are properly sealed, providing you with peace of mind and saving you from potential water damage.
Here are some key tips to troubleshoot common issues and ensure a successful application of plumber’s putty:
- Start by cleaning the area thoroughly and removing any old putty or debris.
- Roll the putty into a thin rope and apply it to the fixture, making sure to cover the entire area where the seal is needed.
- Gently press the fixture into place to create a tight seal.
- Wipe away any excess putty with a clean cloth.
Removing the Old Drain Assembly
First, you’ll need to grab a pair of pliers to loosen the old drain assembly.
Start by removing the drain stopper, which is usually held in place by a screw underneath.
Once the stopper is out, use the pliers to grip the cross-shaped flange at the top of the drain assembly. Turn it counterclockwise to unscrew it from the drain pipe. Be careful not to damage the pipe or the surrounding plumbing.
If the drain assembly is stuck, you may need to apply some penetrating oil to help loosen it.
Once the old drain assembly is removed, you can proceed with the hair clog removal or bathtub drain installation, depending on your needs.
Inspecting and Cleaning the Drain Opening
When it comes to dealing with clogged drains, one of the most common culprits is hair.
In this discussion, I will share some effective methods for removing hair clogs and preventing future blockages.
From using simple tools like drain snakes to utilizing preventative measures such as drain covers, I will provide you with the knowledge and detailed steps to keep your drains flowing smoothly.
Removing Hair Clogs
To remove hair clogs in your bathtub drain, you’ll need to grab a pair of needle-nose pliers. Follow these steps to effectively remove the clog and ensure a smooth drain flow:
- Gently lift the drain stopper using the pliers, being careful not to damage it.
- Reach into the drain with the pliers and pull out any visible hair or debris.
If the clog is stubborn, use a drain cleaner specifically designed to dissolve hair and grime. Pour the drain cleaner down the drain, following the instructions on the bottle.
Preventing corrosion and using drain cleaners are essential in maintaining a clog-free drain. Regularly clean the drain opening and surrounding areas to prevent the buildup of debris. Additionally, consider using drain screens to catch hair and other particles before they enter the drain.
Preventing Future Blockages
Regularly cleaning the drain opening and using drain screens can help prevent future blockages. By performing these simple maintenance tasks, you can keep your bathtub drain running smoothly and avoid the hassle of dealing with clogs. In addition to regular cleaning, it’s important to troubleshoot common issues that may arise with your bathtub drain. Here is a table outlining some common problems and their solutions:
| Common Issue | Troubleshooting |
|---|---|
| Slow draining | Use a plunger or drain snake to remove any obstructions |
| Foul odor | Pour a mixture of baking soda and vinegar down the drain, followed by hot water |
| Gurgling sounds | Check for a clogged vent pipe and clear it if necessary |
| Overflowing drain | Remove the drain cover and clean any debris that may be causing the blockage |
Choosing the Right Replacement Drain Assembly
It’s important to choose the right replacement drain assembly for your bathtub. There are several replacement drain options available in the market, but selecting the right one can make a significant difference in the functionality and appearance of your bathtub.
Here are some factors to consider when choosing a replacement drain assembly:
-
Material: Opt for a drain assembly made of durable materials like brass or stainless steel. This ensures longevity and prevents corrosion.
-
Size: Measure the diameter of your current drain to ensure a proper fit. Choosing the wrong size can lead to leaks and other issues.
-
Style: Consider the aesthetic appeal of the drain assembly. There are various styles available, from classic to modern, allowing you to match it with your bathroom decor.
-
Features: Look for features like a built-in strainer or hair catcher to prevent clogs and maintain a clean drain.
Installing the New Drain Assembly
Now that you have chosen the right replacement drain assembly for your bathtub, it’s time to install it.
Installing the drain cover is a relatively straightforward process, but it’s essential to follow the correct steps to ensure a secure and leak-free installation.
First, remove the old drain cover by unscrewing it counterclockwise.
Next, clean the drain hole thoroughly to remove any debris or old sealant.
Then, apply a generous amount of plumber’s putty to the underside of the new drain cover.
Place the drain cover over the drain hole and press it down firmly to create a watertight seal.
Once the drain cover is in place, you can troubleshoot the drain installation by running water and checking for any leaks.
If you notice any leaks, tighten the drain cover further or apply additional plumber’s putty to create a better seal.
With the drain cover securely installed and no leaks detected, your new drain assembly is ready for use.
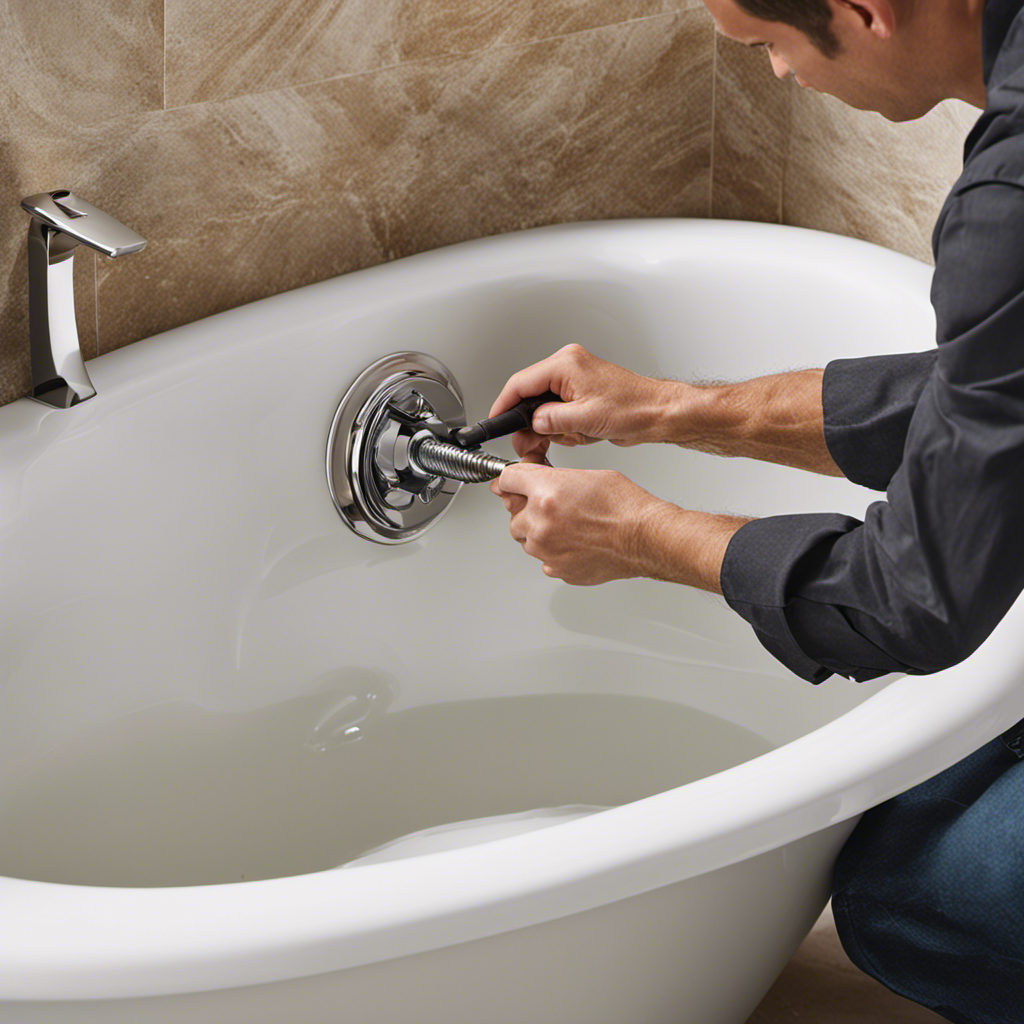
Connecting the Drain to the Plumbing System
After you’ve installed the drain cover, you can proceed to connect it to the plumbing system. This step is crucial for ensuring proper functioning of your bathtub drain. Here’s how you can connect the drain to the plumbing system:
-
First, attach the drain pipe to the drain assembly using PVC glue. Make sure to align the pipe properly and secure it tightly.
-
Next, connect the other end of the drain pipe to the existing plumbing system. Use a coupling or a compression fitting to create a watertight seal.
-
Once the drain pipe is securely connected, tighten the nuts on the drain assembly to ensure a proper seal.
-
Finally, check all the connections to ensure they are secure and leak-free.
With the drain now connected to the plumbing system, we can move on to the next step of testing for leaks and ensuring proper drainage.
Testing for Leaks and Proper Drainage
When it comes to testing for leaks and ensuring proper drainage, there are a few key points to consider.
First, it’s important to be familiar with different leak detection methods to identify any potential issues early on.
Additionally, proper water flow is crucial to maintain the functionality of your plumbing system, so regularly checking and maintaining the flow rate is essential.
Lastly, regular maintenance plays a vital role in preventing leaks and ensuring optimal water flow, so it’s important to establish a routine maintenance schedule to keep your plumbing system in top shape.
Leak Detection Methods
One way to identify leaks is by using a leak detection kit. These kits are easy to use and can help pinpoint the source of the leak quickly. As someone who has dealt with bathtub drain leaks before, I can attest to the effectiveness of these kits.
Here are some common causes of bathtub drain leaks and leak prevention techniques to consider:
-
Corroded pipes: Over time, pipes can corrode and develop small holes, leading to leaks. Regular inspection and replacement of corroded pipes can prevent leaks.
-
Loose fittings: Loose fittings can cause water to seep out of the drain. Tightening the fittings can help prevent leaks.
-
Cracked drain seals: Cracks in the drain seals can result in leaks. Regularly inspecting and replacing damaged seals can help prevent leaks.
-
Improper installation: A poorly installed drain can lead to leaks. Hiring a professional to properly install the drain can prevent future leaks.
Ensuring Proper Water Flow
To ensure proper water flow, you should regularly clean and remove any debris from the showerhead. This is crucial in preventing clogs and troubleshooting common drainage issues.
Over time, mineral deposits and other particles can accumulate in the showerhead, restricting water flow and causing inefficient showers. By cleaning the showerhead regularly, you can prevent these issues and maintain optimal water flow.
To clean the showerhead, simply unscrew it from the shower arm and soak it in a mixture of vinegar and water for about 30 minutes. Then, use a brush to scrub away any remaining debris. Rinse the showerhead thoroughly and reattach it to the shower arm.
Following this simple maintenance routine will ensure that your showerhead continues to provide a strong and steady flow of water.
Importance of Regular Maintenance
Regular maintenance is essential for keeping your showerhead in optimal condition and ensuring a strong and steady flow of water. By taking the time to perform regular maintenance, you can reap a multitude of benefits.
Here are some key reasons why regular maintenance is important:
- Prolongs the lifespan of your showerhead, saving you money in the long run
- Prevents mineral buildup, which can affect water pressure and quality
- Reduces the risk of leaks and water damage
- Improves the overall hygiene and cleanliness of your showering experience
However, it’s crucial to avoid common maintenance mistakes such as using harsh chemicals, neglecting to clean the showerhead regularly, or using excessive force when tightening or removing parts. By avoiding these mistakes, you can ensure that your showerhead remains in optimal condition.
Now that we understand the importance of regular maintenance, let’s move on to reassembling the bathtub components.
Reassembling the Bathtub Components
Now you can start reassembling the bathtub components. Reassembling techniques are crucial to ensure a properly functioning bathtub drain after a replacement.
Begin by placing the new drain assembly into the drain hole, ensuring a tight fit. Use a plumber’s putty or silicone caulk to create a watertight seal.
Next, attach the drain flange with the provided screws or clips, making sure it is secure.
Connect the drain linkage to the trip lever inside the overflow plate, ensuring smooth movement.
Finally, test the drain by filling the bathtub with water and checking for any leaks or drainage issues. If you encounter any problems during reassembly, such as difficulty aligning the components or leaks, refer to the manufacturer’s instructions or seek professional help.
With the bathtub components successfully reassembled, let’s move on to some tips for maintaining a properly functioning bathtub drain.
Tips for Maintaining a Properly Functioning Bathtub Drain
Maintaining a properly functioning bathtub drain can be done by regularly cleaning the drain stopper and removing any debris. This simple maintenance routine can help prevent hair clogs and prolong the life of your drain.
Here are some effective drain maintenance techniques:
-
Use a drain strainer: Placing a drain strainer over your bathtub drain can catch hair and other debris before it goes down the drain, preventing clogs.
-
Flush the drain with hot water: Once a week, pour a pot of boiling water down the drain to help remove any buildup and keep it flowing smoothly.
-
Use a homemade drain cleaner: Mix equal parts baking soda and vinegar, then pour it down the drain. Let it sit for a few minutes before flushing it with hot water. This natural solution can help break down any residue.
-
Schedule professional drain cleaning: Every few years, it’s a good idea to have a professional plumber clean your drains to remove any stubborn clogs or buildup.
Frequently Asked Questions
How Do I Know if I Need to Replace My Bathtub Drain?
If you’re wondering if you need to replace your bathtub drain, there are a few signs to look out for. Some common indicators include leaks, rust, and slow draining. If these issues persist, it may be time to explore replacement options.
Can I Use Any Type of Replacement Drain Assembly for My Bathtub?
Yes, you can use various replacement drain assemblies for your bathtub. However, it’s crucial to consider compatibility issues. Different bathtubs may require specific drain types, so it’s essential to choose the right one for a successful installation.
How Long Does It Typically Take to Replace a Bathtub Drain?
On average, replacing a bathtub drain takes about two hours. It involves several steps, such as removing the old drain, cleaning the area, and installing the new drain assembly. It’s a straightforward process with the right tools and instructions.
What Should I Do if I Encounter Any Difficulty While Removing the Old Drain Assembly?
If I encounter any difficulty while removing the old drain assembly, I can try troubleshooting tips like using lubricant or a drain removal tool. If all else fails, I might need to seek professional help.
Are There Any Specific Maintenance Steps I Should Follow to Keep My Bathtub Drain Working Properly?
To keep my bathtub drain working properly, I follow specific maintenance steps. Regularly clean the drain to remove any debris. If I encounter any issues, I troubleshoot by checking for clogs and using drain cleaners if needed.
Conclusion
In conclusion, changing a bathtub drain can be a relatively straightforward task if you have the right tools and follow the necessary steps. By inspecting and cleaning the drain opening, choosing the right replacement assembly, and properly connecting the drain to the plumbing system, you can ensure a leak-free and properly functioning bathtub drain.
For example, let’s consider a hypothetical situation where a homeowner noticed water pooling around their bathtub drain. By following the steps outlined in this article, they were able to identify and fix a clog in the drain, restoring proper drainage and preventing further water damage.

With an impeccable eye for detail and a passion for bathroom-related, Ava leads our editorial team gracefully and precisely.
Under her guidance, Best Modern Toilet has flourished as the go-to resource for modern bathroom enthusiasts. In her free time, you might find Ava exploring antique shops and looking for vintage bathroom fixtures to add to her collection.