Hey there, folks! Today, I’m gonna walk you through the process of removing an old bathtub drain.
It’s a pesky task, but with the right tools and some elbow grease, you’ll have that drain out in no time.
So, grab your wrenches and put on your DIY hat, because we’re about to dive into the nitty-gritty of this plumbing project.
Get ready to bid farewell to that stubborn drain and say hello to a fresh start in your bathroom.
Let’s get cracking!
Key Takeaways
- Gather all necessary tools and materials, such as pliers, screwdriver, bucket, towel, and a new bathtub drain.
- Prepare the bathroom and bathtub by cleaning and sanitizing the tub surface, ensuring proper ventilation, and wearing protective gloves and eyewear.
- Regularly clean and inspect the drain cover for cracks or damage, and tighten the screws holding it in place.
- Use a drain removal tool to disconnect and remove the drain pipe, being careful not to damage surrounding areas or other plumbing components.

HAUTMEC Tub Drain Remover Wrench Tool Heavy Duty Aluminum Shower Bathtub Drain Removal Tool PL0030
The dual ended tub drain wrench fits most inner diameter 1 3/8" and 1 1/2" tub drain shoe,ideal…
As an affiliate, we earn on qualifying purchases.
As an affiliate, we earn on qualifying purchases.
Gather the Necessary Tools and Materials
Now, you’ll need to gather all the necessary tools and materials for removing the old bathtub drain.
To replace or repair a bathtub drain, you’ll need a few essential items. Firstly, you will require a pair of pliers or a drain removal tool. These tools will help you unscrew and loosen the drain assembly.
Additionally, a screwdriver may be needed to remove any screws or fasteners holding the drain in place.
It is also important to have a bucket or container to catch any water that may come out during the process.
To prevent any damage to your bathtub, it is advisable to have a towel or cloth nearby to protect the surface.
Lastly, don’t forget to have a new bathtub drain on hand for installation once the old one is removed.

Tub Drain Linkage Assembly with Trip Lever and Strainer Done Cove, Fit for Trip Lever Bath Tub Waste and Overflow Drain by Artiwell
TUB DRAIN ASSEMBLY LINKAGE: Designed to repair and replace a worn-out Trip-lever drain assembly linkage that operates the…
As an affiliate, we earn on qualifying purchases.
As an affiliate, we earn on qualifying purchases.
Prepare the Bathroom and Bathtub for the Removal Process
Before you can start, make sure you’ve prepared the bathroom and tub for the removal process. Cleaning and sanitizing the bathtub is crucial to ensure a hygienic work environment.
Begin by removing any debris or residue from the tub surface using a mild cleaner and scrub brush. Rinse the tub thoroughly to remove any cleaning product residue.
Next, sanitize the bathtub by applying a disinfectant solution and allowing it to sit for the recommended amount of time. After sanitizing, rinse the tub again to remove the disinfectant.
It is also important to ensure proper ventilation in the bathroom during the removal process. Open windows or use a fan to circulate fresh air and prevent the buildup of fumes.
Additionally, for safety measures, wear protective gloves and eyewear to protect yourself from any potential hazards.
With the bathroom and tub clean and prepared, you can now move on to loosening and removing the drain cover in the next step.
HAUTMEC Tub Drain Remover Wrench Tool Heavy Duty Aluminum Shower Bathtub Drain Removal Tool PL0030
The dual ended tub drain wrench fits most inner diameter 1 3/8" and 1 1/2" tub drain shoe,ideal…
As an affiliate, we earn on qualifying purchases.
As an affiliate, we earn on qualifying purchases.
Loosen and Remove the Drain Cover
To begin, you’ll want to loosen and take off the cover over the drain. This is an essential step in removing an old bathtub drain.
Here are some important points to keep in mind when it comes to drain cover maintenance and common issues with bathtub drains:
-
Regular cleaning: Cleaning the drain cover regularly can prevent clogs and buildup of debris, ensuring optimal drainage.
-
Check for cracks or damage: Inspect the drain cover for any cracks or damage that may hinder its function. Replace if necessary.
-
Addressing rust or corrosion: Rust or corrosion on the drain cover can lead to leaks or further damage. Remove any rust and apply a rust-resistant coating.
-
Tightening screws: Over time, the screws holding the drain cover in place may become loose. Regularly check and tighten them to prevent the cover from coming off.
By properly maintaining the drain cover, you can avoid common issues and ensure a smooth removal process.
Now, let’s move on to the next step: disconnecting and removing the drain pipe.

Refrigerator Coil Cleaning Brush,Sewer Set Brush Clog Remover,for Toilet, Kitchen Sink, Sewer, Bathroom Bathtub Hair Clogging Cleaning Tool,Long Drain Brush
DURABLE MATERIAL: The brush rod is made of high quality stainless steel, flexible and bendable. The spiral bristles…
As an affiliate, we earn on qualifying purchases.
As an affiliate, we earn on qualifying purchases.
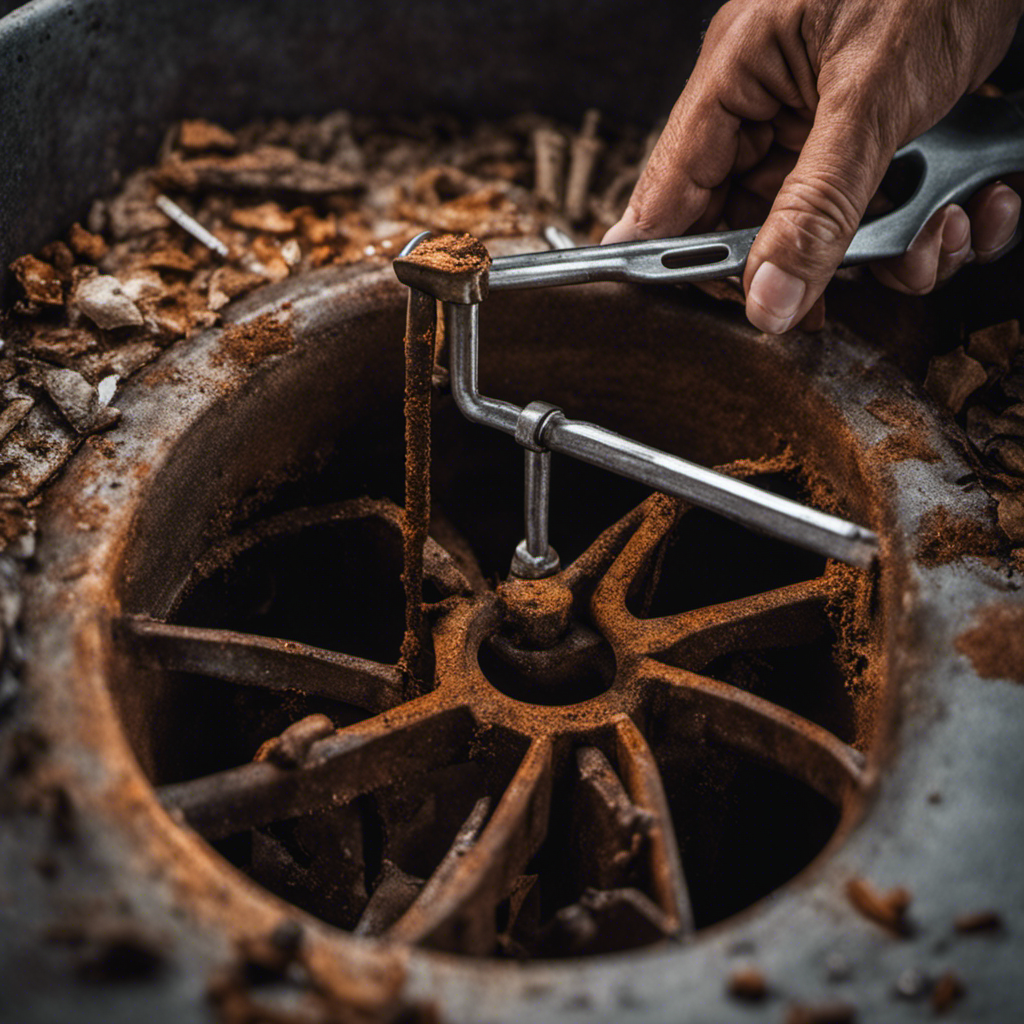
Disconnect and Remove the Drain Pipe
After you’ve loosened and taken off the drain cover, you’ll need to disconnect and remove the drain pipe.
To replace the drain pipe, you’ll need a drain removal tool, which is designed to grip onto the drain pipe and help you remove it easily.
Start by placing the drain removal tool onto the drain pipe and tightening the grip. Once the tool is securely attached, use a wrench to turn the tool counterclockwise, loosening the drain pipe from the bathtub.
As you turn the tool, you’ll feel the drain pipe becoming loose. Continue turning until the drain pipe is completely disconnected from the bathtub.
Once it’s loose, you can simply pull it out and set it aside. Be careful not to damage the surrounding area or any other plumbing components while removing the drain pipe.
Remove the Old Bathtub Drain Assembly
Once you’ve disconnected the drain pipe, it’s time to take out the assembly. This step is crucial in replacing the old drain with a new one. Here are some common problems encountered during bathtub drain removal:
-
Rust and corrosion: Over time, the drain assembly may become rusted or corroded, making it difficult to remove. Applying penetrating oil and using a drain removal tool can help loosen the assembly.
-
Stuck drain flange: The drain flange may be tightly sealed or glued to the bathtub. In this case, using a drain key or pliers with a firm grip can help break the seal and remove the flange.
-
Broken crossbars or screws: In some instances, the crossbars or screws holding the drain assembly in place may be damaged or stripped. This requires careful extraction using a screwdriver or pliers.
-
Access issues: Limited access to the drain assembly, especially in older bathtubs with limited space, can make the removal process challenging. In such cases, using specialized tools like a drain extractor can help simplify the task.
Frequently Asked Questions
Can I Remove an Old Bathtub Drain Without Using Any Tools?
I can remove an old bathtub drain without any tools, but it’s not recommended. Alternative methods may include using a suction cup or pliers, but there are potential challenges such as damage to the drain or surrounding area.
How Long Does It Usually Take to Remove an Old Bathtub Drain?
Removing an old bathtub drain can take anywhere from 30 minutes to an hour, depending on the condition and difficulty. Proper techniques, such as using a drain removal tool, can make the process smoother.
Can I Reuse the Old Drain Pipe After Removing the Bathtub Drain?
I can reuse the old drain pipe after removing the bathtub drain. However, there are alternatives to reusing it, such as replacing it with a new one or using a different type of drain system.
Is It Necessary to Turn off the Water Supply Before Removing the Drain?
Yes, it is necessary to turn off the water supply before removing the drain. It ensures that you won’t have any water leakage during the process. Safety first! Also, wearing gloves is recommended and you can remove the drain without hiring a professional plumber.
What Should I Do if the Drain Cover Is Stuck and Won’t Loosen?
If the drain cover is stuck and won’t loosen, I would first try using a lubricant to help loosen it. If that doesn’t work, there are alternative methods to remove a stuck drain cover.
Conclusion
After gathering the necessary tools and materials and preparing the bathroom and bathtub, the next step is to disconnect and remove the drain pipe. This can be a bit tricky, as it requires careful maneuvering and a good understanding of the plumbing system. However, with patience and precision, the old bathtub drain assembly can be removed entirely.
Stay tuned for the final steps in our next article, where we will reveal the secrets to removing the old bathtub drain once and for all!