Hey there!
So, you’ve got a bathtub drain that’s seen better days, huh? Well, fear not, because I’ve got just the solution for you.
In this step-by-step guide, I’m going to show you how to replace that old drain and give your bathtub a fresh new start.
Grab your tools and let’s dive right in!
Key Takeaways
- Gather the necessary tools and materials, including pliers, screwdriver, drain removal tool, silicone caulk gun, and pipe wrench
- Remove the bathtub stopper by twisting it counterclockwise and being careful not to drop it into the drain
- Disconnect the overflow plate and drain linkage by unscrewing the overflow plate, locating the lever connecting to the plate, and unscrewing the nut holding it in place
- Detach the drain linkage by gripping the connecting nut firmly and rotating it counterclockwise, then carefully pulling the drain linkage out of the overflow opening

EZ-FLO Lift-n-Turn Bath Drain Assembly Kit, 1-1/2 in. x 11.5 Coarse Thread, 2-7/8 in. OD Flange, 5/16 in. Tapped Zinc Body, Chrome Plated, 35233
BATH DRAIN STOPPER KIT: Bathtub drain stop kit makes for an excellent addition to any home bathroom
As an affiliate, we earn on qualifying purchases.
As an affiliate, we earn on qualifying purchases.
Gather the Necessary Tools and Materials
You’ll need a pair of pliers and a screwdriver to remove the old bathtub drain. Before you begin, gather all the necessary tools and materials.
To replace a bathtub drain, you will need the following: a new bathtub drain, a drain removal tool, a silicone caulk gun, a bottle of plumber’s putty, and a pipe wrench.
When choosing a new bathtub drain, consider the type of drain you currently have and the style of your bathroom. There are different types of drains, such as pop-up drains and trip lever drains, so make sure to choose the right one. Additionally, select a drain that matches the finish and aesthetic of your bathroom fixtures.
Once you have all the necessary tools and materials, you’re ready to start replacing your bathtub drain.

HAUTMEC Tub Drain Remover Wrench Tool Heavy Duty Aluminum Shower Bathtub Drain Removal Tool PL0030
The dual ended tub drain wrench fits most inner diameter 1 3/8" and 1 1/2" tub drain shoe,ideal…
As an affiliate, we earn on qualifying purchases.
As an affiliate, we earn on qualifying purchases.
Remove the Bathtub Stopper
To remove the bathtub stopper, simply twist it counterclockwise until it comes loose.
Start by locating the stopper on your bathtub drain. It is usually located in the center of the tub, near the faucet. Once you have located it, grab the stopper firmly with your hand.
Apply steady pressure and rotate it counterclockwise. You may feel some resistance at first, but continue twisting until the stopper starts to move. Keep rotating until the stopper is completely unscrewed and comes loose from the drain.
Be careful not to drop it into the drain as you remove it. This step is essential when it comes to bathtub maintenance, especially if you need to replace the stopper with a new one.
Artiwell Universal Tip Toe Bath Drain Stopper and Cover, Bathtub Drain Stopper, Replaces Lift and Turn, Tip-Toe and Trip Lever drains for Tub, EZ Installation and Clearing (Chrome Plated)
UGRADED TUB DRAIN STOPPER AND COVER: New design for easy installation and removing, so that you can clearing…
As an affiliate, we earn on qualifying purchases.
As an affiliate, we earn on qualifying purchases.
Disconnect the Overflow Plate and Drain Linkage
To continue the process of replacing the bathtub drain, the next step involves removing the overflow plate and detaching the drain linkage.
First, locate the overflow plate on the side of the bathtub and unscrew the screws holding it in place. Once the screws are removed, carefully pull the overflow plate off, exposing the drain linkage.
To detach the drain linkage, locate the lever that connects to the plate and unscrew the nut holding it in place.
Removing Overflow Plate
First, locate the screws on the overflow plate and use a screwdriver to remove them. Once the screws are removed, gently pull the overflow plate away from the bathtub wall. Be careful not to damage the surrounding tiles or plumbing. The overflow plate is connected to the drain linkage, which operates the bathtub drain stopper. If you are troubleshooting common bathtub drain issues, such as a clogged drain or a malfunctioning stopper, removing the overflow plate is an important step. By accessing the drain linkage, you can inspect and clean any debris that may be causing the issue. Additionally, you can check for any loose or broken parts that may need to be replaced.
Below is a table that summarizes the steps to remove the overflow plate:
| Steps |
|---|
| Locate the screws on the overflow plate |
| Use a screwdriver to remove the screws |
| Gently pull the overflow plate away from the bathtub wall |
Remember to keep track of all the screws and parts you remove during this process, as they will need to be reinstalled when you replace the bathtub drain.
Detaching Drain Linkage
Once the overflow plate is removed, you can detach the drain linkage by unscrewing the connecting nut. This is an important step in replacing a bathtub drain stopper or troubleshooting drain issues.
Here’s a step-by-step guide to help you:
-
Locate the connecting nut: It is usually located near the overflow opening on the side of the bathtub.
-
Use pliers or a wrench to grip the connecting nut firmly.
-
Rotate the nut counterclockwise to loosen it.
-
Once the nut is loose, carefully pull the drain linkage out of the overflow opening.
-
Inspect the drain linkage for any damage or blockages that may be causing drainage problems.
-
If you are replacing the drain stopper, remove the old stopper from the linkage and install the new one.
-
If troubleshooting, clean the linkage and remove any obstructions before reattaching it.
Remember to tighten the connecting nut securely after reattaching the drain linkage.
HAUTMEC Tub Drain Remover Wrench Tool Heavy Duty Aluminum Shower Bathtub Drain Removal Tool PL0030
The dual ended tub drain wrench fits most inner diameter 1 3/8" and 1 1/2" tub drain shoe,ideal…
As an affiliate, we earn on qualifying purchases.
As an affiliate, we earn on qualifying purchases.
Remove the Old Drain Flange
After removing the screws, you can easily lift off the old drain flange. This is an important step in replacing the drain and maintaining your bathtub.
Here is a step-by-step guide on how to remove the old drain flange:
-
Start by locating the screws that hold the drain flange in place. These are usually found on the underside of the bathtub.
-
Use a screwdriver to carefully remove the screws. Place them in a safe place so that you don’t lose them.
-
Once the screws are removed, gently lift the old drain flange off the bathtub. Be careful not to damage the surrounding area.
-
Inspect the old drain flange for any signs of damage or wear. If it is in good condition, you may be able to reuse it. Otherwise, it’s best to replace it with a new one.
Clean and Prepare the Area Around the Drain
To properly clean and prepare the area around the drain, start by wiping away any dirt or debris. Use a clean cloth or paper towel to remove any loose particles that may be present.
Once the surface is clean, you can proceed with the following steps:
-
Apply a cleaning product: Choose a suitable cleaning product for the material of your bathtub. Read the instructions carefully and apply the product to the area around the drain. Allow it to sit for the recommended amount of time to ensure effective cleaning.
-
Scrub the area: Use a scrub brush or sponge to gently scrub the surface around the drain. Pay attention to any stubborn stains or buildup and apply more pressure if necessary. Rinse the area thoroughly to remove any residue from the cleaning product.
-
Safety precautions: When working with cleaning products, always follow the safety precautions outlined on the label. Wear protective gloves and goggles to protect your skin and eyes. Ensure the area is well-ventilated by opening windows or using a fan.
Install the New Drain Flange
Before installing the new drain flange, make sure you have the necessary tools and materials. The tools you’ll need include a drain wrench, pliers, and a screwdriver. The materials needed are the new drain flange and a plumber’s putty.
Start by removing the old drain flange. Use the drain wrench to loosen and remove the old flange by turning it counterclockwise.
Clean the area around the drain to ensure a proper seal. Remove any debris or old putty using pliers or a screwdriver.
If you prefer an alternative drain option, such as a push-pop drain or a toe-touch drain, make sure to follow the manufacturer’s instructions for installation.
Apply a thin layer of plumber’s putty to the underside of the new drain flange.
Insert the new drain flange into the drain hole and tighten it using the drain wrench.
Wipe away any excess putty and test the drain for leaks by running water into the bathtub.
Connect the Drain Linkage and Overflow Plate
Once you have inserted the new drain flange, connect the drain linkage and overflow plate by securing them with screws.
Proper maintenance of bathtub drains is crucial to ensure they function properly and avoid common issues.
Here’s a step-by-step guide to help you connect the drain linkage and overflow plate:
- Locate the drain linkage on the underside of the bathtub.
- Insert the threaded end of the linkage into the hole on the drain flange.
- Align the holes on the overflow plate with the corresponding holes on the bathtub.
- Place the overflow plate over the drain linkage and press it against the bathtub surface.
- Insert screws through the holes on the overflow plate and tighten them with a screwdriver.
- Double-check that the drain linkage moves smoothly when the overflow plate is lifted or lowered.
Seal the Drain Flange and Overflow Plate
Make sure you carefully apply a waterproof sealant around the edges of the drain flange and overflow plate to prevent any water leakage. Proper sealing techniques are crucial to ensure a watertight seal and prevent any potential issues with bathtub drains.
Here’s a step-by-step guide on how to seal the drain flange and overflow plate properly:
-
Clean the area around the drain flange and overflow plate using a mild cleaner and a cloth.
-
Apply a thin bead of waterproof sealant around the edges of the drain flange, ensuring complete coverage.
-
Gently press the drain flange into place, making sure it sits flush with the bathtub surface.
-
Apply another thin bead of sealant around the edges of the overflow plate.
-
Carefully align the overflow plate and secure it in place using the provided screws.
-
Wipe away any excess sealant with a damp cloth.
-
Allow the sealant to cure according to the manufacturer’s instructions before using the bathtub.
Test for Leaks
To ensure there are no leaks, carefully inspect the sealed drain flange and overflow plate for any signs of water seepage. This step is crucial in troubleshooting leaks and preventing water damage. Here’s a step-by-step guide to help you check for any potential issues:
-
Inspect the drain flange:
-
Look for any cracks or gaps in the seal.
-
Run your fingers along the edges to feel for any moisture or dampness.
-
Use a flashlight to examine the area closely for any signs of water damage.
-
Examine the overflow plate:
-
Check for any discoloration or water stains around the plate.
-
Look for any signs of rust or corrosion, as this could indicate a leak.
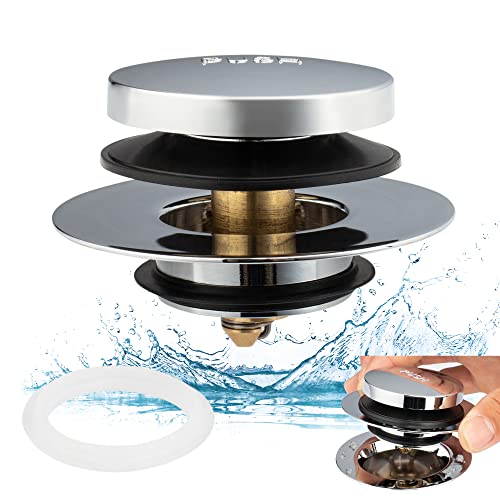
Replace the Bathtub Stopper
When removing the old stopper, be careful not to damage the surrounding area. Start by unscrewing the overflow plate located on the side of the bathtub. This will give you access to the stopper mechanism.
Next, pull out the old stopper assembly, which may vary depending on the type of stopper you have. There are different types of bathtub stoppers available in the market, such as pop-up stoppers, lift-and-turn stoppers, and trip lever stoppers. Each type has its own pros and cons.
Pop-up stoppers are easy to use but can be prone to clogging. Lift-and-turn stoppers are more durable but may require more effort to operate. Trip lever stoppers offer good drainage but can be tricky to adjust.
Once the old stopper is removed, you can clean up and enjoy your new bathtub drain.
Clean up and Enjoy Your New Bathtub Drain
After removing the old stopper, it’s time to tidy up and start enjoying your newly cleaned bathtub. Here’s how to clean up and make the most of your new bathtub drain:
- Clean the bathtub surface:
- Use a mild cleaning solution and a sponge or cloth to wipe down the surface of the bathtub. Pay attention to any stubborn stains or residue.
- Rinse the bathtub thoroughly with warm water to remove any cleaning solution residue.
Choosing the right drain flange material:
- Consider the material of your bathtub and choose a drain flange material that complements it. Options include stainless steel, brass, and plastic.
- Ensure that the chosen drain flange material is durable, corrosion-resistant, and easy to clean.
Frequently Asked Questions
How Do I Choose the Right Bathtub Drain Flange for My Bathtub?
I choose the right bathtub drain flange for my bathtub by considering the bathtub drain materials and following the bathtub drain installation steps. It’s important to research and ensure compatibility for a successful replacement.
Can I Replace a Bathtub Drain Without Removing the Bathtub?
Yes, you can replace a bathtub drain without removing the bathtub. To do this, you will need a few tools such as pliers, a drain wrench, and a drain removal tool. It is possible to perform this task without professional help.
What Should I Do if I Encounter Rust or Corrosion When Removing the Old Drain Flange?
If I encounter rust or corrosion when removing the old drain flange, I can try using penetrating oil and a wire brush to clean it. If that doesn’t work, I can explore alternative solutions like using a drain removal tool or calling a professional plumber.
Is It Necessary to Use Plumber’s Putty or Silicone Sealant When Installing the New Drain Flange?
It is not necessary to use plumber’s putty when installing the new drain flange. Silicone sealant is a common alternative. The pros of using silicone sealant include its waterproof and flexible properties, but it can be more difficult to remove if needed.
How Can I Prevent Future Clogs in My Bathtub Drain?
To prevent future clogs in my bathtub drain, I can follow these maintenance tips. First, use a drain strainer to catch hair and debris. Second, regularly clean the drain with baking soda and vinegar. Third, avoid pouring grease or oil down the drain.
Conclusion
Well, that was a fun little project! Who knew replacing a bathtub drain could be so exciting?
I must say, the process was quite straightforward and surprisingly satisfying. From gathering the necessary tools to sealing the drain flange, every step was meticulously detailed and easy to follow.
And now, with my new bathtub drain in place, I can finally relax and enjoy a nice long soak without any worries. Who knew I could become a DIY plumbing expert?