I’m gonna show you how to tile directly to your bathtub. It’s a great way to give your bathroom a fresh, new look. I’ve got all the steps you need to follow, from prepping the surface to finishing up with grouting.
Trust me, it’s not as complicated as it sounds. So grab your tools and let’s get started on transforming your bathtub into a beautiful tiled masterpiece.
Key Takeaways
- Thoroughly clean the bathtub surface before tiling
- Choose tiles and adhesive that are durable and water resistant
- Apply the adhesive evenly and in small sections to prevent drying out
- Properly prepare the surface and fit tiles around fixtures and edges for a seamless finish

VEVOR Wet Tile Saw with Stand - 10-inch 65Mn Steel Blade, 4500 RPM Motor, Water Reservoir, Caster Wheels, 0-45 Degrees Miter Angle for Cutting Tiles & Stones
0-45° Angle and Deep Cutting: The VEVOR wet tile saw provides adjustable cutting angles from 0 to 45...
As an affiliate, we earn on qualifying purchases.
Preparing the Bathtub Surface
Now that you’ve gathered all the necessary tools and materials, it’s time to start preparing the bathtub surface for tiling.
The first step is to thoroughly clean the bathtub to ensure proper adhesion of the tiles. I recommend using a mild detergent or a tub cleaner specifically designed for removing soap scum and grime. Scrub the surface with a sponge or a soft brush, paying attention to the corners and edges. Rinse the bathtub thoroughly to remove any residue.
Next, it’s important to remove any old caulk that may be present. Caulk can prevent the tiles from adhering properly and can also create an uneven surface. Use a caulk removal tool or a utility knife to carefully scrape away the old caulk. Be sure to remove all traces of caulk, as any leftover residue can affect the tile installation.
DEWALT Wet Tile Saw with Stand, 10-Inch, Corded (D24000S)
Your purchase includes One Dewalt 10-Inch Wet Tile Saw, Wet Tile Saw Stand, 10-Inch XP4 Porcelain Tile Blade,...
As an affiliate, we earn on qualifying purchases.
Choosing the Right Tiles and Adhesive
When selecting the appropriate tiles and adhesive, it’s essential to consider factors like durability and water resistance. Choosing the right tile colors can greatly enhance the overall aesthetic appeal of your bathroom. Whether you prefer a classic white or a bold mosaic pattern, the possibilities are endless.
Additionally, it’s important to use adhesive primer before applying the tiles. This step is often overlooked but offers many benefits. The adhesive primer creates a strong bond between the tiles and the surface, ensuring that they stay in place for years to come. It also helps to prevent moisture from seeping through, protecting the integrity of the tiles and preventing any potential damage.

MAXKOSKO 60sq.ft. Electric Floor Heat Mat Kit, 120V Underfloor Radiant Heating System for Tile,Stone and Laminate Indoor Use with Alarm Cable Monitor
Step on Warmth with Floor Heating Mat: Heated flooring system for tile provide maximized warmth to keep the...
As an affiliate, we earn on qualifying purchases.
Applying the Tile Adhesive
To apply the adhesive, you’ll want to start by mixing it according to the manufacturer’s instructions.
Here are some proper adhesive application techniques and common mistakes to avoid when applying tile adhesive:
- Ensure that the bathtub surface is clean and free from any dirt or debris.
- Use a notched trowel to spread the adhesive evenly over the surface. Apply enough adhesive to create a solid bond with the tiles.
- Avoid applying too much adhesive, as it can cause the tiles to slip or become uneven.
- Work in small sections to prevent the adhesive from drying out before you can place the tiles.
By following these proper adhesive application techniques and avoiding common mistakes, you’ll be able to achieve a strong and durable bond between the tiles and the bathtub surface.
Now, let’s move on to setting the tiles on the bathtub surface.

LuxHeat 20sqft Floor Heating Mat Kit - 120v in Floor Heating System - Complete Electric Radiant Heated Flooring System Includes Alarm, UDG Programmable Thermostat w/GFCI & Flooring Sensor
LUXURY AND COMFORT - Enjoy the Warmth of LuxHeat's easy-to-install Electric Floor Heating System. Heating Kit Includes: 20...
As an affiliate, we earn on qualifying purchases.
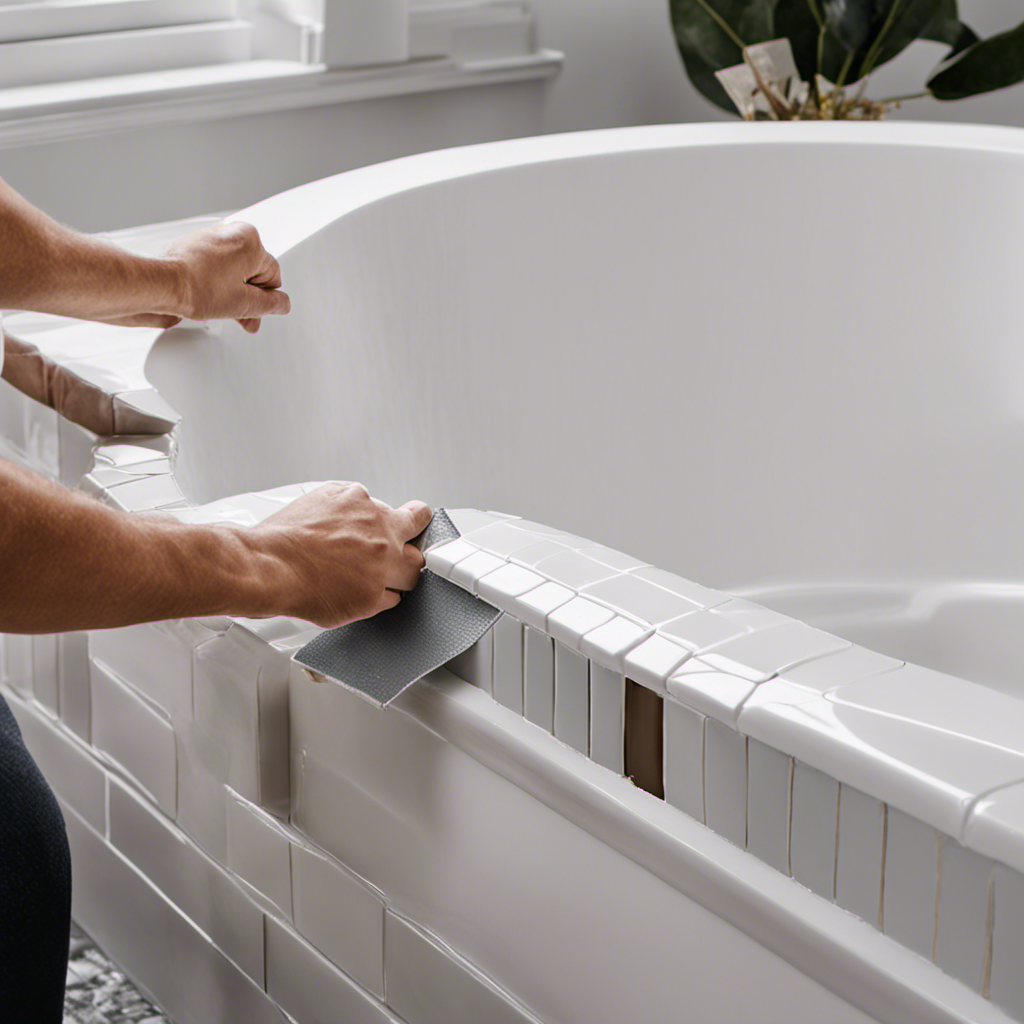
Setting the Tiles on the Bathtub Surface
After applying the adhesive, you’ll want to start setting the tiles on the surface.
When it comes to tile layout and design options for bathtub surfaces, there are a few things to consider. One popular option is the traditional straight lay pattern, where tiles are laid in a straight line. Another option is the diagonal pattern, which can add visual interest to the space.
It’s important to carefully plan the layout before starting, ensuring that the tiles fit neatly around fixtures and edges. Additionally, there are some common mistakes to avoid when tiling directly onto a bathtub. One mistake is not properly preparing the surface, which can lead to tiles not adhering properly. Another mistake is not using a waterproofing membrane, which can cause water damage over time.
Grouting and Finishing the Tiled Bathtub Surface
For a polished and professional finish, make sure to properly grout the surface of your tiled bathtub. Grouting not only enhances the aesthetic appeal of your bathtub, but it also helps in maintaining the grout lines and sealing the tiled surface.
Here are some essential steps to follow for a flawless grouting process:
- Clean the tiled surface thoroughly to remove any dirt or debris.
- Mix the grout according to the manufacturer’s instructions, ensuring a smooth and consistent consistency.
- Apply the grout using a grout float, making sure to fill in the gaps between the tiles evenly.
- Use a damp sponge to wipe off any excess grout and smooth the grout lines.
After grouting, allow the grout to dry completely before sealing the tiled bathtub surface. This will protect the grout from moisture and stains, ensuring its durability and longevity. Remember to choose a high-quality grout sealer and follow the manufacturer’s instructions for application.
Frequently Asked Questions
How Do I Ensure That the Tiles Stick Properly to the Bathtub Surface?
To ensure proper adhesion of tiles to the bathtub surface, it’s important to prepare the area beforehand. Clean the surface thoroughly and choose the right adhesive specifically designed for tiling bathtubs.
Can I Use Any Type of Tile Adhesive for Tiling Directly to a Bathtub?
Yes, you can use different types of tile adhesive for tiling directly to a bathtub. However, it’s important to consider the pros and cons of each alternative adhesive option to ensure proper tile adhesion.
Is It Necessary to Use Spacers When Setting the Tiles on the Bathtub Surface?
It’s crucial to ensure proper tile alignment when tiling a bathtub surface. While some alternative tile installation methods may not require spacers, using them will help achieve a precise and professional look.
How Long Should I Wait Before Grouting the Tiled Bathtub Surface?
I’ll wait at least 24 hours after tiling the bathtub surface before grouting. This allows the tiles to set properly. To prevent tiles from popping off, I’ll apply the grout correctly and clean it off the bathtub surface.
Are There Any Special Finishing Techniques I Should Use to Seal the Tiled Bathtub Surface?
There are several sealing techniques and waterproofing methods that can be used to protect the tiled bathtub surface. It’s important to ensure a proper seal to prevent water damage and maintain the longevity of the tiles.
Conclusion
In conclusion, tiling a bathtub can be a straightforward process if you follow the right steps and use the correct materials.
By preparing the bathtub surface properly, selecting the appropriate tiles and adhesive, and applying the adhesive carefully, you can achieve a professional-looking result.
One interesting statistic to note is that according to a survey conducted by a leading home improvement magazine, 85% of homeowners who tiled their bathtubs themselves reported being satisfied with the outcome.
So why not give it a try and transform your bathtub into a beautiful tiled oasis?