
As I embark on the journey of installing a toilet flange, I am reminded of the intricate puzzle it presents. With each step, I must carefully prepare the area, remove the old flange, and clean and measure for a replacement.
The process requires my undivided attention, as common mistakes lurk around every corner. But fear not, for I am armed with essential tips to ensure a successful installation.
Join me as I navigate the world of toilet flange installation, avoiding pitfalls and achieving triumph.
Key Takeaways
- Cover the floor with newspapers before starting the installation to avoid making a mess.
- Measure the diameter of the drain pipe and purchase a replacement flange of the correct size.
- Remember to shut off the water supply and flush the toilet before removing the old flange and installing the new one.
- Be careful not to over-tighten the nuts and bolts, as this can cause damage to the flange.
Step 1: Preparing the Area
First, I cover the floor with newspapers, disconnect the water supply, and remove the toilet to prepare the area.
It is important to use protective gear such as gloves and safety glasses to ensure personal safety.
Once the floor is covered and the water supply is disconnected, I carefully remove the toilet using a screwdriver and putty knife.
This creates a clean and open workspace for the installation of the toilet flange.
It is crucial to prepare the workspace properly to avoid any damage or accidents during the installation process.
Step 2: Removing the Old Flange
After covering the floor with newspapers, I used a screwdriver and putty knife to remove the old flange and scrape off the wax seal. It was important to be careful not to damage the surrounding area while removing the rusted flange.
Once the old flange was removed, I measured the diameter of the drain pipe using a tape measure. This measurement was crucial in choosing the right replacement flange. I made sure to select a flange that matched the size of the drain pipe to ensure a proper fit.
Additionally, I purchased a new wax seal to ensure a secure and leak-free installation. By taking these steps, I was able to remove the old flange and prepare for the installation of the new one.
Step 3: Cleaning and Measuring
To clean the flange, I used a rag to wipe away any debris and ensure a smooth surface for the new installation. Cleaning techniques are crucial in preparing the flange for a successful installation.
Here are three important steps to follow:
-
Remove any wax residue: Use a putty knife to scrape off the old wax seal from the flange. Make sure to remove all traces of the old seal to create a clean surface.
-
Inspect for damage: Check the flange for any cracks, corrosion, or other signs of damage. If the flange is damaged, it may need to be replaced to prevent future issues.
-
Measure the drain pipe diameter: Before purchasing a replacement flange, measure the diameter of the drain pipe to ensure you choose the right size. Using a flange that doesn’t fit properly can lead to leaks and instability.
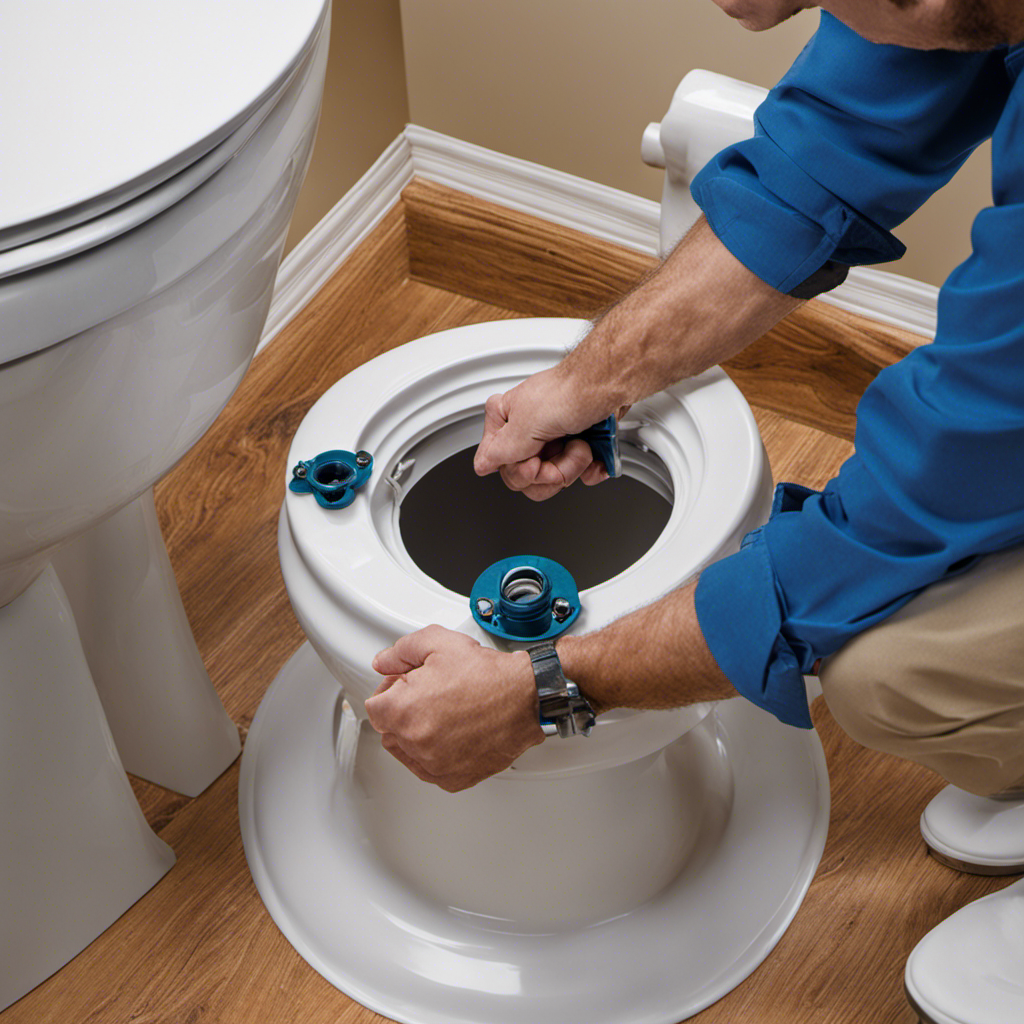
Step 4: Installing the New Flange
I positioned the new flange over the drain and tightened the bolts to secure it in place. This step is crucial for a proper installation of the toilet flange. By securely fastening the bolts, we ensure that the flange remains stable and prevents any leaks or movement.
When installing a toilet flange, it is essential to be aware of common issues and troubleshooting techniques. One common mistake is letting the flange sit too tall, which can lead to breakage in the future. Another mistake is over-tightening the nuts and bolts, which can cause them to break or crack.
To avoid these issues, proper maintenance and care for toilet flanges are necessary. Regularly inspect the flange for any signs of damage, such as cracks or corrosion. Clean the flange with a disinfectant before taking it to the hardware store for replacement. Additionally, ensure that the replacement flange is the correct size by measuring the diameter of the drain pipe. Taking these precautions will help ensure a successful installation and a long-lasting toilet flange.
| Common Issues and Troubleshooting | Proper Maintenance and Care for Toilet Flanges |
|---|---|
| Letting the flange sit too tall | Regularly inspect for damage |
| Over-tightening nuts and bolts | Clean with disinfectant before replacement |
| Measure the diameter of the drain pipe |
Step 5: Positioning and Securing the Toilet
Positioning the toilet over the drain, I tightened the nuts to secure it to the floor and checked for stability. This step is crucial in ensuring that the toilet is properly aligned and securely fastened to the flange.
However, there are common issues that can arise during this process. Here are some troubleshooting tips to help you avoid these problems:
-
Ensure proper alignment: Make sure that the toilet is centered over the flange and sits evenly on the floor. Misalignment can lead to leaks and instability.
-
Check for gaps: Ensure that there are no gaps between the toilet base and the floor. Gaps can cause rocking and potential leaks. If there are gaps, consider using shims to fill them.
-
Test for leaks: After securing the toilet, turn on the water supply and flush the toilet to check for any leaks. If you notice any leaks, tighten the nuts or bolts slightly to stop the leakage.
Common Mistakes to Avoid
During the installation of a toilet flange, it is important to be aware of common mistakes that can occur. Flange installation troubleshooting can save time, money, and frustration. One common mistake is choosing the wrong flange size. This can lead to improper fitting, leaks, and instability. To avoid this, it is crucial to measure the diameter of the drain pipe accurately and purchase the correct size of the replacement flange. Another common mistake is letting the flange sit too tall, which can result in breakage in the future. It is important to ensure that the flange is properly aligned with the floor. By being aware of these potential pitfalls and taking the necessary precautions, a successful installation can be achieved.
| Common Mistakes to Avoid |
|---|
| Choosing the wrong flange size |
| Allowing the flange to sit too tall |
| Forgetting to cut off the water supply and flush the toilet before installation |
| Over-tightening nuts and bolts |
Tips for Successful Installation
Before you start installing, make sure you have all the necessary tools and turn off the water supply. Here are three tips to help you have a successful installation:
-
Use the right size flange: One common mistake when installing a toilet flange is using the wrong size. It’s important to accurately measure the diameter of the drain pipe and buy a replacement flange that fits perfectly. Using the wrong size can cause leaks and instability.
-
Follow the steps carefully: To have a smooth installation, it’s crucial to follow each step precisely. From preparing the area and removing the old flange to installing the new one and reconnecting the water supply, each step is important. Skipping or rushing through any step can lead to mistakes and potential issues.
-
Call a professional if needed: If you encounter any difficulties or have doubts during the installation process, it’s recommended to seek professional help. They have the expertise and experience to handle any problems that may arise and ensure a successful installation.
Frequently Asked Questions
How Do I Know if My Toilet Flange Needs to Be Replaced?
To determine if your toilet flange needs replacement, look for signs such as a loose toilet, water leakage, or a damaged flange. Repair methods include tightening bolts or replacing the flange altogether.
Can I Reuse the Old Wax Seal When Installing a New Flange?
No, it is not recommended to reuse the old wax seal when installing a new flange. It is best to use a new wax seal for a proper and secure installation.
What Type of Screws Should I Use to Secure the New Flange?
For securing the new flange, the best screws to use are stainless steel or brass screws. These screws provide durability and resistance to rust, ensuring a secure and long-lasting installation.
How Tight Should the Nuts and Bolts Be When Securing the Toilet to the Floor?
Tighten the nuts and bolts on the toilet flange until they are snug, but avoid over-tightening to prevent damage. Properly securing the flange is crucial for a stable and leak-free toilet installation.
Is It Necessary to Use Pennies to Fill Gaps Between the Toilet and the Floor?
No, it is not necessary to use pennies to fill gaps between the toilet and the floor. There are alternative gap fillers available that can be used during proper toilet flange installation.
Conclusion
In conclusion, after following these easy steps for installing a toilet flange, you can avoid common mistakes and ensure a successful installation.
By preparing the area, removing the old flange, cleaning and measuring for a replacement, and installing the new flange and wax seal, you can quickly and efficiently complete the task.
Remember to shut off the water supply and flush the toilet before starting, and be careful not to overtighten nuts and bolts.
By following these tips and avoiding mistakes, you can confidently install a toilet flange and enjoy a leak-free bathroom.

With an impeccable eye for detail and a passion for bathroom-related, Ava leads our editorial team gracefully and precisely.
Under her guidance, Best Modern Toilet has flourished as the go-to resource for modern bathroom enthusiasts. In her free time, you might find Ava exploring antique shops and looking for vintage bathroom fixtures to add to her collection.