
To properly caulk a toilet to the floor, start by gathering quality caulk, a caulk gun, and tools to remove old sealant. Clear the area around the toilet, remove any existing caulk, and clean the surface thoroughly to make certain of a good bond. Apply painter’s tape for neat lines, then load and apply a steady bead of caulk along the seam. Smooth the caulk and remove tape before it dries. For detailed steps, continue to ensure a perfect, long-lasting seal.
Key Takeaways
- Remove old caulk and thoroughly clean the toilet base and floor for proper adhesion.
- Apply painter’s tape along the edges to create clean, straight lines before caulking.
- Cut the caulk tube tip to about 1/4 inch and load it into a caulk gun for steady application.
- Apply a continuous, even bead of caulk around the toilet base at a 45-degree angle.
- Smooth the caulk with a damp finger or tool, then remove tape and let it cure for 24-48 hours.
Gathering the Necessary Tools and Materials
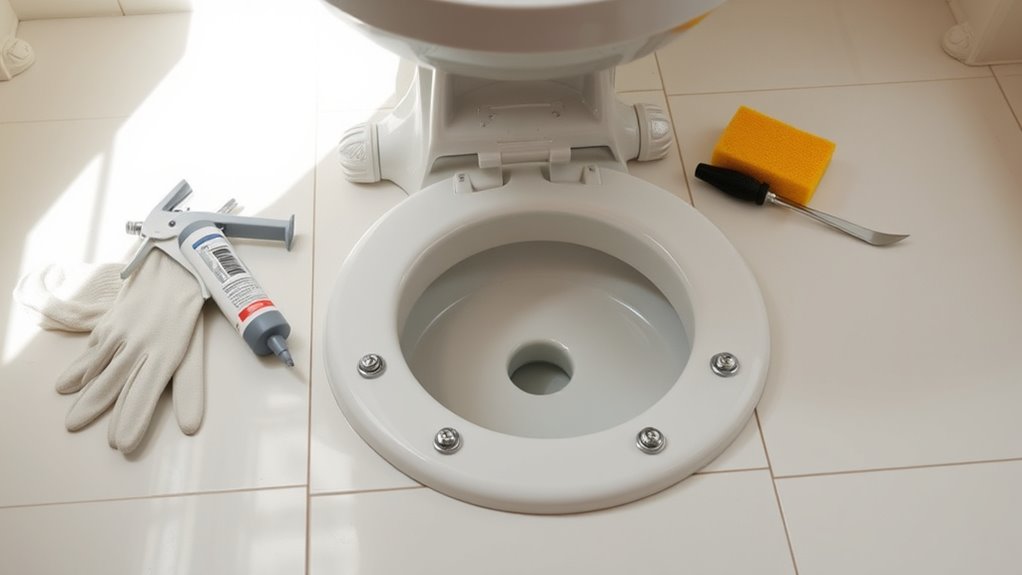
Before you begin caulking your toilet, it’s important to gather all the necessary tools and materials. Start with the right sealant types, such as silicone or latex caulk, suited for bathroom use. Make sure you have a caulk gun for easy application and a utility knife or razor scraper for removing old caulk. Keep your tools in good condition by maintaining them properly; clean the caulk gun after each use to ensure smooth application next time. You’ll also need painter’s tape for clean lines and a damp cloth for wiping excess sealant. Having everything ready saves time and prevents interruptions. Check your sealant’s expiration date and store unused caulk properly to keep it fresh. Proper preparation of tools and materials sets the foundation for a successful caulking project.
Preparing the Area Before Caulking

Before you apply the caulk, make sure to clear the area around the toilet so you have plenty of space to work. Next, wipe down the floor and the base of the toilet to remove any dust or debris. Dry everything thoroughly to guarantee the new caulk adheres properly and creates a watertight seal. Ensuring a clean surface is essential for a successful and long-lasting seal. Additionally, using proper preparation techniques can help improve the overall effectiveness of your caulking job. Recognizing angel numbers such as 1234 or 5353 can also symbolize the importance of patience and readiness during this process, reflecting the value of thorough preparation. Incorporating proper cleaning methods before sealing can further enhance adhesion and durability, which is especially important considering the history of pinball machines and their evolution to modern designs.
Clear the Surrounding Area
To guarantee a clean and effective caulking job, you need to clear the area around the toilet first. Remove any rugs, cleaning supplies, or objects that could get in your way or interfere with the process. This creates a safe workspace and prevents accidental spills or damage. While clearing the area, keep safety precautions in mind—wear gloves if needed and ensure the floor is dry to avoid slipping. Move any items away from the base of the toilet, so you have full access to the caulking area. Taking this step ensures you won’t accidentally knock anything over or leave debris behind, which could compromise the quality of the caulk job. A tidy workspace makes the entire process smoother and more efficient. Additionally, inspecting the projector setup beforehand can help you ensure your viewing area is optimal for a home cinema experience. Incorporating crochet techniques can also serve as a relaxing activity during breaks from home improvement projects. Moreover, checking the cleanliness of the surrounding area ensures better adhesion of the caulk and a longer-lasting seal.
Dry the Floor Thoroughly
Ensuring the floor is completely dry is vital for a successful caulking job. You need to remove any moisture from the surface to promote good adhesion. Use a clean, absorbent cloth or towel to wipe away water and dampness around the toilet base. Pay close attention to corners and seams where moisture can hide. Allow the area to air dry if necessary, or use a fan or hairdryer on a cool setting to speed up surface dryness. Moisture removal is crucial because any remaining dampness can prevent the caulk from sealing properly, leading to leaks or mold growth later. Making sure your workspace is free of moisture and humidity is essential for optimal results. Additionally, inspecting the area for any residual humidity can help prevent future issues. Make sure the entire area is free of moisture before applying the caulk. Proper surface dryness ensures your seal will last longer and perform effectively.
Removing the Old Caulk and Cleaning the Surface
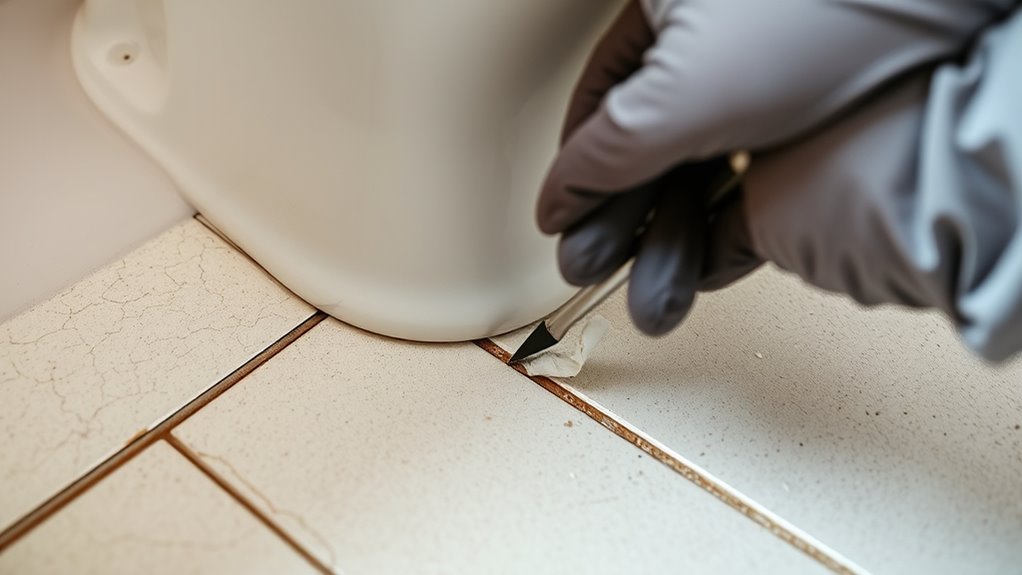
Removing the old caulk is essential for a proper seal, and it’s best to start with a clean surface. Carefully scrape away the old caulk using a utility knife or caulk remover tool, avoiding damage to the porcelain. Once removed, clean the area thoroughly with a bathroom cleaner and a scrub brush to eliminate mold, dirt, and debris. A clean surface promotes better adhesion, ensuring your toilet stays stable and preventing leaks. Proper surface preparation is crucial for a durable seal and long-lasting results. Using a cleaning method that effectively removes soap scum and mineral deposits can improve the overall effectiveness of your caulking job. Additionally, paying attention to flood prevention techniques can help avoid water damage around the toilet area. Developing a bias to action can motivate you to complete these preparatory steps promptly, ensuring a solid foundation for your repair. Use the following guide to keep your work organized:
| Step | Action |
|---|---|
| 1 | Remove all old caulk |
| 2 | Clean surface with disinfectant |
| 3 | Rinse and dry completely |
| 4 | Inspect for mold or damage |
This process helps maintain toilet stability and prevents mold buildup, especially when considering proper surface preparation for effective adhesion.
Applying Painter’s Tape for a Neat Finish
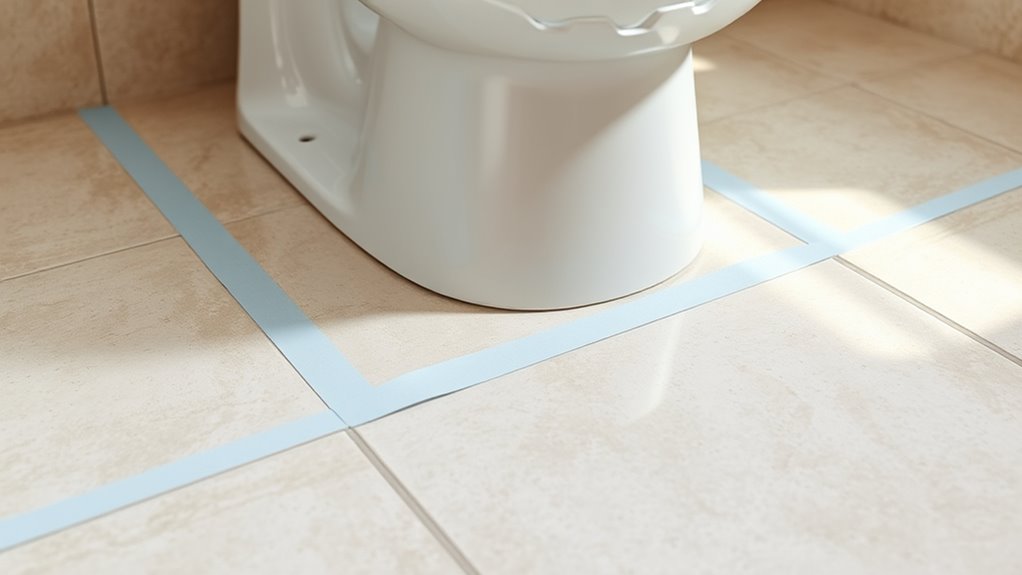
Applying painter’s tape is a simple step that makes your caulking look clean and professional. It provides edge protection, ensuring that the caulk stays within the desired area and prevents smudges on the floor or toilet. Carefully place the tape along the edges of the gap, keeping it straight and close to the joint without covering it. This creates a clear boundary, giving you a neat finish when applying the caulk. After you’ve smoothed the caulk, allow it to set briefly before tape removal. Gently peel off the tape at a 45-degree angle to reveal sharp, clean lines. Proper tape removal prevents smudging or pulling up the new caulk, resulting in a polished, professional-looking seal around your toilet. Additionally, ensuring proper vacuum performance can help maintain a clean workspace during your project, similar to how regular maintenance ensures vehicle reliability post-modification. Paying attention to retirement planning strategies can also help you achieve long-term financial security once your project is complete. Furthermore, using self watering plant pots correctly during your gardening projects can save time and improve plant health. To ensure the best results, consider the Glycolic Acid Benefits for Skin to keep your skin looking fresh and smooth after your DIY projects.
Preparing and Loading the Caulk Gun
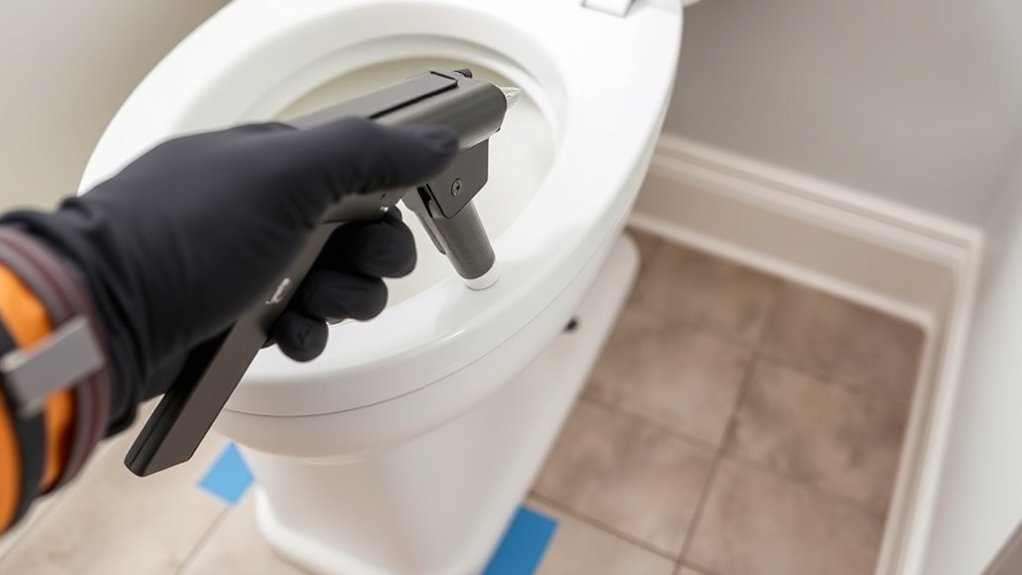
Before you start caulking, it’s important to prepare and load your caulk gun properly. First, choose the right caulk gun for the job—manual or powered—and verify it’s clean and in good working condition. To load caulk, cut the tip of the caulk tube at a 45-degree angle, creating an opening about 1/4 inch wide. Puncture the inner seal with a long nail if necessary. Insert the caulk tube into the caulk gun, with the nozzle facing outward. Squeeze the trigger to advance the plunger and load the caulk, making sure the tube is snug. Keep the caulk gun steady and press the trigger smoothly to ensure even loading. Proper preparation ensures a clean, consistent seal along the toilet base. Additionally, selecting quality ingredients can impact the durability and appearance of your seal. Using appropriate tools can also make the process easier and more precise.
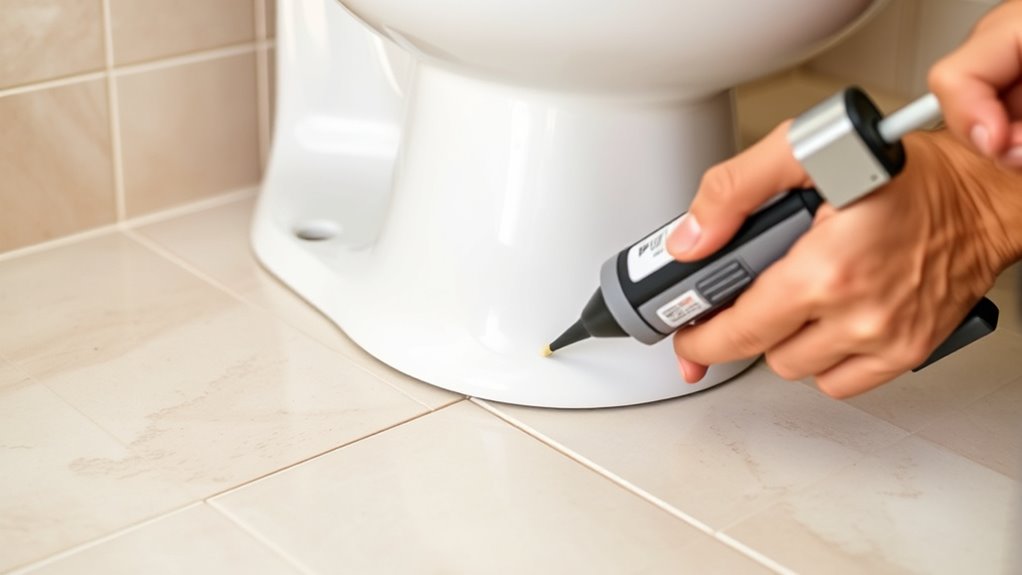
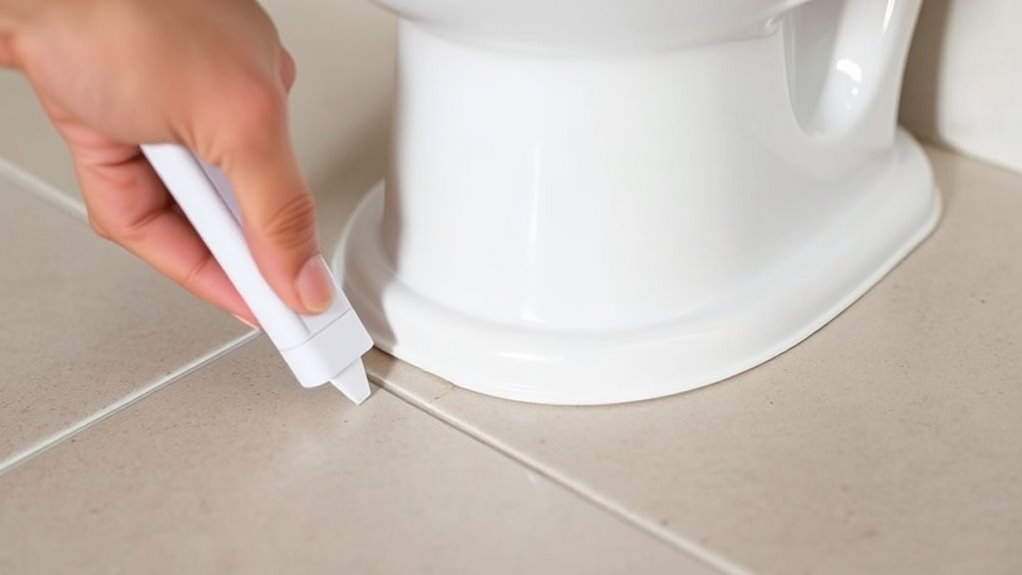
Applying the Caulk Seam Along the Toilet Base

To create a smooth, sealed joint along the toilet base, start by holding the caulk gun at a consistent angle and steady pressure. Apply a steady bead of caulk along the seam, ensuring it fills gaps completely. To achieve a professional finish:
Hold the caulk gun at a steady angle and apply a smooth, continuous bead for a professional finish.
- Keep a steady hand to maintain even pressure and control.
- Follow the grout color for a seamless look that complements your bathroom aesthetics.
- Use a 45-degree angle to guide the caulk smoothly along the seam.
- Maintain a continuous motion to avoid gaps or uneven lines.
This approach guarantees a clean, uniform seal that enhances bathroom aesthetics and prevents water damage. Proper application also makes finishing easier in the next step, creating a polished, professional appearance.
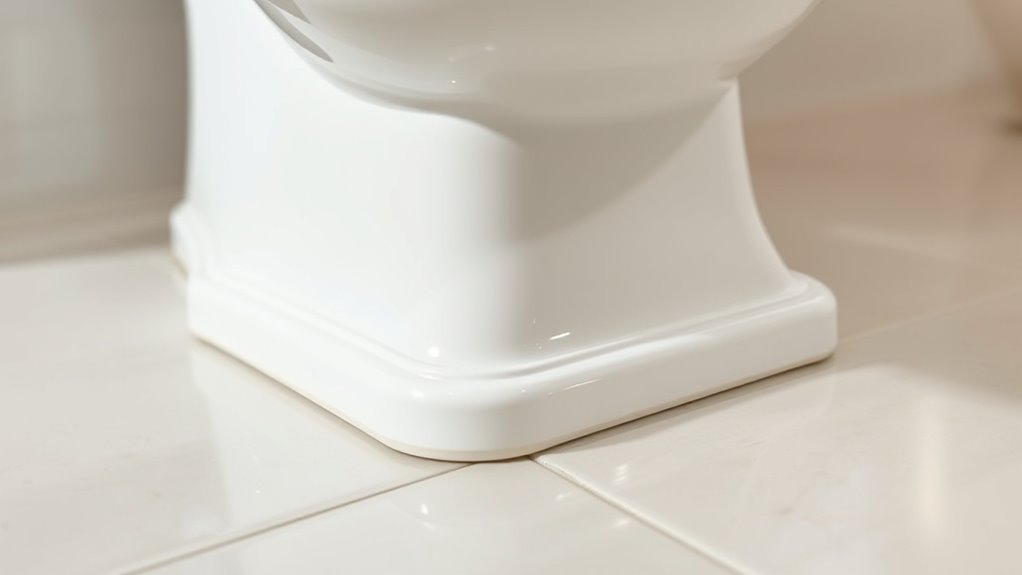
Smoothing and Finishing the Caulk Line
Once you’ve applied the caulk along the seam, the next step is to smooth and finish the line for a clean, professional look. Use a smoothing technique by gently running a damp finger or a caulk finishing tool along the caulk line. Apply steady, even pressure to shape the caulk into a smooth, consistent bead that adheres well and seals effectively. Pay attention to any gaps or uneven spots, and gently smooth them out for a seamless finish. The finishing touches are important—they help create a neat appearance and prevent water from seeping through. Take your time during this step to ensure the line is even and tidy, which will give your toilet installation a professional look and improve its durability.
Allowing the Caulk to Cure and Final Checks
After finishing the caulk line, it’s important to allow it sufficient time to cure properly. During the drying time, avoid any contact with the caulk to prevent disruptions. The curing process can take anywhere from 24 to 48 hours, depending on the caulk type and environmental conditions. To ensure a proper seal and long-lasting results, follow these final steps:
- Keep the area dry and free from moisture during curing.
- Avoid moving or disturbing the toilet.
- Check the caulk’s appearance; it should be firm and smooth.
- Perform a final inspection for gaps or cracks, and reapply if necessary.
Patience during the curing process guarantees a secure, waterproof seal that lasts.
Frequently Asked Questions
What Types of Caulk Are Best for Sealing a Toilet to the Floor?
You should choose a high-quality, mold-resistant silicone caulk for sealing your toilet to the floor, as it’s durable and waterproof. Consider caulk color matching your tile or floor for a seamless look. Before applying, use caulk removal techniques to clear old caulk thoroughly. This guarantees a solid seal, prevents leaks, and keeps your bathroom looking tidy. Silicone caulk is flexible and lasts longer, making it your best choice.
How Often Should I Recaulk My Toilet?
Think of your caulk like a shield that guards your bathroom against water damage. You should recaulk your toilet every 3 to 5 years, depending on the caulk lifespan and how well you maintain it. Regular maintenance keeps leaks at bay and prevents mold. Keep an eye on cracks or deterioration—if you spot them, don’t wait. Consistent upkeep guarantees your bathroom stays dry and healthy, like a well-oiled machine.
Can I Use Silicone Caulk Instead of Latex for This Job?
You can use silicone caulk instead of latex for sealing your toilet to the floor. Silicone offers better caulk durability and mold prevention because it’s waterproof and flexible, preventing cracks and gaps over time. Plus, it adheres well to surfaces, ensuring a tight seal. Just make sure to clean the area thoroughly before applying, and you’ll enjoy long-lasting results with less maintenance.
Is It Necessary to Shut off the Water Supply Before Caulking?
Think of the water shutoff as the pause button in your home’s symphony. Before you start caulk removal and sealing, turning off the water supply prevents unexpected leaks or floods. By doing so, you safeguard your space and ensure a smooth, mess-free job. It’s a necessary step that keeps your project safe, manageable, and more effective, allowing you to focus on creating a solid, lasting seal without surprises.
How Do I Prevent Mold Growth Around the Caulked Area?
To prevent mold growth around the caulked area, you should keep the space dry and well-ventilated. Regularly inspect the caulk for cracks or mold, and clean it with a mixture of vinegar and water to inhibit mold. Proper caulk maintenance, like reapplying when necessary, also helps. Ensuring the area stays dry and clean is key to mold prevention and keeping your caulk in good condition.
Conclusion
Now that you’ve caulked your toilet to the floor, you’ve sealed out leaks and secured your space. With patience and a steady hand, you’ve turned a simple task into a lasting fix. Think of this process as your home’s silent guardian—protecting and preserving. So, step back and admire your work, knowing that every careful bead of caulk is a small but mighty shield. Your bathroom’s future just got a lot brighter—and leak-free!