Hey there! So, you’ve found yourself with a broken toilet seat, huh? Well, don’t worry – I’ve got your back. In this article, I’m going to walk you through the step-by-step process of fixing that pesky problem.
From assessing the damage to installing the new toilet seat, I’ll provide you with all the necessary tools and guidance.
So, let’s get started and get that toilet seat back in tip-top shape!
Key Takeaways
- Assess the damage and gather necessary tools before starting the repair process.
- Carefully remove the old toilet seat, inspecting the bowl for any additional damage.
- Install the new toilet seat properly, aligning the hinge holes with the bowl holes.
- Test the seat stability and make any final adjustments before completing the repair.

Brondell Bidet Toilet Seat Non-Electric Swash Ecoseat, Fits Elongated Toilets, White - Dual Nozzle System, Ambient Water Temperature - Bidet with Easy Installation
CLEAN AND REFRESHING: With Brondell’s Ecoseat 101 Bidet, you’ll experience a soothing, freshwater wash that leaves you feeling...
As an affiliate, we earn on qualifying purchases.
Assessing the Damage
Now that you’ve determined the toilet seat is broken, it’s time to assess the extent of the damage.
Begin by carefully examining the seat for any cracks or signs of wear and tear. If you notice any cracks, you can attempt to repair them using a strong adhesive specifically designed for plastic. Apply the adhesive to both sides of the crack, and firmly press the pieces together. Allow sufficient time for the adhesive to dry completely before using the seat.
Alternatively, if the hinges are the issue, you may need to replace them. Check if the hinges are securely attached to the seat and the toilet bowl. If they are loose or damaged, purchase new hinges and follow the manufacturer’s instructions for installation.
Now that you’ve assessed the damage, it’s time to gather the necessary tools for the repair.

BIGCOW Ultra-Slim Bidet Attachment for Toilet - Dual Nozzle (Frontal & Rear Wash) with Adjustable Cold Water Pressure and Stainless Steel Inlet - Hygienic Solution for Fresh Cleanliness, Silver 1 Pcs
【Dual Spraying Modes】- This toilet bidet offers both rear wash for thorough cleaning and a specially designed frontal...
As an affiliate, we earn on qualifying purchases.
Gathering the Necessary Tools
First, you’ll need to gather the necessary tools for the job. When repairing a broken toilet seat, it’s important to choose the right replacement seat. Consider factors such as size, shape, and material to ensure a proper fit and comfortable experience.
Safety precautions are crucial during toilet seat repair. Always turn off the water supply and disconnect the toilet from the power source to avoid any accidents. Additionally, wear gloves and protective eyewear to protect yourself from any sharp edges or debris.
Once you have all the necessary tools and safety measures in place, you can proceed to remove the old toilet seat, which I will explain in the next section.

LUXE Bidet NEO 120 - Single Nozzle, Self-Cleaning, Non-Electric Bidet Attachment for Toilet Seat, Adjustable Water Pressure, Rear Wash (White)
THE ULTIMATE VALUE – With a sleek design and high-quality parts, Our Bidet Attachment will give your bathroom...
As an affiliate, we earn on qualifying purchases.
Removing the Old Toilet Seat
After disconnecting the toilet from the power source and taking necessary safety precautions, you can proceed to remove the old seat.
Start by locating the two bolts that secure the seat to the toilet bowl. These bolts are usually located at the back of the seat, near the hinges. Using a screwdriver or wrench, loosen and remove the nuts that hold the bolts in place.
Once the nuts are removed, you can lift the old seat off the toilet bowl. Inspect the toilet bowl for any cracks or damage that may require repair. If necessary, you can use epoxy or a toilet repair kit to fix any cracks.
Before replacing the seat, check the hardware to ensure it is in good condition. If needed, replace any damaged or missing bolts or nuts.

LUXE Bidet NEO 120 - Single Nozzle, Self-Cleaning, Non-Electric Bidet Attachment for Toilet Seat, Adjustable Water Pressure, Rear Wash (Blue)
THE ULTIMATE VALUE – With a sleek design and high-quality parts, Our Bidet Attachment will give your bathroom...
As an affiliate, we earn on qualifying purchases.
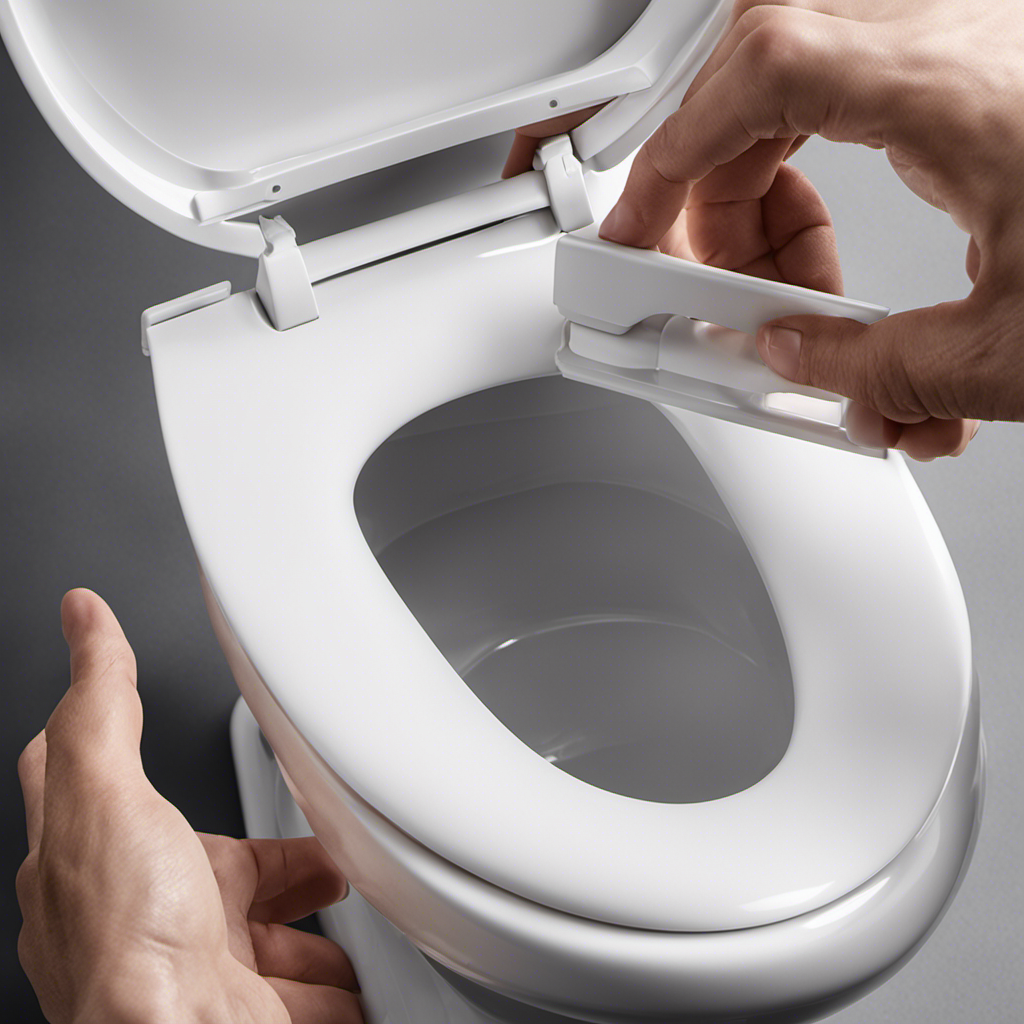
Installing the New Toilet Seat
To install the new toilet seat, make sure you have the necessary tools and hardware. Here are the steps to follow:
-
Position the seat:
- Place the new seat on the toilet bowl, ensuring it is aligned properly.
- Make sure the seat is centered and the hinge holes match up with the holes on the bowl.
-
Secure the bolts:
- Insert the bolts through the hinge holes and into the holes on the bowl.
- Tighten the nuts by hand until they are snug.
- Avoid overtightening, as it may crack the toilet bowl.
-
Check for stability:
- Sit on the seat to test its stability.
- If it wobbles, reposition the seat and tighten the bolts further.
- Once the seat feels secure, use a wrench to give the nuts a final tightening.
Testing and Final Adjustments
Now that you’ve checked the stability of the seat, give the nuts a final tightening with a wrench. This will ensure that the seat is securely attached to the toilet bowl.
After tightening the nuts, it’s time to test the seat to make sure it’s working properly. Sit on the seat and check for any wobbling or movement. If the seat feels unstable, double-check the nuts and tighten them further if necessary.
If you encounter any issues during this process, here are some troubleshooting tips:
-
Wobbling seat: Check if the nuts are tightened properly. If they are, the seat may be damaged and need replacement.
-
Cracked seat: If you notice any cracks in the seat, it’s best to replace it to prevent any accidents.
-
Difficulty in tightening nuts: Use a wrench or pliers for better grip and leverage.
Remember to always follow safety precautions during toilet seat repair. Wear gloves to protect your hands and be cautious while working with tools.
Frequently Asked Questions
How Can I Prevent My Toilet Seat From Breaking in the Future?
To prevent future toilet seat breakage, I’ll share some tips for toilet seat maintenance. By avoiding excessive force, keeping it clean, and checking for loose screws regularly, you can prolong its lifespan.
Can I Use Any Type of Toilet Seat for My Toilet?
I can use different types of toilet seats for my toilet, but I need to consider toilet seat compatibility. Some materials, like wood or plastic, may not be suitable for certain toilets.
Do I Need to Hire a Professional to Fix a Broken Toilet Seat?
No, you don’t need to hire a professional to fix a broken toilet seat. With a few simple steps, you can easily do it yourself. Save money and tackle this DIY project!
How Long Does It Usually Take to Fix a Broken Toilet Seat?
On average, fixing a broken toilet seat doesn’t take long. It depends on the cause of the break, which can vary from wear and tear to accidental damage.
Are There Any Specific Safety Precautions I Should Take While Fixing a Broken Toilet Seat?
When fixing a broken toilet seat, it’s important to take safety measures. Make sure to wear gloves and eye protection. You’ll need a screwdriver, replacement parts, and a wrench for the job.
Conclusion
Well, fixing a broken toilet seat may seem like a daunting task, but fear not! With just a few simple steps, you can have your toilet seat good as new.
Assess the damage and gather your tools.
Remove the old seat and install the new one.
Give it a test run.
It may sound easy, but trust me, it’s a journey that will leave you feeling like a toilet seat repair expert.
So go ahead, grab your tools and get ready to conquer that broken seat!