Bathtub
How to Clean Acrylic Bathtub
![An image showcasing sparkling clean acrylic bathtubs](https://bestmoderntoilet.com/wp-content/uploads/2023/08/how-to-clean-acrylic-bathtub_402.png)
I’ve discovered the best way to keep my acrylic bathtub sparkling clean, and I can’t wait to share it with you.
Cleaning an acrylic bathtub doesn’t have to be a daunting task. By following a few simple steps, you can easily remove soap scum, hard water deposits, mildew, and mold.
I’ll show you the right cleaning products to use, how to prepare the bathtub, and even how to maintain it for long-lasting cleanliness.
Let’s dive in and make your bathtub shine like new!
Key Takeaways
- Choose natural cleaning products specifically designed for acrylic surfaces to avoid damage.
- Remove any items from the bathtub before cleaning and use warm water with a mild, non-abrasive cleaner.
- Use vinegar mixed with water or baking soda paste to remove soap scum and stubborn stains.
- Prevent and remove hard water deposits by using water softeners, vinegar, baking soda, and lemon juice.
Choosing the Right Cleaning Products
You should be careful when choosing the right cleaning products for your acrylic bathtub. Using natural cleaning products is highly recommended to avoid damaging the surface. Harsh chemicals can cause discoloration or even scratches on the acrylic material. Instead, opt for gentle, non-abrasive cleaners that are specifically designed for acrylic surfaces. Look for products that are labeled as acrylic-friendly or safe for use on acrylic bathtubs.
Additionally, it is important to use the recommended cleaning tools for your bathtub. Soft microfiber cloths or sponges are ideal for cleaning acrylic surfaces as they won’t scratch or damage the material. Avoid using scrub brushes or abrasive cleaners that can cause harm.
By choosing the right cleaning products and tools, you can effectively clean your acrylic bathtub without compromising its appearance or longevity.
Now, let’s move on to preparing the bathtub for cleaning.
Preparing the Bathtub for Cleaning
To get started, make sure you’ve gathered all the necessary cleaning supplies for preparing your acrylic bathtub.
The first step in bathtub maintenance is to remove any items from the tub, such as shampoo bottles or soap dishes.
Next, fill the tub with warm water and add a mild, non-abrasive cleaner specifically formulated for acrylic surfaces. Avoid using harsh chemicals or abrasive scrub brushes, as they can damage the acrylic.
Instead, use a soft sponge or cloth to gently scrub the surface of the tub, paying special attention to any stains or buildup.
Rinse thoroughly with warm water, making sure to remove all traces of the cleaner.
Finally, dry the tub with a clean, soft towel to prevent water spots or streaks.
Removing Soap Scum and Stains
When it comes to removing soap scum and stains from my bathtub, I have found that vinegar works wonders. By mixing equal parts vinegar and water in a spray bottle, I can easily spray the solution onto the affected areas and let it sit for a few minutes before scrubbing it away with a sponge or brush.
Another effective method I have discovered is using baking soda. By creating a paste with baking soda and water, I can apply it to stubborn stains and let it sit for a while before scrubbing it away.
Lastly, lemon juice mixed with water can also be a great natural solution for removing soap scum and stains. The acidity of the lemon juice helps break down the buildup, making it easier to clean.
Vinegar for Soap Scum
Using vinegar is an effective way to remove soap scum from your acrylic bathtub. Vinegar has many cleaning benefits and is a great natural alternative to harsh chemical cleaners. Here are some reasons why vinegar is an excellent bathtub cleaner:
- Vinegar is a natural disinfectant, killing bacteria and germs that may be lurking in your bathtub.
- It is a powerful solvent that breaks down soap scum and removes stains effectively.
- Vinegar is safe to use on acrylic surfaces, as it won’t cause any damage or discoloration.
- It is an affordable and readily available cleaning solution that can be found in most households.
To use vinegar as a bathtub cleaner, simply mix equal parts of vinegar and warm water in a spray bottle. Spray the mixture onto the soap scum, let it sit for a few minutes, and then scrub away with a soft cloth or sponge. Rinse thoroughly with water, and your acrylic bathtub will be sparkling clean and free from soap scum.
Baking Soda Stain Removal
Mixing baking soda with water creates a versatile paste that I can use to remove stubborn stains from various surfaces. Baking soda, also known as sodium bicarbonate, is a natural cleaning agent that offers numerous benefits.
Its mild abrasive properties make it effective in lifting and removing stains without causing damage. Additionally, baking soda is non-toxic, making it a safer alternative to harsh chemical cleaners.
To create the stain-removing paste, simply mix baking soda with a small amount of water until a thick consistency is achieved. Apply the paste to the stained area, gently scrubbing with a sponge or cloth. Rinse thoroughly and wipe dry.
Baking soda’s versatility and natural cleaning abilities make it an excellent choice for tackling tough stains, while promoting a safer and healthier cleaning environment.
Lemon Juice and Water
Lemon juice and water create a refreshing and natural solution for tackling tough stains. When it comes to cleaning, using natural alternatives like lemon juice can have numerous benefits. Here are some reasons why lemon juice is a great option for cleaning:
-
Natural bleaching properties: Lemon juice contains citric acid, which acts as a natural bleach. It can help lighten stains and brighten surfaces without the use of harsh chemicals.
-
Antibacterial properties: Lemon juice has antimicrobial properties that can help kill bacteria and germs, making it an effective cleaner for various surfaces.
-
Pleasant scent: The fresh and citrusy scent of lemon juice can leave your home smelling clean and revitalized.
-
Versatility: Lemon juice can be used to clean a variety of surfaces, including countertops, glass, and stainless steel.
Tackling Hard Water Deposits
When it comes to tackling hard water deposits in your bathroom, there are two key points to consider: preventing future mineral buildup and using effective cleaning methods.
To prevent future mineral buildup, it’s important to invest in a water softener or use vinegar regularly to dissolve the minerals.
As for cleaning methods, using a mixture of baking soda and lemon juice can be highly effective in removing stubborn mineral deposits.
Preventing Future Mineral Buildup
To avoid future mineral buildup in your acrylic bathtub, it’s important to regularly rinse it after each use. This simple step helps prevent discoloration and keeps the surface of your tub looking shiny and new.
Here are some additional tips to maintain the shine and prevent mineral buildup:
- Use a soft sponge or cloth to gently clean the bathtub.
- Avoid using abrasive cleaners or scrub brushes that can damage the acrylic surface.
- For stubborn stains, create a mixture of warm water and mild dish soap to gently scrub the area.
- Regularly apply a non-abrasive acrylic cleaner to keep the tub looking its best.
Effective Cleaning Methods
Regularly rinsing your tub after each use helps prevent mineral buildup and keeps it looking shiny and new. However, there are times when a deeper clean is necessary to maintain the pristine condition of your acrylic bathtub.
To effectively clean your bathtub, start by choosing the right cleaning products. Avoid using abrasive cleaners or scrub brushes, as they can damage the surface of your tub. Instead, opt for gentle cleaners specifically designed for acrylic surfaces.
Another common mistake is using excessive force when scrubbing. Instead, use a soft cloth or sponge and apply gentle pressure. Don’t forget to pay attention to the corners and crevices where dirt and grime can accumulate.
Rinse thoroughly after cleaning to remove any residue. Following these effective cleaning techniques will ensure that your acrylic bathtub stays clean and beautiful for years to come.
Dealing With Mildew and Mold
You can easily remove mildew and mold from your acrylic bathtub using a mixture of vinegar and baking soda. This natural cleaning solution is effective in removing stubborn stains and preventing the growth of mold and mildew in the future.
Here’s how you can tackle this problem:
- Start by mixing equal parts vinegar and baking soda to create a paste.
- Apply the paste directly onto the affected areas of the bathtub.
- Let it sit for about 15-20 minutes to allow the solution to penetrate the stains.
- Scrub the surface using a soft brush or sponge, making sure to reach all the corners and crevices.
Scrubbing and Polishing the Surface
Now that we’ve tackled the issue of mildew and mold, let’s move on to scrubbing and polishing the surface of your acrylic bathtub. This step is crucial for restoring its shine and cleanliness. To effectively scrub the bathtub, you’ll need some basic tools and techniques. Here are some scrubbing techniques and polishing tools you can use:
Scrubbing Techniques | Polishing Tools |
---|---|
Soft sponge or cloth | Microfiber cloth |
Non-abrasive cleaner | Acrylic polish |
Baking soda | White vinegar |
Toothbrush | Rubbing alcohol |
Using a soft sponge or cloth, gently scrub the surface of the bathtub using a non-abrasive cleaner or a mixture of baking soda and water. For tougher stains, you can use a toothbrush. After scrubbing, rinse the bathtub thoroughly with water. To polish the surface and restore its shine, use a microfiber cloth and acrylic polish. Apply a small amount of polish to the cloth and buff the surface in circular motions. This will help remove any remaining residue and leave your bathtub looking brand new.
Transitioning to the next section, let’s now move on to cleaning the drains and fixtures of your acrylic bathtub.
Cleaning the Drains and Fixtures
To effectively maintain the cleanliness of your acrylic bathtub, it’s important to regularly clean the drains and fixtures. Neglecting these areas can lead to clogs and buildup, compromising the functionality and appearance of your bathtub.
Here are some steps to ensure your drains and fixtures remain in top shape:
-
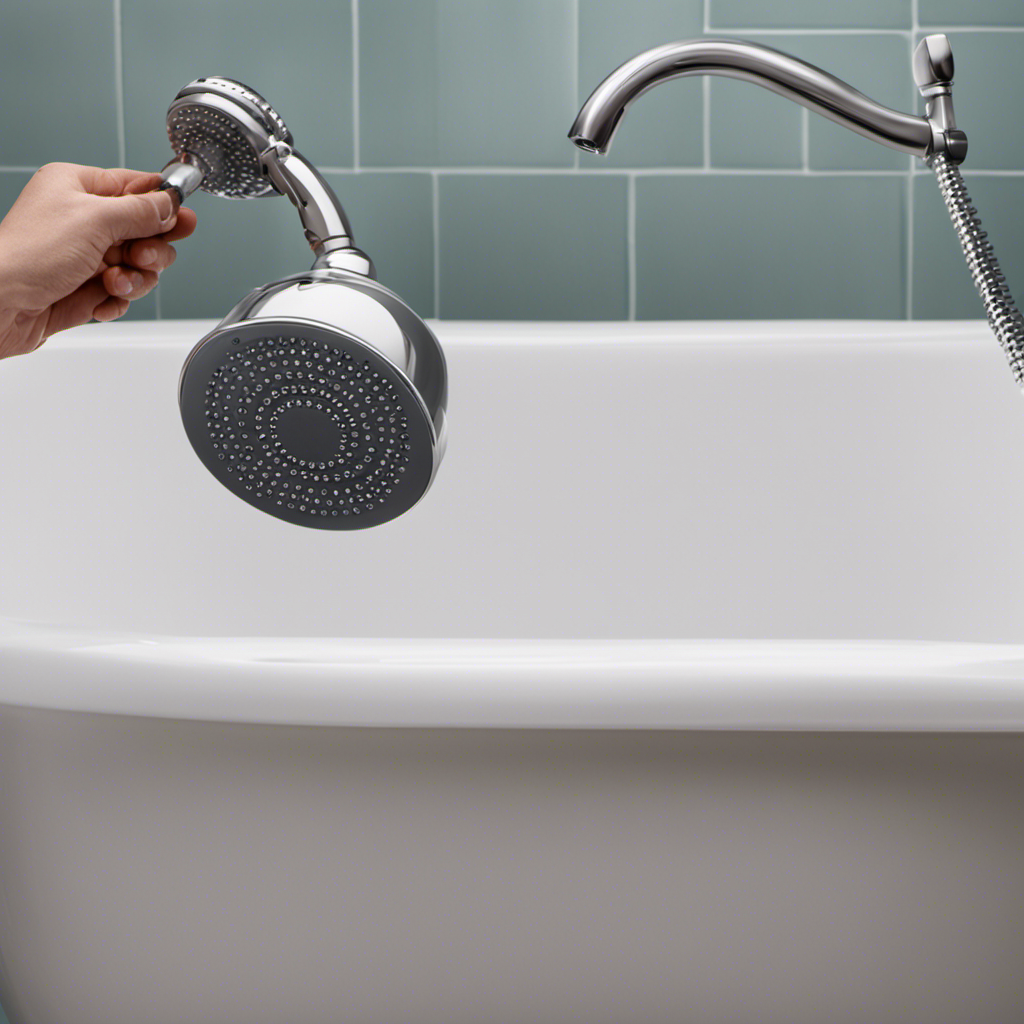
Cleaning the showerhead: Remove the showerhead and soak it in a vinegar solution to dissolve any mineral deposits. Use a toothbrush to scrub away any remaining residue, then rinse thoroughly before reattaching.
-
Unclogging the bathtub drain: Start by removing any visible debris using a drain snake or wire hanger. Then, pour a mixture of baking soda and vinegar down the drain, followed by hot water. Finally, use a plunger to dislodge any remaining clogs.
-
Cleaning the fixtures: Wipe down the fixtures with a soft cloth and mild soap to remove dirt and grime. For stubborn stains, make a paste using baking soda and water, apply it to the fixtures, and let it sit for a few minutes before scrubbing gently.
Maintaining the Acrylic Bathtub
Regular maintenance is crucial for keeping your acrylic bathtub in good condition. To prevent scratches, it is important to use non-abrasive cleaners when cleaning your bathtub. Avoid using harsh chemicals or abrasive scrub brushes, as they can cause damage to the acrylic surface. Instead, opt for mild dish soap or a vinegar and water solution.
Gently scrub the bathtub using a soft cloth or sponge, making sure to rinse thoroughly afterwards. It is also important to avoid placing sharp objects directly on the bathtub surface, as they can easily scratch the acrylic. To maintain the glossy finish of your acrylic bathtub, you can use a specially formulated acrylic cleaner or a mixture of baking soda and water.
Regularly cleaning and caring for your acrylic bathtub will help extend its lifespan and keep it looking beautiful for years to come.
Tips for Preventing Future Build-up
Using gentle cleaners and avoiding harsh chemicals or abrasive scrub brushes can help prevent future build-up in your acrylic bathtub. Here are some tips to keep your bathtub looking clean and new:
- Use a non-abrasive cleaner specifically designed for acrylic surfaces.
- Avoid using bleach or ammonia-based cleaners as they can cause discoloration.
- Instead, opt for mild dish soap or vinegar diluted in water for regular cleaning.
- Gently scrub the bathtub using a soft sponge or cloth to avoid scratches.
Frequently Asked Questions
How Do I Remove Stubborn Stains From My Acrylic Bathtub?
To remove stubborn stains from my acrylic bathtub, I would recommend using a mixture of baking soda and white vinegar. Apply the paste to the stains, let it sit for a few minutes, then scrub with a non-abrasive sponge.
Can I Use Bleach to Clean My Acrylic Bathtub?
Yes, you can use bleach to clean your acrylic bathtub. However, it’s important to be cautious as bleach can damage the surface. There are also bleach alternatives and other cleaning products that work best for acrylic tubs.
Are There Any Natural Cleaning Solutions That Can Be Used on Acrylic Bathtubs?
Yes, there are natural cleaning solutions that can be used on acrylic bathtubs. They offer many benefits, such as being eco-friendly, non-toxic, and gentle on the surface. These solutions can effectively remove dirt and stains while keeping your bathtub in great condition.
How Often Should I Clean My Acrylic Bathtub?
I make sure to clean my acrylic bathtub regularly to prevent scratches. I use the best cleaning products specifically made for acrylic bathtubs. It keeps my tub looking pristine and beautiful.
What Should I Do if My Acrylic Bathtub Develops Cracks or Chips?
If my acrylic bathtub develops cracks or chips, I should address the issue promptly to prevent further damage. Repairing cracks can be done by using acrylic repair kits or seeking professional help.
Conclusion
After following these steps, your acrylic bathtub will be cleaner than ever before! The combination of the right cleaning products and thorough scrubbing will leave your tub sparkling like new.
Say goodbye to soap scum, hard water deposits, and mildew – they don’t stand a chance against your cleaning skills.
With regular maintenance and a few preventative measures, your acrylic bathtub will stay pristine for years to come.
So go ahead, take a nice long soak in your beautifully clean tub and relax in the knowledge that you’ve conquered the art of cleaning acrylic bathtubs!
Mateo’s flair for writing is matched only by his keen eye for design. As an interior designer turned writer, Mateo brings a unique perspective. He blends aesthetics with functionality in every piece he pens, providing readers with beautifully crafted content that’s also supremely useful.
Mateo loves exploring the latest bathroom tech trends and is our expert on smart toilets. When he’s not writing or designing, Mateo can be found sketching ideas for his next big project at local coffee shops.
Bathtub
Should I Close the Toilet Seat After Pooping
![](https://bestmoderntoilet.com/wp-content/uploads/2023/11/can-you-flush-toilet-when-power-is-out_529_IP418730-21.jpg)
Similar to a ship’s crew discussing which way to navigate, we frequently contemplate the timeless query: should we shut the toilet seat after using it?
In this article, we explore the hygiene benefits, potential health risks, and courtesy arguments for closing the seat.
We also delve into the reasons why some opt to leave it open.
Join us as we navigate the murky waters of toilet seat etiquette and help you make an informed decision based on facts and considerations.
Key Takeaways
- Closing the toilet seat after pooping helps prevent the spread of germs and maintains cleanliness in the bathroom.
- Leaving the seat open increases the risk of spreading germs and bacteria throughout the bathroom, potentially causing illnesses.
- Closing the seat shows respect and consideration for others, preventing accidental contact with germs and reducing the risk of someone falling into the toilet bowl.
- When deciding whether to close the seat, it is important to consider personal preferences, household dynamics, and the importance of reaching a mutual agreement to maintain harmony in shared spaces.
Hygiene Benefits of Closing the Seat
Closing the toilet seat after using it can help prevent the spread of germs and maintain cleanliness in the bathroom. By closing the seat, you create a barrier that prevents bacteria and other microorganisms from escaping the toilet bowl and contaminating the surrounding area. This simple act of hygiene can significantly reduce the risk of illness and infection.
When the seat is left open, it allows for the dispersion of microscopic droplets that may contain harmful bacteria, increasing the chances of cross-contamination. Closing the toilet seat also prevents items from accidentally falling into the bowl, ensuring that the surface remains clean and free from potential sources of contamination.
Potential Health Risks of Leaving the Seat Open
Leaving the toilet seat open can increase the risk of spreading germs and bacteria throughout the bathroom. When the seat is left open, particles from flushing can be dispersed into the air, landing on various surfaces. These particles may contain harmful microorganisms that can cause illnesses such as diarrhea, urinary tract infections, and respiratory infections. To illustrate the potential health risks of leaving the seat open, consider the following table:
Risks | Cleanliness |
---|---|
Spread of germs | Reduced hygiene |
Increased infection | Decreased sanitation |
Higher risk of illness | Poor bathroom hygiene |
The Courtesy Argument for Closing the Seat
After we finish using the toilet, it’s considerate to close the seat for the next person. This simple act shows respect and consideration for others who may need to use the bathroom after us. While some may argue that leaving the seat open isn’t a big deal, the courtesy argument for closing the seat holds its ground. Here are three reasons why closing the seat is the polite thing to do:
- Hygiene: Closing the seat prevents any accidental contact with germs or bacteria that may be present in the toilet bowl. It helps maintain a clean and sanitary environment for everyone.
- Safety: A closed seat reduces the risk of someone accidentally falling into the toilet bowl, especially in households with young children or elderly individuals.
- Cultural perspectives: Closing the seat is a common practice in many cultures, seen as a sign of cleanliness and respect. By adhering to this etiquette, we can show our understanding and consideration for diverse cultural norms.
Reasons Why Some People Choose to Leave the Seat Open
While it’s important to consider the courtesy argument for closing the seat, some people choose to leave it open for their own personal reasons. Toilet seat etiquette is a matter of individual preference, and there are several factors that might influence this choice.
Some individuals may have physical limitations or disabilities that make it difficult to close the seat after use. Others may find it more convenient to leave the seat open, especially in households where multiple people use the bathroom. Additionally, some individuals may have cultural or personal beliefs that affect their decision to leave the seat open.
Ultimately, each person’s choice regarding the toilet seat should be respected, as long as they’re mindful of the preferences and needs of others who share the same space.
Considerations for Making Your Own Decision
When making our own decision about whether to close the toilet seat after pooping, there are several factors to consider. Here are three key considerations to keep in mind:
- Toilet Seat Etiquette: Proper toilet seat etiquette is an important aspect to consider. Closing the toilet seat after using it shows respect for others who might use the bathroom next, ensuring a clean and tidy environment for everyone.
- Personal Preferences: Your own personal preferences should also play a role in making this decision. Some people prefer to close the toilet seat for hygienic reasons or to prevent pets from drinking out of the bowl, while others may leave it open for convenience or personal habits.
- Household Dynamics: The dynamics of your household can also influence your decision. If you live alone, you have the freedom to choose what works best for you. However, if you live with others, it’s important to consider their preferences and reach a mutual agreement to maintain harmony.
Frequently Asked Questions
Are There Any Specific Bacteria or Germs That Can Be Easily Transmitted From Leaving the Toilet Seat Open?
Leaving the toilet seat open can expose us to specific bacteria and germs that are easily transmitted. It’s important to close the toilet seat to minimize the risk of spreading these harmful microorganisms.
How Does Leaving the Toilet Seat Open Affect the Overall Cleanliness of the Bathroom?
Leaving the toilet seat open can have a negative effect on bathroom hygiene. It allows for the spread of bacteria and unpleasant odors to linger. Closing the seat after use helps maintain cleanliness and control odors.
Are There Any Potential Health Risks Associated With Closing the Toilet Seat After Pooping?
Closing the toilet seat after pooping may have potential hygiene risks. It can trap bacteria and odors, impacting bathroom sanitation. However, regularly cleaning the toilet and practicing good hand hygiene can help mitigate these risks.
What Are the Social Implications of Leaving the Toilet Seat Open in Public Restrooms?
When it comes to social etiquette in public restrooms, closing the toilet seat after use is considered good hygiene. It shows respect for others and helps maintain cleanliness, preventing potential health risks.
How Can Personal Preferences and Cultural Norms Influence the Decision to Close or Leave the Toilet Seat Open After Using the Bathroom?
When considering whether to close the toilet seat after using it, personal preferences and cultural norms play a significant role. Our individual choices and societal expectations shape our decision-making in this matter.
Conclusion
In conclusion, closing the toilet seat after pooping is a hygienic and considerate practice. It helps prevent the spread of germs and potential health risks associated with leaving it open.
Like closing the door to keep out unwanted guests, closing the toilet seat is a simple act of courtesy that can make a big difference in maintaining a clean and healthy bathroom environment.
So remember, just like shutting the front door to keep the cold out, close the toilet seat to keep the germs in!
With an impeccable eye for detail and a passion for bathroom-related, Ava leads our editorial team gracefully and precisely.
Under her guidance, Best Modern Toilet has flourished as the go-to resource for modern bathroom enthusiasts. In her free time, you might find Ava exploring antique shops and looking for vintage bathroom fixtures to add to her collection.
Bathtub
Which Button Do You Push on a Dual Flush Toilet
![](https://bestmoderntoilet.com/wp-content/uploads/2023/11/bold-and-luxurious-black-toilets-in-modern-bathrooms_203_IP418765-24.jpg)
Did you know that the average person flushes the toilet approximately 2,500 times annually?
With the rise of environmentally-conscious habits, many people are turning to dual flush toilets for water conservation.
But which button should we push?
In this article, we will explore the intricacies of the dual flush system and provide you with clear instructions on when to use the big and small buttons.
Get ready to master the art of flushing efficiently and responsibly.
Key Takeaways
- Dual flush toilets offer two options for flushing: a full flush for solid waste and a half flush for liquid waste.
- The big button is used for a full flush to effectively remove solid waste from the bowl, while the small button is used for liquid waste.
- Clear size and labeling help users understand the purpose of each button, eliminating any confusion in button usage.
- Proper maintenance is crucial for the efficiency and longevity of dual flush toilets, including regular cleaning and timely repairs.
Understanding the Dual Flush System
Understanding the Dual Flush System is essential for us to effectively use a dual flush toilet. Dual flush toilets offer two options for flushing: a full flush for solid waste and a half flush for liquid waste. This system allows for water conservation, as the half flush uses significantly less water than a traditional toilet flush.
However, it’s important to note that there are pros and cons to using a dual flush toilet. On the positive side, these toilets can save water and lower utility bills. On the negative side, some users may find it confusing to determine which button to push for each type of waste. Additionally, there are common misconceptions about dual flush toilets, such as the belief that they’re difficult to maintain or prone to clogging.
Differentiating the Big and Small Buttons
To differentiate the big and small buttons on a dual flush toilet, we can easily identify them based on their size and labeling. The big button is typically larger in size and is labeled for a ‘full flush,’ while the small button is smaller and labeled for a ‘half flush.’ This labeling system helps users understand the purpose of each button and eliminates any button labeling confusion.
When to Use the Big Button
We typically use the big button on a dual flush toilet for a full flush. This button is designed to release a larger amount of water, which is necessary to effectively remove solid waste from the bowl. The table below provides a summary of when to use the big button and its associated benefits:
Situation | When to Use the Big Button | Water Conservation Benefits |
---|---|---|
After a bowel movement | Always | Ensures thorough waste removal |
When disposing of toilet paper | Always | Prevents clogging and improves hygiene |
Cleaning the toilet bowl | Occasionally | Removes stubborn stains and bacteria |
When performing maintenance on the toilet | Occasionally | Facilitates proper cleaning and repairs |
When conducting a water pressure test | Occasionally | Tests the functionality of the toilet |
Using the big button when necessary not only ensures proper waste removal and hygiene but also helps conserve water. It is important to remember that proper maintenance for dual flush toilets, such as regular cleaning and timely repairs, is crucial to maintain their efficiency and longevity.
When to Use the Small Button
When using a dual flush toilet, it’s important to know when to use the small button. The small button is designed to be used for liquid waste, which requires less water to flush effectively. Here are five key reasons why it’s beneficial to use the small button:
- Water conservation benefits: By using the small button for liquid waste, you can significantly reduce water usage compared to using the big button for every flush. This helps conserve water, which is a precious resource.
- Proper maintenance of dual flush toilets: Using the small button for liquid waste helps prevent clogs and keeps the toilet in good working condition. It’s important to follow the manufacturer’s guidelines for proper maintenance.
- Efficient and effective flushing: The small button is specifically designed to provide enough water to effectively flush liquid waste without wasting excess water.
- Environmental responsibility: Choosing to use the small button demonstrates a commitment to environmental sustainability and reducing our ecological footprint.
- Cost savings: By using the small button for liquid waste, you can save on your water bill, as you’re using less water for each flush.
Additional Tips and Considerations
For optimal performance and efficiency, it is important to consider some additional tips and considerations when using a dual flush toilet. Apart from knowing which button to push, there are other factors that can enhance your experience with this water-saving fixture.
Firstly, let’s talk about the water-saving benefits of dual flush toilets. Compared to traditional toilets, dual flush toilets use significantly less water, helping to conserve this precious resource. By choosing the right dual flush toilet for your bathroom, you can maximize these water-saving benefits.
To assist you in making an informed decision, here is a table outlining some key factors to consider when selecting a dual flush toilet:
Consideration | Description | Importance |
---|---|---|
Water usage | How much water does the toilet consume? | High |
Flush power | Does it effectively remove waste? | High |
Design and aesthetics | Does it match your bathroom decor? | Medium |
Price | Is it within your budget? | Medium |
Frequently Asked Questions
What Is the Average Cost of a Dual Flush Toilet?
On average, the cost of a dual flush toilet ranges from $200 to $600. These toilets offer numerous benefits, including water conservation and cost savings. They have separate buttons for flushing, allowing users to choose the appropriate flush volume.
How Does a Dual Flush Toilet Help in Water Conservation?
Water efficiency benefits of a dual flush toilet include reduced water consumption and lower utility bills. It helps conserve water by offering two flush options for liquid and solid waste, minimizing environmental impact.
Are Dual Flush Toilets Compatible With All Plumbing Systems?
Dual flush toilets have installation requirements to ensure compatibility with all plumbing systems. The benefits of dual flush toilets for older plumbing systems include water conservation and reduced strain on pipes.
Can I Retrofit a Regular Toilet Into a Dual Flush Toilet?
To retrofit a regular toilet into a dual flush toilet, you will need a conversion kit. This upgrade offers the benefits of water conservation and cost savings. The process involves replacing the flush mechanism and adjusting the water usage options.
What Are Some Common Troubleshooting Tips for a Dual Flush Toilet?
Common problems with dual flush toilets include insufficient flush power, water leaks, and button malfunctions. To fix them, ensure proper water pressure, check for leaks, and clean or replace faulty buttons.
Conclusion
In conclusion, understanding the dual flush system is crucial for efficient water usage in toilets.
Differentiating between the big and small buttons is key to knowing when to use each one.
Remember, the big button is for solid waste, while the small button is for liquid waste.
By using the appropriate button, you can contribute to water conservation efforts and help protect the environment.
So, next time you’re faced with a dual flush toilet, don’t hesitate to push the right button and make a splash in water efficiency.
With an impeccable eye for detail and a passion for bathroom-related, Ava leads our editorial team gracefully and precisely.
Under her guidance, Best Modern Toilet has flourished as the go-to resource for modern bathroom enthusiasts. In her free time, you might find Ava exploring antique shops and looking for vintage bathroom fixtures to add to her collection.
Bathtub
Can You Use a Power Shower Without Electricity
![](https://bestmoderntoilet.com/wp-content/uploads/2023/11/thorstenmeyer_Create_an_image_depicting_a_serene_backyard_with__97c4ef95-26e9-4b63-a5c4-f22ec6c8b1d1_IP418215-19.jpg)
Do you find it frustrating to depend on electricity for a rejuvenating power shower? Don’t worry, we have some alternative solutions that will help you stay clean and fresh without requiring a power source.
In this article, we’ll explore portable shower solutions, gravity-fed systems, solar-powered alternatives, and hand pump showers.
So, if you’re ready to master the art of staying clean even when the lights go out, let’s dive in!
Key Takeaways
- Portable shower options are practical and convenient for showering without electricity, as they are lightweight and easy to transport.
- Gravity-fed shower systems are a viable option that relies on the force of gravity for water pressure, making them simple and reliable without the need for electricity.
- Solar-powered shower solutions are an eco-friendly alternative that use solar energy to heat water efficiently and reduce reliance on electricity.
- Hand pump showers are a practical choice in remote areas or during power outages, as they require no electricity and are portable and easy to install.
Portable Shower Options
When it comes to finding a solution for showering without electricity, one option that we’ve found to be practical and convenient is using a portable shower.
Portable showers are commonly used in camping scenarios, where access to electricity may be limited. These showers are designed to be lightweight and easy to transport, making them ideal for outdoor use. They typically consist of a water reservoir, a shower head, and a pump mechanism.
One advantage of portable showers is their water-saving feature. Many models are equipped with water-saving technology, such as adjustable flow rates and spray patterns, which help conserve water while still providing an enjoyable shower experience.
Additionally, some portable showers are designed to be solar-powered, utilizing the sun’s energy to heat the water. This further reduces the need for electricity and makes them even more eco-friendly.
Gravity-Fed Shower Systems
Although it may seem counterintuitive, using a gravity-fed shower system is a viable option for showering without electricity. Gravity-fed shower systems rely on the force of gravity to provide water pressure, making them ideal for low pressure showers or water saving solutions.
These systems work by using a water source placed at a higher elevation than the showerhead. As the water flows down, it creates enough pressure to provide a satisfying shower experience.
One advantage of gravity-fed shower systems is their simplicity and reliability. They don’t require any electricity or complex components, making them easy to install and maintain.
Additionally, these systems are environmentally friendly, as they reduce water consumption by using only the necessary amount of water for each shower.
Solar-Powered Shower Solutions
To continue our exploration of alternative showering options, let’s now delve into the realm of solar-powered shower solutions.
Solar-powered water heaters are an eco-friendly shower alternative that harnesses the power of the sun to heat water. Here are three key considerations when it comes to solar-powered shower solutions:
- Efficiency: Solar water heaters are designed to maximize the conversion of solar energy into heat, ensuring efficient water heating.
- Storage: These systems include a storage tank where heated water is stored for later use, allowing for continuous hot water availability.
- Backup Systems: Some solar-powered shower solutions come with backup systems, such as electric or gas heaters, to ensure hot water supply during cloudy days or periods of high demand.
Hand Pump Showers
We frequently rely on electricity for power showers, but hand pump showers offer an alternative solution. While electric pumps provide convenience and consistent water pressure, hand pump showers can be a practical choice in certain situations. These manual shower options are especially useful in remote areas where electricity is not readily available or during power outages.
Hand Pump Showers | Electric Pump Showers |
---|---|
No electricity needed | Requires electricity |
Portable and easy to install | Requires professional installation |
Water pressure dependent on user’s strength | Consistent water pressure |
Suitable for outdoor use | Suitable for indoor use |
Hand pump showers require no electricity, making them an eco-friendly choice. They are portable and can be easily installed, providing a convenient solution for camping trips or off-grid living. However, the water pressure in hand pump showers relies on the user’s strength, which may not be as consistent as electric pump showers. Ultimately, the choice between hand pump and electric pump showers depends on the specific needs and preferences of the user.
Alternative Methods for Staying Clean
There are various alternative methods we can use to stay clean without relying on a power shower. Here are some water-saving techniques and DIY shower alternatives to consider:
- Dry shampoo: A quick and easy way to freshen up your hair without using water.
- Wet wipes: Perfect for freshening up your body when you don’t have access to a shower.
- Basin wash: Fill a basin with warm water and use a washcloth or sponge to cleanse your body.
- Bucket shower: Fill a bucket with water and use a cup or small container to pour water over yourself.
- Solar shower: Utilize the sun’s heat to warm up a bag of water and hang it for a makeshift shower.
- Portable camping showers: These compact devices use a gravity-fed system and can be used anywhere.
Frequently Asked Questions
How Does a Portable Shower Differ From a Power Shower?
A portable shower differs from a power shower in terms of convenience and mobility. The portable shower offers benefits such as easy transportation and setup, while the power shower provides advantages like high water pressure and consistent temperature control.
Can a Gravity-Fed Shower System Provide Enough Water Pressure for a Satisfying Shower Experience?
Using a gravity-fed shower system, one can enjoy a satisfying shower experience without relying on electricity. However, compared to the convenience and power of a portable shower, the water pressure may be lower.
Are Solar-Powered Shower Solutions Practical for Everyday Use?
Solar-powered shower solutions are practical for everyday use. The efficiency of these showers is dependent on the amount of sunlight available. However, the initial cost of solar-powered showers can be high, making them less accessible for some individuals.
How Does a Hand Pump Shower Work and Is It Easy to Use?
A hand pump shower operates by manually pumping water to create water pressure. It is easy to use, requiring repetitive pumping, and can provide a satisfying shower experience without the need for electricity.
What Are Some Alternative Methods for Staying Clean When a Power Shower Is Not Available?
Portable showers and water saving techniques are essential when a power shower is unavailable. We’ll explore alternative methods for staying clean, ensuring you have the knowledge to master cleanliness even without electricity.
Conclusion
In conclusion, when it comes to using a power shower without electricity, there are a variety of options available. From portable showers to gravity-fed systems, solar-powered solutions, and hand pump showers, there are alternative methods for staying clean even without access to electricity.
So, whether you’re camping in the wilderness or experiencing a power outage, don’t fret, as there are ways to enjoy a refreshing shower experience that will leave you feeling rejuvenated and ready to take on the day.
As they say, when it comes to cleanliness, where there’s a will, there’s a way.
With an impeccable eye for detail and a passion for bathroom-related, Ava leads our editorial team gracefully and precisely.
Under her guidance, Best Modern Toilet has flourished as the go-to resource for modern bathroom enthusiasts. In her free time, you might find Ava exploring antique shops and looking for vintage bathroom fixtures to add to her collection.
-
Bathroom Enhancements3 months ago
Will Hot Bath Lower Blood Pressure
-
Reviews2 months ago
LDian Smart Toilet Review [2024]
-
Reviews3 months ago
Kohler Innate Smart Toilet Review [2024]
-
Bathtub1 week ago
Are Clorox Toilet Wand Refills Septic Safe
-
Reviews3 months ago
Kohler NUMI 2.0 Smart Toilet Review [2024]
-
Reviews3 months ago
CANEST Smart Toilet Review: The Ultimate Bathroom Upgrade [2024]
-
Toilet Types3 months ago
Are Bleach Tablets Bad for Your Toilet
-
Reviews3 months ago
Woodbridge B0970S Smart Bidet Toilet Review [2024]