
I’ve been there before – staring at a grimy bathtub covered in stubborn grout. It can be frustrating and overwhelming, but fear not!
I’m here to guide you through the step-by-step process of removing grout from your bathtub. With the right tools, preparation, and a little elbow grease, you’ll have your bathtub looking brand new in no time.
So, let’s roll up our sleeves and get ready to tackle this grout removal challenge head-on!
Key Takeaways
- There are various tools and methods available for grout removal, including grout saws, grout removal tools, and rotary tools with grout removal attachments.
- Before starting the grout removal process, it is important to prepare the bathtub by covering the edges with painter’s tape or plastic sheeting and clearing the area of personal items.
- Applying a grout removal solution can help soften the grout before using tools, and it is important to consider the material and condition of the surface when selecting a solution.
- Safety precautions should be prioritized during the grout removal process, including wearing protective gloves and goggles to prevent injuries and minimizing the chances of getting hurt when working with chemicals or tools.

ALLWAY CT31 3-in-1 Caulk Tool for Removal and Application
Multifunction 3-in-1 Caulk Tool: Comfortable soft-grip and made from strong engineering plastic
As an affiliate, we earn on qualifying purchases.
As an affiliate, we earn on qualifying purchases.
Gathering the Necessary Tools
Before starting, make sure you have all the necessary tools to remove the grout from your bathtub.
When it comes to bathtub maintenance, grout removal is an important task. There are a few alternatives for grout removal, depending on the severity of the problem.
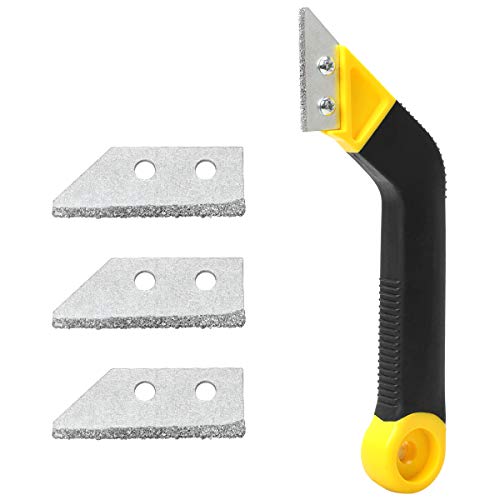
One option is using a grout saw, which is a small handheld tool with a sharp blade. This allows you to carefully remove the grout between the tiles.
Another alternative is using a grout removal tool, which is a manual tool with a carbide tip that helps scrape away the grout.
Additionally, you can use a rotary tool with a grout removal attachment, which can make the process easier and faster.
Whichever method you choose, make sure to follow the instructions carefully and take necessary safety precautions.

Dremel Grout Removal Rotary Tool Attachment, 568-01
30° cutting angle provides controlled cutting along the grout line
As an affiliate, we earn on qualifying purchases.
As an affiliate, we earn on qualifying purchases.
Preparing the Bathtub for Grout Removal
To get started, make sure you’ve gathered all the necessary tools and materials for preparing your bathtub for grout removal. Before diving into the grout removal process, it’s important to take some preventive measures to protect the surrounding areas.
Start by covering the edges of the bathtub with painter’s tape or plastic sheeting. This will prevent any accidental damage to the bathtub’s surface. Next, clear the area of any personal items or accessories that might get in the way during the grout removal process.
Now, let’s discuss alternative grout removal methods. One popular method is using a grout removal tool, such as a grout saw or a rotary tool with a grout removal bit. These tools are effective in removing grout from the bathtub’s surface.
Another alternative method is using a chemical grout remover. These products are available in most home improvement stores and can help dissolve the grout, making it easier to remove. Remember to always follow the manufacturer’s instructions when using chemical grout removers.

Miracle Sealants Miracle Heavy Duty Tile & Stone Cleaner, Grout Haze Remover, Non-Acidic, 32oz
POWERFUL NON-ACID CLEANER: Effectively removes grout haze, grease, and dirt from ceramic, porcelain, glass, grout, and natural stone…
As an affiliate, we earn on qualifying purchases.
As an affiliate, we earn on qualifying purchases.
Applying a Grout Removal Solution
When it comes to grout removal, it’s important to have effective techniques in your arsenal. Whether you’re dealing with old, stubborn grout or simply want to refresh your tile’s appearance, choosing the right solution is crucial.
However, it’s equally important to prioritize safety precautions when applying these solutions to avoid any potential hazards or accidents. In this discussion, I will delve into effective grout removal techniques, guide you on selecting the right solution for your needs, and provide essential safety precautions to keep in mind throughout the process.
Effective Grout Removal Techniques
You can try using a grout removal tool to effectively remove the grout from your bathtub.
One of the best hacks for grout removal is to use a rotary tool with a grout removal bit. This tool allows you to easily cut through the grout, making it easier to remove.
Another DIY grout removal tip is to use a grout saw. This small handheld tool has a serrated blade that allows you to scrape away the grout. It’s important to be careful when using these tools as they can be sharp. Make sure to wear protective gloves and goggles.
Additionally, before using any grout removal tool, it’s a good idea to apply a grout removal solution to soften the grout and make it easier to remove.
Choosing the Right Solution
Before selecting a solution, consider the specific material and condition of the surface that needs to be treated for optimal results.
There are various grout removal alternatives available that you can choose from. One option is to use a grout removal tool, which allows you to manually scrape away the grout. Another alternative is to use a grout removal solution, which is applied to the grout and then wiped away.
If you are hesitant about tackling the task yourself, you can always opt for professional grout removal services. These services are performed by experienced professionals who have the knowledge and tools to effectively remove grout without causing damage to the surface.
After considering these options, you can make an informed decision on how to proceed with your grout removal project.
Now, let’s discuss the safety precautions when applying these solutions.
Safety Precautions When Applying
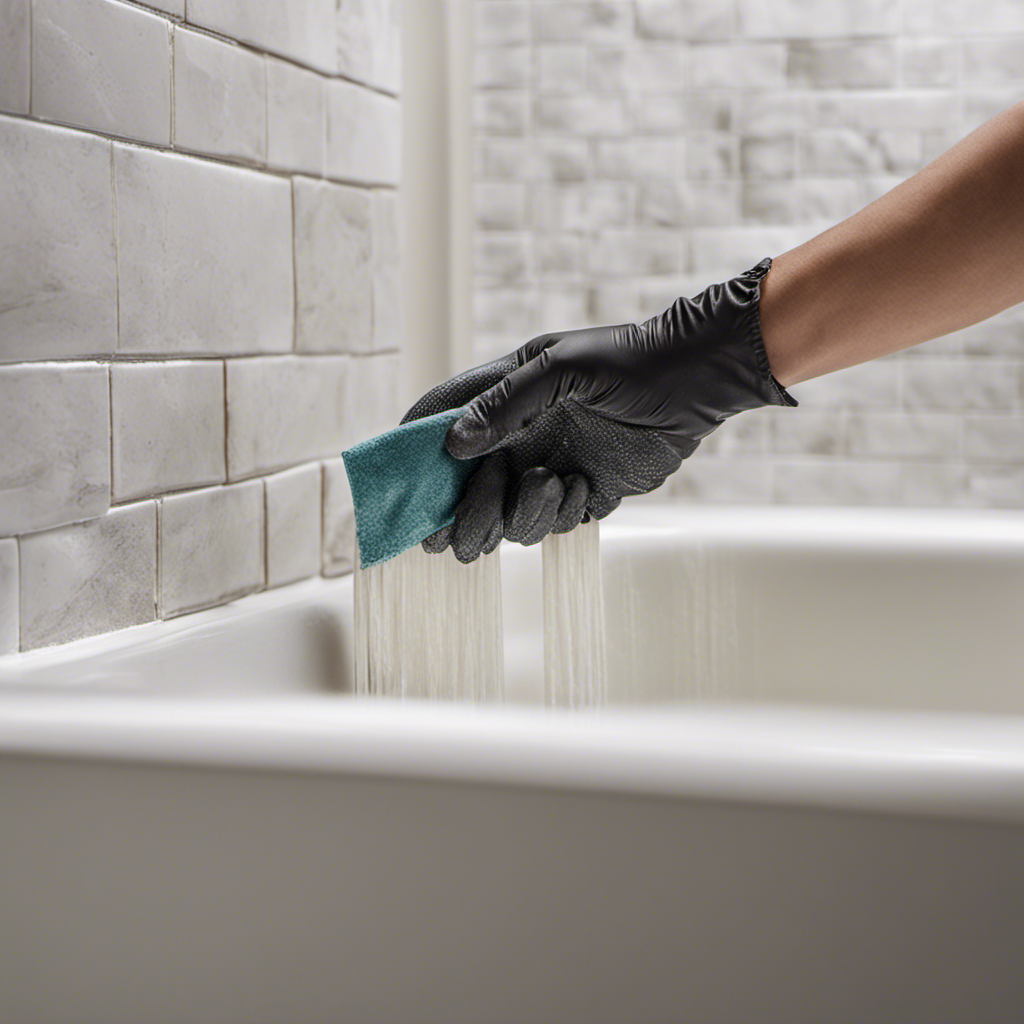
To ensure your safety while applying these solutions, it’s important to wear protective gloves and goggles. Preventing injuries should always be a top priority when working with any chemicals or tools.
Safety gear such as gloves and goggles provide a barrier between your skin and potentially harmful substances, reducing the risk of accidents and chemical burns. Gloves protect your hands from sharp tools, while goggles shield your eyes from flying debris.
By wearing the proper safety gear, you can minimize the chances of getting hurt during the grout removal process.
Now that we have covered the importance of safety precautions, let’s move on to the next step: scrubbing and scraping away the grout.
Coitak Tile Grout Saw Angled Grout Saw with 3 Pieces Extra Blades Replacement, Grout Removal Tool for Tile Cleaning (Yellow)
Premium Material: Grout saw is made of high-quality plastic and hard metal, “diamond style” blade helps you remove…
As an affiliate, we earn on qualifying purchases.
As an affiliate, we earn on qualifying purchases.
Scrubbing and Scraping Away the Grout
When it comes to removing grout, there are several effective methods that can get the job done. From using a grout removal tool to applying a grout dissolving solution, I have tried and tested various techniques over the years.
In addition to discussing these removal methods, I will also share valuable tips on how to prevent grout damage during the removal process, ensuring a smooth and successful project.
Effective Grout Removal Methods
There are several effective methods for removing grout from a bathtub.
When it comes to grout removal, there are a variety of products available that can make the task easier. One popular option is a grout removal tool, which is a handheld tool specifically designed to scrape away grout.
Another option is using a grout removal solvent, which can help break down the grout and make it easier to remove.
For those who prefer a DIY approach, there are also some helpful tips to consider. One tip is to use a grout saw, which is a small handheld tool with a serrated blade that can be used to carefully scrape away the grout.
Another tip is to use a mixture of baking soda and water to create a paste that can be applied to the grout and then scrubbed away with a brush.
Preventing Grout Damage
One effective way to prevent damage to grout is by regularly sealing it to protect it from moisture and stains. Sealing the grout creates a protective barrier that helps to prevent grout discoloration and avoid grout mold.
Here are four practical tips to help you maintain your grout and keep it looking its best:
-
Clean regularly: Regular cleaning will help prevent dirt and grime from building up and staining the grout. Use a mild cleaner and a soft brush to gently scrub the grout lines.
-
Dry thoroughly: After cleaning, make sure to dry the grout thoroughly to prevent moisture from seeping in. Use a clean towel or allow it to air dry before sealing.
-
Use a high-quality grout sealer: Invest in a good quality grout sealer and apply it according to the manufacturer’s instructions. This will help create a protective barrier and prevent moisture and stains from penetrating the grout.
-
Reapply sealer as needed: Over time, the grout sealer may wear off. Check the condition of your grout periodically and reapply the sealer as needed to maintain its protection.
Rinsing and Cleaning the Bathtub Surface
To rinse and clean the bathtub surface, you should use a clean cloth or sponge. This step is crucial in preparing the surface for the grout removal process. Cleaning the bathtub surface ensures that there are no loose dirt or debris that could interfere with the grout removal.
Here are some effective cleaning techniques that I recommend:
-
Use a mild cleaning solution: Mix warm water with a small amount of dish soap or vinegar. This solution is gentle yet effective in removing any dirt or grime on the bathtub surface.
-
Scrub gently: Using a clean cloth or sponge, gently scrub the bathtub surface in circular motions. Pay extra attention to areas with visible grout lines.
-
Rinse thoroughly: After scrubbing, rinse the bathtub surface with clean water to remove any residue from the cleaning solution.
By following these steps, you will have a clean and prepared bathtub surface ready for the grout removal process.
| Cleaning Techniques | Grout Removal Process |
|---|---|
| Use mild cleaning solution | Use a grout removal tool |
| Scrub gently in circular motions | Work in small sections |
| Rinse thoroughly with clean water | Remove grout carefully to avoid damaging the surface |
Finishing Touches and Maintenance Tips
For a polished look and easy maintenance, remember to wipe down the surfaces with a clean cloth after each use. Regularly inspect and replace any worn caulk or seals.
Here are some maintenance tips to keep your bathtub looking its best:
-
Use a non-abrasive cleaner: Choose a gentle cleaner specifically designed for bathtubs to avoid scratching the surface. Avoid harsh chemicals that may damage the finish.
-
Remove soap scum regularly: Soap scum can build up over time, making your bathtub look dull. Use a mild bathroom cleaner or a mixture of vinegar and water to remove soap residue.
-
Prevent mold and mildew: Keep your bathtub clean and dry to prevent the growth of mold and mildew. Use a mold and mildew-resistant caulk and a squeegee to remove excess water after each use.
-
Protect the surface: Use a bathtub mat or non-slip stickers to prevent scratches and maintain the overall appearance of your bathtub.
Recommended products:
- Soft Scrub Total All Purpose Bath and Kitchen Cleanser
- Mr. Clean Magic Eraser Bath Scrubber
- Tilex Mold and Mildew Remover
- Gorilla Clear 100% Silicone Sealant
Conclusion
In conclusion, removing grout from a bathtub can be a daunting task, but with the right tools and techniques, it can be done efficiently.
Remember to always gather the necessary tools and prepare the bathtub properly before applying a grout removal solution.
Scrubbing and scraping away the grout is a labor-intensive process, but the end result will be worth it.
And here’s an interesting statistic to keep you engaged: Did you know that 75% of homeowners struggle with grout cleaning? So, you’re not alone in this battle!
Follow these steps and maintain your bathtub regularly to keep it looking fresh and clean.