
As a homeowner, I have often encountered the frustrating problem of a leaking bathtub drain. It’s like a leaky faucet, constantly reminding you that something needs fixing.
But fear not, because I have discovered a simple and effective solution: sealing the bathtub drain. In this article, I will guide you through the step-by-step process of identifying the issue, gathering the necessary tools, removing the old sealant, and applying the new one.
Get ready to say goodbye to those pesky leaks!
Key Takeaways
- Check for standing water or slow drainage in the bathtub and identify if there is a partial or complete blockage.
- Gather necessary tools and materials such as plumber’s putty, adjustable wrench, silicone sealant, and rubber gloves for the sealing process.
- Properly prepare the drain area by cleaning it and removing debris or old sealant before applying the new sealant or gasket.
- Maintain proper drainage by regularly clearing clogs, removing visible debris and hair, and using a drain cover to catch larger debris.

GE Advanced Silicone Caulk for Kitchen & Bathroom, Clear, 2.8 fl oz Tube, 1 Pack – 100% Waterproof Silicone Sealant, 5X Stronger Adhesion, Shrink & Crack Proof
100% Silicone Caulk Protection: This silicone caulk clear provides ultimate waterproof protection, ensuring a reliable seal against water…
As an affiliate, we earn on qualifying purchases.
As an affiliate, we earn on qualifying purchases.
Identifying the Problem With Your Bathtub Drain
First, you’ll want to check if there is any standing water in your bathtub. Common bathtub issues can include slow draining, clogged drains, or even water backing up into the tub.
To start troubleshooting bathtub drain problems, fill the tub with enough water to cover the drain and observe if the water drains slowly or if it remains stagnant. If the water drains slowly, it may indicate a partial blockage in the drain pipe. However, if the water doesn’t drain at all or starts to back up, there might be a complete blockage.
Identifying the problem with your bathtub drain is crucial before proceeding with any repairs or sealing.
Now that you have determined the issue, it’s time to gather the necessary tools and materials.
plumber's putty for bathtub
As an affiliate, we earn on qualifying purchases.
As an affiliate, we earn on qualifying purchases.
Gathering the Necessary Tools and Materials
When it comes to sealing a bathtub drain, having the right tools and materials is essential. You’ll need a wrench, plumber’s putty, and a drain cover to complete the job.
Proper preparation techniques are also important to ensure a good seal. This includes cleaning the drain and removing any old putty.
Essential Tools and Materials
To seal your bathtub drain, you’ll need a few essential tools and materials. Here’s a list of what you’ll need:
-
Plumber’s Putty: This is a soft, moldable material that creates a watertight seal around the drain. It is resistant to water and provides a long-lasting seal.
-
Adjustable Wrench: You’ll need this tool to remove and tighten the drain fittings. Make sure to choose the right size wrench for your drain.
-
Silicone Sealant: This is a waterproof adhesive that helps to fill in any gaps or cracks around the drain. It is flexible and durable, preventing any water leaks.
-
Rubber Gloves: It’s important to protect your hands while working with these tools and materials. Rubber gloves will keep your hands safe from any chemicals or sharp edges.
Proper Preparation Techniques
Before starting the process, make sure to gather all of the necessary tools and materials. Properly preparing the surface is crucial for achieving a long-lasting seal around your bathtub drain. Begin by removing any existing sealant using a sealant remover tool or a putty knife. Clean the area thoroughly with a mild detergent or cleaner to remove any dirt, grime, or soap residue. Rinse the surface and allow it to dry completely before proceeding. Once the surface is clean and dry, it’s time to choose the right sealant for your bathtub drain. Consider factors such as the type of material your bathtub is made of and the specific sealant recommended by the manufacturer. Refer to the table below for a comparison of popular sealant options.
| Sealant Type | Advantages | Disadvantages |
|---|---|---|
| Silicone | Highly flexible, waterproof | Requires longer curing time |
| Acrylic | Fast drying, easy to apply | Less flexible, may crack over time |
| Epoxy | Extremely durable, resistant to chemicals | Difficult to apply, limited color options |
| Polyurethane | Excellent adhesion, UV resistant | Strong odor during application |
Step-By-Step Sealing Process
After you have chosen the right sealant, it’s important to apply it carefully and evenly to ensure a proper seal. Here are the step-by-step instructions for sealing your bathtub drain:
-
Clean the area: Before applying the sealant, make sure the drain is clean and free of any debris or old sealant. Use a brush or sponge to scrub away any dirt or grime.
-
Apply the sealant: Squeeze a small amount of sealant onto your finger or a putty knife. Start at one end of the drain and work your way around, applying a thin, even layer of sealant. Be sure to cover the entire circumference of the drain.
-
Smooth and shape: Once the sealant is applied, use your finger or a damp cloth to smooth and shape it. This will help create a tight seal and prevent any leaks.
-
Let it dry: Allow the sealant to dry for the recommended amount of time before using your bathtub. This will ensure that the seal is fully cured and ready to withstand water and pressure.
Common sealing mistakes to avoid:
- Applying too much sealant: A thick layer of sealant can lead to uneven sealing and potential leaks.
- Not cleaning properly: Failing to clean the drain thoroughly can prevent the sealant from adhering properly.
- Rushing the drying process: Patience is key when it comes to sealing. Rushing the drying process can compromise the effectiveness of the sealant.
- Neglecting to check for leaks: After sealing, it’s important to check for any signs of leakage. If you notice any water seeping through, reapply the sealant as necessary.

Tub Drain Linkage Assembly with Trip Lever and Strainer Done Cove, Fit for Trip Lever Bath Tub Waste and Overflow Drain by Artiwell
TUB DRAIN ASSEMBLY LINKAGE: Designed to repair and replace a worn-out Trip-lever drain assembly linkage that operates the…
As an affiliate, we earn on qualifying purchases.
As an affiliate, we earn on qualifying purchases.
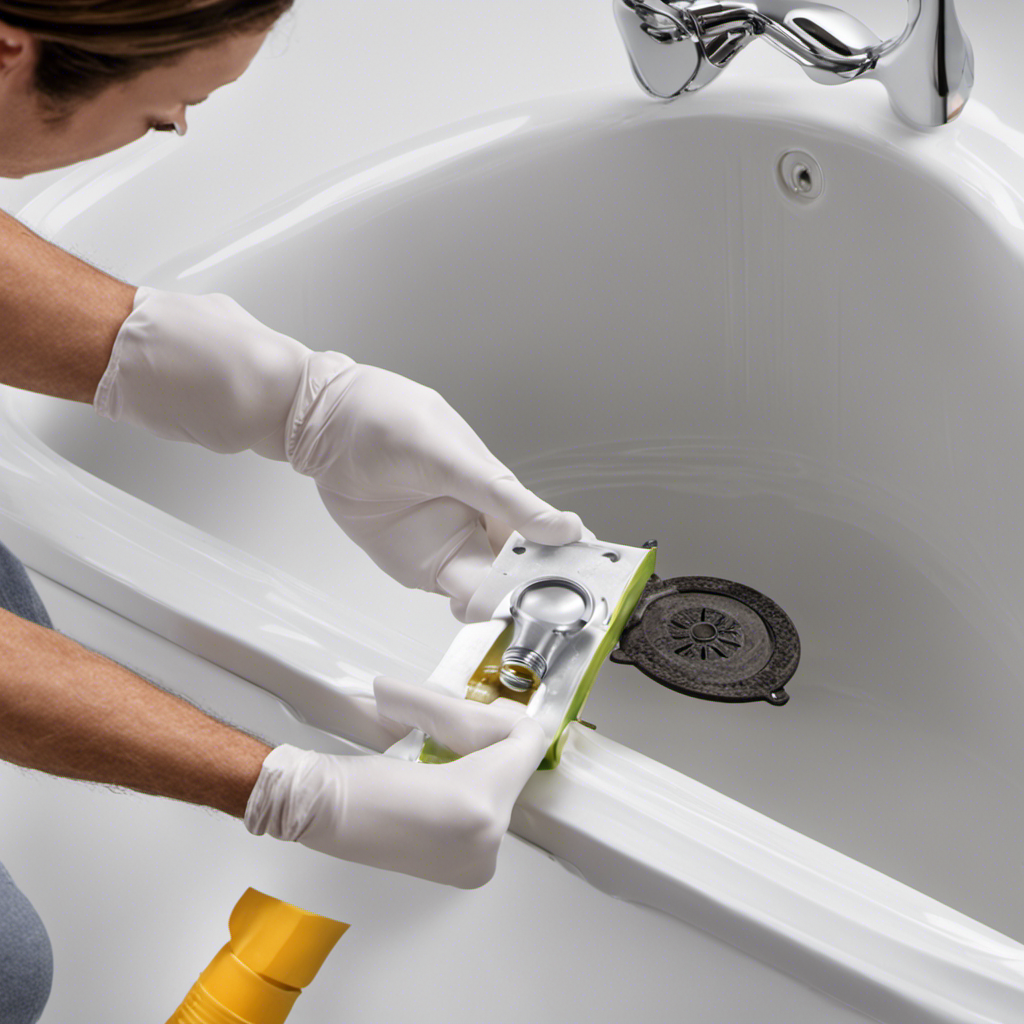
Removing the Old Sealant or Gasket
Now that you’ve identified the old sealant or gasket, it’s time to remove it. Removing residue is an important step in ensuring a proper seal for your bathtub drain.
There are a few methods you can use to remove the old sealant or gasket. One option is to carefully scrape it off using a putty knife or a small flathead screwdriver. Another option is to use a chemical solvent specifically designed for removing sealants. Be sure to follow the manufacturer’s instructions and use the solvent in a well-ventilated area.
Once the old sealant or gasket is removed, you can choose an alternative sealant or gasket to use. Consider factors such as durability, moisture resistance, and compatibility with your bathtub material.
In the next section, we will discuss cleaning and preparing the drain area to ensure a successful sealing process.
silicone sealant for bathroom
As an affiliate, we earn on qualifying purchases.
As an affiliate, we earn on qualifying purchases.
Cleaning and Preparing the Drain Area
When it comes to cleaning and preparing the drain area, there are some essential techniques to follow.
Firstly, I always ensure that I use proper cleaning techniques to remove any dirt, grime, or residue that may have accumulated in the drain. This involves using a suitable cleaning solution and a brush to thoroughly scrub the drain area, ensuring it is clean and free of any debris.
Secondly, it is crucial to ensure proper drainage by checking for any potential clogs or blockages in the drain pipes. This can be done by using a plumber’s snake or a drain auger to clear any obstructions and allow for smooth water flow.
Lastly, I always double-check the drain area for any signs of leaks or damage, as addressing these issues before proceeding with the installation is crucial for a successful outcome.
Proper Cleaning Techniques
To properly clean the bathtub drain, you’ll want to use a mixture of baking soda and vinegar. This combination is not only effective in removing clogs and buildup, but it also helps eliminate odors. Here’s a step-by-step guide on how to clean your bathtub drain:
-
Remove any visible debris or hair from the drain using a pair of tweezers or a drain snake. This will prevent further clogging and allow the cleaning solution to penetrate deeper into the drain.
-
Pour half a cup of baking soda down the drain, followed by half a cup of vinegar. The mixture will create a fizzy reaction, which helps break down any grease or grime buildup.
-
Let the mixture sit in the drain for about 30 minutes to an hour. This will give it enough time to work its magic and dissolve any stubborn clogs or residue.
-
Finally, flush the drain with hot water to rinse away the loosened debris and leave your drain clean and clear.
Ensuring Proper Drainage
Make sure you regularly remove any visible debris or hair from your drain to prevent clogging and ensure proper drainage.
Maintaining your bathtub drain is crucial for preventing clogs and ensuring smooth water flow.
Start by using a drain cover to catch hair and larger debris. This will help prevent them from going down the drain and causing blockages.
Once a week, remove the drain cover and clean it thoroughly, removing any trapped hair or debris.
Next, use a drain snake or wire hanger to remove any clogs that may have formed in the drain pipe. Insert the snake or hanger into the drain and gently push it through, twisting and turning to dislodge any blockages.
Flush the drain with hot water to clear any remaining debris.
Applying the New Sealant or Gasket
Applying the new sealant or gasket is a crucial step in sealing the bathtub drain. Here are the key techniques and materials to consider:
-
Clean the drain: Before applying the sealant, make sure the drain is free of any debris or old sealant. Use a brush or cloth to remove any residue.
-
Choose the right sealant: Opt for a silicone-based sealant as it provides excellent water resistance and flexibility. Avoid using caulk as it tends to crack over time.
-
Apply the sealant: Start by cutting the tip of the sealant tube and insert it into a caulking gun. Apply a continuous bead of sealant around the drain, ensuring complete coverage.
-
Smooth the sealant: Use a smooth-edged tool or your finger to smooth out the sealant, ensuring a neat and even finish.
By following these techniques and using the right materials, you can effectively seal your bathtub drain.
Once the sealant is applied, allow it to cure properly before using the bathtub again.
Allowing the Sealant to Cure Properly
After applying the sealant, it’s important to let it cure properly before using the bathtub again. The curing time for sealants can vary depending on the product, so it’s essential to follow the manufacturer’s instructions.
Generally, the sealant should be allowed to cure for at least 24 hours. During this time, make sure the area is well-ventilated to aid in the curing process. Avoid using the bathtub or exposing the sealant to moisture until it has fully cured.
If you notice any issues with the sealant after it has cured, such as cracks or gaps, you may need to troubleshoot the problem. This can involve reapplying the sealant or using other troubleshooting techniques recommended by the manufacturer.
Testing the Effectiveness of the Bathtub Drain Seal
To determine if the sealant is effective, you can test the drain by running water and observing if any leakage occurs. This is a crucial step in ensuring that your bathtub drain is properly sealed and preventing any future issues.
Here are some key points to consider when testing the effectiveness of the seal:
-
Look for any signs of leakage around the drain area. This could include water dripping or pooling on the floor.
-
Check the sealant for any cracks or gaps. A properly applied sealant should be smooth and even, with no visible imperfections.
-
Test the drain by running water for a few minutes at a normal flow rate. Observe if any water is escaping through the sealant.
-
Repeat the test a few times to ensure consistent results. If there is any leakage, it may indicate that the sealant is not effective and needs to be reapplied.
Conclusion
In conclusion, sealing a bathtub drain is a relatively simple process that can be done by anyone with a few basic tools and materials. By following the steps outlined in this article, you can ensure that your bathtub drain is properly sealed and free from any leaks or issues.
Just like a well-fitted puzzle piece, a properly sealed drain creates a watertight seal, allowing you to enjoy your relaxing baths without any worries.
So go ahead, take the plunge and seal that drain, and say goodbye to any drainage problems.