
I’ve got the perfect solution for anyone struggling with installing a toilet flange on a concrete floor! Let me guide you through the process step by step, making it easier than you ever thought possible.
With just a few tools and materials, we’ll prepare the concrete floor, mark the placement of the flange, and cut a hole in the floor with precision.
Then, we’ll securely install the flange and finish up by testing the installation.
Get ready to conquer this task like a pro!
Key Takeaways
- Preparing the concrete floor is essential for a successful installation.
- Properly marking the placement of the toilet flange ensures accuracy and stability.
- Cutting a hole in the concrete floor requires careful measurement and following manufacturer guidelines.
- Safety precautions, proper anchoring techniques, and choosing the right materials are crucial for preventing leaks and maintaining stability during installation.

Smart Toilet with Bidet Built In, Heated Seat, Warm Water Wash & Dryer, Tankless Bidet Toilet with Foot Sensor & Night Light, Auto Open/Close Lid & Flush, Wireless Remote, 1.26GPF Water-Saving Design
🛠️ Easy Installation & Reliable Support: This smart toilet with bidet built in includes all accessories, flange kit,...
As an affiliate, we earn on qualifying purchases.
Tools and Materials Needed
You’ll need a hammer, chisel, drill, and a toilet flange kit to complete this installation.
When it comes to working with concrete, choosing the right tools is crucial for a successful installation. Firstly, make sure to select a hammer that is sturdy enough to break through the concrete. A chisel with a sharp edge will help you chip away at the concrete and create a groove for the flange.
A drill with a masonry bit is essential for drilling holes into the concrete to secure the flange. Additionally, when working with concrete, it is important to wear safety goggles, gloves, and a dust mask to protect yourself from debris and dust.
Follow these tips for working with concrete, and you’ll be well-prepared for installing a toilet flange on a concrete floor.

WITMYA Smart Toilet with Bidet Built In, One Piece Bidet Toilet with Auto Dual Flush, Foam Shield, Modern Elongated Tankless Toilet with Foot Sensor, Heated Bidet Seat, Warm Water & Dryer,LED Display
【Efficient Flush & Energy-Saving Design】There smart toilets feature a highly efficient 1.28 GPF water-saving dual flush system with...
As an affiliate, we earn on qualifying purchases.
Preparing the Concrete Floor
First, make sure the area is clean and free from any debris or dust. This is important to ensure a smooth and level surface for pouring the concrete mixture.
Start by removing any loose or broken pieces of concrete and sweep away any dirt or dust.
Next, prepare the concrete mixture according to the instructions on the bag. Mix it thoroughly until it reaches a smooth consistency.
Begin pouring the concrete mixture onto the prepared area, making sure to distribute it evenly.
Use a trowel or a float to level the concrete surface, smoothing out any uneven areas. Take your time and pay attention to detail to ensure a flat and even surface.
Allow the concrete to cure and dry completely before moving on to the next step.

Loniko Smart Toilet with Bidet Built In, Heated Seat & Dual Auto Flush, Foot Sensor, Tankless Modern Elongated Electric Toilet with Warm Water Wash, Air Dryer, LED Display & 1000g MaP Flush, 1.28 GPF
🧻 [Powerful & Water-Saving Dual Flush System] This one piece smart toilet with bidet built in uses an...
As an affiliate, we earn on qualifying purchases.
Marking the Placement of the Toilet Flange
Once the area is clean, mark the placement of the toilet flange using a pencil or marker. This step is crucial for ensuring that the flange is installed correctly and securely.
Here’s what you need to keep in mind when marking the placement:
-
Measure for accuracy: Use a measuring tape to determine the center of the drain pipe. Measure the distance from the back wall to the center of the drain pipe and mark it on the floor. This will help you position the flange accurately.
-
Importance of a level surface: It is essential to have a level surface for proper installation. Use a level tool to check if the floor is even. If it’s not level, you may need to make adjustments before proceeding with the installation.
-
Aligning with the toilet base: Align the flange with the marks you made on the floor, ensuring that it is centered and level. This will help prevent any leaks or stability issues once the toilet is installed.

LOUPUSUO Smart Toilet with Warm Water Sprayer and Dryer, One Piece Bidet Toilet with Auto Dual Flush Foot Sensor Operation,Heated Seat Smart with Built In Fahrenheit LED Display
Powerful Flushing System: Designed with low water consumption (1.26 gallons per flush), this system ensures efficient and thorough...
As an affiliate, we earn on qualifying purchases.
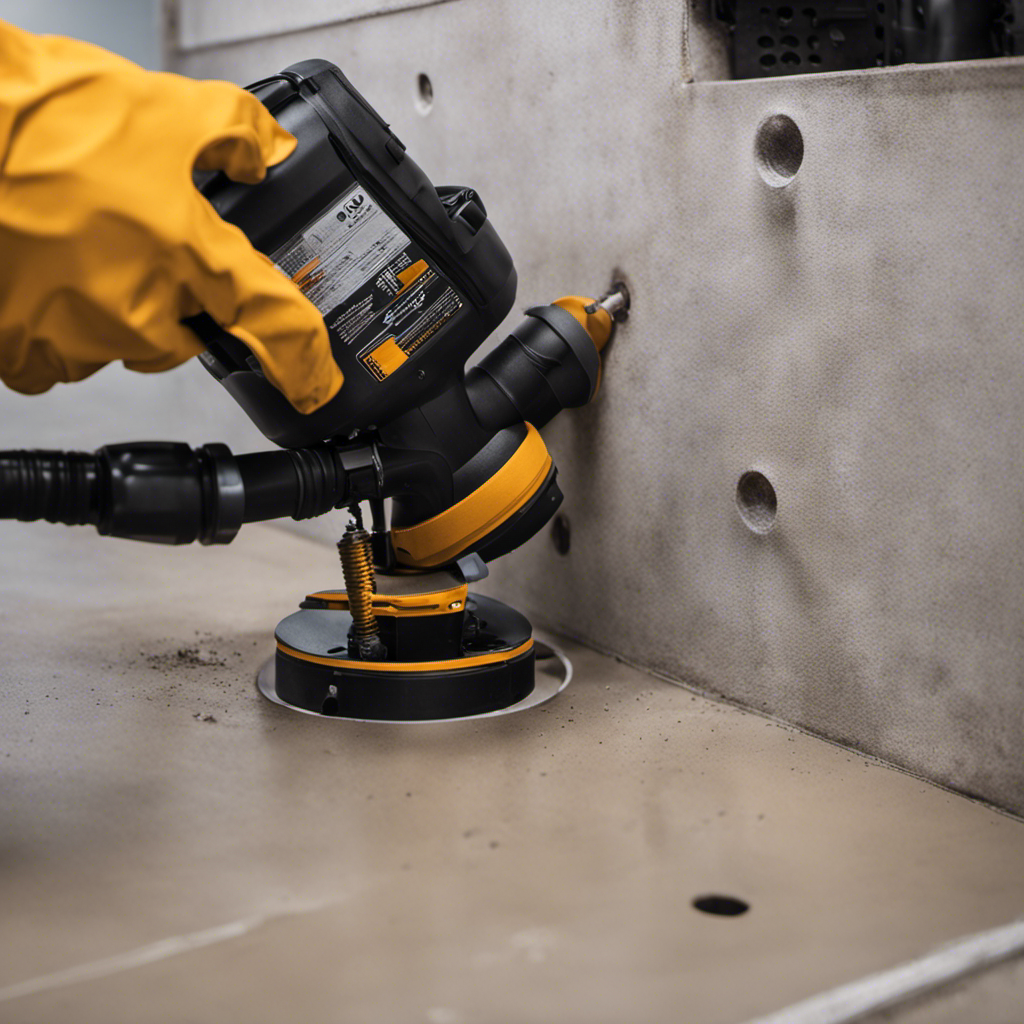
Cutting a Hole in the Concrete Floor
When cutting a hole in a concrete floor for a toilet flange, there are several important factors to consider.
First, the size of the hole must be appropriate to accommodate the flange and allow for proper installation.
I recommend using a circular saw with a diamond blade for this task, as it provides accurate and clean cuts.
Size of the Hole
To properly install the toilet flange on your concrete floor, you’ll need to make sure the hole is the correct size. The size of the hole is crucial for a secure and leak-free installation. Here are some key points to consider when determining the proper hole size:
-
Measure the diameter of the flange: Before cutting the hole, you need to know the exact size of the toilet flange. Measure the diameter accurately to ensure a precise fit.
-
Account for the thickness of the flange: Take into account the thickness of the flange when determining the hole size. This will help ensure that the flange sits flush with the surface of the concrete floor.
-
Allow for clearance: It’s important to leave some clearance around the flange hole to accommodate any movement or adjustments during installation.
-
Follow manufacturer guidelines: Always refer to the manufacturer’s instructions for specific guidelines on the recommended hole size for your particular toilet flange.
Tools Needed
You’ll need a few tools to complete the installation of the toilet flange on your concrete floor. When it comes to installing a toilet flange, there are some common mistakes that people make. One of the most common mistakes is not using the right tools for the job. To avoid this, make sure you have a few key tools on hand.
Firstly, you’ll need a hammer drill to drill holes into the concrete floor. This will allow you to secure the flange properly. Additionally, you’ll need a wrench to tighten the bolts and screws. Lastly, having a level will ensure that the flange is installed correctly and will prevent any leaks.
By using these tools, you can avoid common installation mistakes and ensure a successful toilet flange installation.
Now, let’s move on to discussing some important safety precautions.
Safety Precautions
Now that we have discussed the tools needed for installing a toilet flange on a concrete floor, let’s move on to the important topic of safety precautions.
It is crucial to take necessary steps to prevent leaks and maintain stability during the installation process. Here are a few key points to keep in mind:
-
Use proper safety equipment: Wear gloves and safety goggles to protect yourself from any potential hazards.
-
Inspect the concrete floor: Check for any cracks or uneven surfaces that might affect the stability of the flange.
-
Apply a waterproof sealant: Before installing the flange, make sure to apply a waterproof sealant around the area to prevent any leaks.
-
Secure the flange firmly: Use strong adhesive or screws to secure the flange tightly to the concrete floor, ensuring its stability.
Installing the Toilet Flange
First, make sure you’ve gathered all the necessary tools for installing the toilet flange on the concrete floor. You will need a hammer drill, a masonry drill bit, a wrench, a concrete anchor, and a toilet flange.
To install the flange, start by marking the location where the flange will be placed on the concrete floor. Use the hammer drill with the masonry drill bit to create holes for the concrete anchors. Make sure the holes are deep enough to securely hold the flange in place.
Once the holes are drilled, insert the concrete anchors and tighten them using the wrench. Next, place the toilet flange over the anchors and align it with the floor drain. Use the wrench to secure the flange to the anchors, making sure it is level and securely attached.
If you encounter any issues during the installation, here are some troubleshooting tips:
| Issue | Solution |
|---|---|
| Flange is not level | Adjust the position of the flange and re-tighten the anchors |
| Flange is not securely attached | Check if the anchors are properly tightened |
| Flange is not aligned with the floor drain | Re-position the flange and ensure proper alignment |
Securing the Flange to the Concrete Floor
When securing the flange to a concrete floor, it is crucial to employ proper anchoring techniques and choose the right materials.
One must ensure that the flange is securely fastened to the concrete to prevent any movement or leaks.
Proper Anchoring Techniques
To properly anchor the toilet flange on a concrete floor, you’ll need to use the correct techniques. Here are some tips to ensure a secure and long-lasting installation:
- Start by cleaning the concrete surface thoroughly, removing any debris or old flange remnants.
- Use a high-quality epoxy adhesive to bond the flange to the concrete. Apply the adhesive evenly around the flange’s base.
- Once the flange is placed on the adhesive, press it firmly into the concrete to ensure a strong bond.
- Allow the adhesive to fully cure before proceeding with the toilet installation.
Proper leveling techniques are crucial for preventing leaks and ensuring the toilet sits securely on the flange. Troubleshooting common issues, such as misaligned flanges or loose bolts, can help prevent future problems. Remember to always follow manufacturer instructions and seek professional help if needed.
Choosing the Right Materials
You’ll want to make sure you select the appropriate materials for the job. When it comes to installing a toilet flange on a concrete floor, there are various waterproofing options and alternative flange installation methods available. To help you make an informed decision, I have provided a table below that outlines some of these options and methods:
| Waterproofing Options | Alternative Flange Installation Methods |
|---|---|
| PVC Cement | Compression Fit |
| Rubber Gaskets | Epoxy Resin |
| Silicone Sealant | Expansion Anchors |
| Wax Rings | Wedge Anchors |
| Waterproof Membrane | Screw Anchors |
Each of these materials and methods has its own advantages and considerations, so it’s important to choose the one that best suits your specific needs. By carefully selecting the right materials and installation method, you can ensure a secure and long-lasting toilet flange installation. Once you’ve made your selection, the next step is to test and finish the installation.
With the appropriate materials and methods in place, it’s time to move on to testing and finishing the installation.
Testing and Finishing the Installation
After attaching the toilet flange to the concrete floor, make sure to test for proper fit and finish the installation. To ensure a successful installation, here are some testing techniques and troubleshooting tips:
-
Check for stability: Apply pressure to the flange to see if it moves or wobbles. If it does, you may need to reinforce the connection to the floor.
-
Test the wax ring: Place the wax ring on the flange and carefully lower the toilet onto it. Gently rock the toilet back and forth to ensure a proper seal. If there is any movement, the wax ring may need to be replaced.
-
Inspect for leaks: After connecting the water supply line and flushing the toilet, check for any signs of leaks around the base. If you notice water pooling or dripping, tighten the connections or replace faulty parts.
-
Ensure proper drainage: Finally, flush the toilet several times to ensure proper drainage. If water backs up or drains slowly, there may be a blockage in the pipes that needs to be addressed.
Conclusion
In conclusion, installing a toilet flange on a concrete floor requires careful preparation, precise cutting, and secure installation.
By following the steps outlined in this article, you can successfully complete this task and ensure a stable and functional toilet.
Remember to use the necessary tools and materials, mark the placement accurately, cut the hole with precision, and secure the flange firmly to the concrete floor.
With proper testing and finishing touches, your toilet flange installation will be a success.