
I’ve got a toilet nightmare for you: a leaky wax ring. It’s like a flood waiting to happen! But fear not, because I’ve got the solution.
In this article, I’ll guide you through the precise steps to replace that pesky wax ring and ensure a watertight seal. With just a few tools and a little know-how, you’ll be able to tackle this DIY project and save yourself from a potential disaster.
Let’s dive in, shall we?
Key Takeaways
- Choose a high-quality wax ring made from durable materials
- Thoroughly clean the area around the flange before installation
- Remove any remaining wax residue and debris from the flange
- Ensure the wax ring is properly aligned and seated on the flange
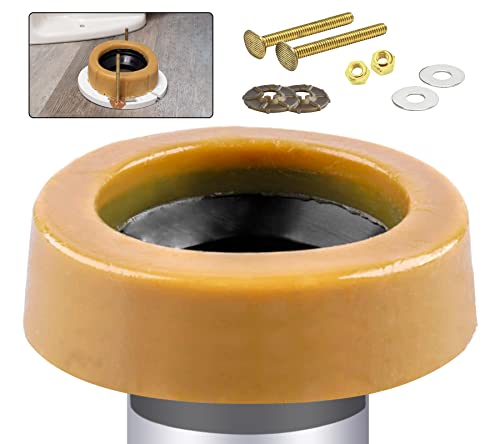
Extra Thick Toilet Wax Ring Kit with Flange and Bolts for Floor Outlet Toilets New Install or Re-seat, Fits 3-inch or 4-inch Waste Lines
Signs of a Bad Toilet Wax Ring?: If you can smell a sewer-like smell coming from your toilet,…
As an affiliate, we earn on qualifying purchases.
As an affiliate, we earn on qualifying purchases.
Gathering the Necessary Tools and Materials
Before starting the process, make sure you have all the tools and materials you’ll need.
When it comes to replacing a wax ring on a toilet, choosing the right wax ring is crucial. Look for a wax ring that is made from high-quality materials and has a thick, durable construction. This will ensure a tight seal and prevent any leaks.
Common mistakes to avoid include using a wax ring that is too thin or too thick, as this can lead to a faulty seal. Another mistake to avoid is not properly cleaning the area around the flange before installing the new wax ring. Any debris or residue can interfere with the seal, so it’s important to thoroughly clean the area.

Flange-Off Toilet Flange Removal Tool
For professional use only to safely remove a toilet flange
As an affiliate, we earn on qualifying purchases.
As an affiliate, we earn on qualifying purchases.
Removing the Toilet and Old Wax Ring
To start the process, simply turn off the water supply and disconnect the toilet from the floor. This step is crucial for any toilet maintenance or repair.
Here are four important things to keep in mind when removing the toilet and old wax ring:
-
Be gentle: The toilet is a delicate fixture, so handle it with care to avoid any damage or cracks.
-
Clear the area: Before lifting the toilet, clear the surrounding area of any objects or obstacles that may get in the way.
-
Use a wrench: To disconnect the toilet from the floor, use a wrench to loosen the bolts securing it in place.
-
Protect the floor: Place old towels or rags on the floor to catch any water or debris that may spill during the removal process.

Hibbent Extra Thick Toilet Wax Ring Replacement Kit, Universal Toilet Seal Ring with Brass Toilet Floor Bolts and Retainer Washers, PE Flange Fits 3 Inch and 4 Inch Drain Pipes
Universal Toilet Wax Ring: The Hibbent toilet flange is compatible with 3-inch and 4-inch waste lines, suitable for…
As an affiliate, we earn on qualifying purchases.
As an affiliate, we earn on qualifying purchases.
Cleaning and Preparing the Toilet Flange
After disconnecting the toilet, it’s important to clean and prepare the toilet flange for the installation of a new wax ring. Proper toilet flange maintenance is crucial in preventing future leaks and ensuring a secure connection between the toilet and the floor.
To clean the flange, start by removing any remaining wax residue and debris using a putty knife or a scraper. Make sure to clean both the inside and outside edges of the flange. Next, inspect the flange for any signs of damage or corrosion. If necessary, replace the flange to ensure a tight seal.
Before installing the new wax ring, it’s essential to ensure that the toilet flange is level and securely attached to the floor. Use a level and screws or bolts to adjust and secure the flange if needed.
Taking these steps will help maintain the integrity of the toilet flange and prevent future leaks.

Oatey Fix-It Stainless Steel Flange Repair Ring, Adjustable Toilet Flange Repair Kit for Broken or Cracked Mounting Flanges, Secure Seal
REPAIRS BROKEN OR DAMAGED FLANGES: Easily fixes broken, cracked, or worn-out toilet mounting flanges without full replacement, restoring…
As an affiliate, we earn on qualifying purchases.
As an affiliate, we earn on qualifying purchases.
Installing the New Wax Ring and Reattaching the Toilet
Once the toilet is disconnected, it’s time to install the new wax ring and reattach the toilet. Here are the steps to follow:
-
Position the new wax ring: Place the wax ring on the toilet flange, ensuring it is centered and aligned properly. This will create a watertight seal between the toilet and the flange.
-
Realignment of toilet bolts: Carefully lower the toilet onto the wax ring, making sure the toilet bolts pass through the mounting holes. Gently rock the toilet back and forth to help the wax ring settle evenly.
-
Tighten the toilet bolts: Using a wrench, tighten the nuts onto the toilet bolts until the toilet feels stable. Be careful not to overtighten, as this can crack the toilet or damage the wax ring.
-
Troubleshooting common installation issues: If the toilet wobbles or feels unstable, try realigning the toilet bolts and tightening them again. If there are leaks, double-check the wax ring’s position and make sure it is sealing properly.
Now that the toilet is reattached, we can move on to the next step: testing for leaks and ensuring a proper seal.
Testing for Leaks and Ensuring Proper Seal
Now, you’ll want to check for any leaks and make sure the seal is properly intact.
Troubleshooting common issues with toilet wax rings is essential to ensure a tight seal and prevent any future problems.
Firstly, carefully inspect the area around the base of the toilet for any signs of water leakage. If you notice any water pooling or dampness, it could indicate a faulty seal.
To fix this, you can try tightening the bolts that secure the toilet to the floor. Additionally, make sure the wax ring is properly aligned and seated on the toilet flange.
Applying a small amount of plumber’s putty around the base can also help maintain a tight seal.
Regularly inspecting and maintaining the wax ring will prevent leaks and ensure a properly functioning toilet.
Frequently Asked Questions
How Often Should the Wax Ring on a Toilet Be Replaced?
I’m not an expert, but based on what I’ve heard, the wax ring on a toilet should be replaced every few years or if you notice any leaks or odors coming from the base.
Can I Use a Different Type of Sealant Instead of a Wax Ring?
Yes, you could use an alternative sealant instead of a wax ring, such as a rubber gasket or a foam ring. However, it’s important to consider the pros and cons of using a different sealant.
Is It Necessary to Remove the Toilet Completely When Replacing the Wax Ring?
No, it is not necessary to remove the toilet completely when replacing the wax ring. There are alternative sealants available for toilet installation, but the wax ring is the most common and effective choice.
What Should I Do if the Toilet Flange Is Damaged or Corroded?
If the toilet flange is damaged or corroded, I would repair it before replacing the wax ring. This can involve replacing the flange or using alternative sealant options to ensure a secure and watertight connection.
How Can I Prevent Leaks After Installing the New Wax Ring?
To prevent future leaks after installing the new wax ring, I recommend checking for proper alignment, tightening bolts securely, and ensuring a tight seal. Troubleshooting common installation issues can save you from potential headaches down the line.
Conclusion
In conclusion, replacing a wax ring on a toilet may seem like a daunting task, but it can be easily accomplished with the right tools and materials.
Remember the adage, ‘A stitch in time saves nine,’ and take care of any leaks or issues with your toilet promptly.
By following the steps outlined in this article, you can ensure a proper seal and prevent any future problems.
Now, go forth with confidence and conquer your toilet repair!