Ready to upgrade your bathtub fixtures? Say goodbye to that outdated look and hello to a fresh, modern style.
In this step-by-step guide, we’ll show you how to effortlessly change out your bathtub fixtures. With just a few tools and materials, you’ll have your new fixtures installed in no time.
Get ready to enjoy a revitalized bathing experience as you effortlessly control the water flow and temperature.
Let’s dive in and give your bathroom the makeover it deserves.
Key Takeaways
- Regularly clean bathtub fixtures with mild soap and water solution to maintain their appearance and prevent damage.
- When removing old fixtures, use lubricant to loosen stuck or corroded parts and shut off the water supply before starting the removal process.
- When installing new fixtures, ensure proper sealing of connections using plumber’s tape or pipe joint compound to prevent leaks.
- Adjust water flow and temperature for optimal performance, and troubleshoot any issues such as leaks or low water pressure by checking for loose connections, damaged washers, or debris.

iSpring Whole House Water Filter System, Highly Reduces Sediment, Taste, Odor, and up to 99% Chlorine, 3-Stage w/ 20-Inch Sediment and Carbon Block Filters, Model: WGB32B, 1" Inlet/Outlet
Chlorine-Free, Pure Water: Shield your family and appliances with the WGB32B whole house water filter—eradicating up to 99%...
As an affiliate, we earn on qualifying purchases.
Tools and Materials Needed
To change out bathtub fixtures, you’ll need a wrench, screwdriver, pliers, and new fixtures.
Choosing the right fixtures is essential for a successful and functional installation. When selecting new fixtures, consider the style and design that matches your bathroom decor. Additionally, ensure that the fixtures are compatible with your existing plumbing system.
Proper maintenance of bathtub fixtures is crucial to extend their lifespan and prevent leaks. Regularly clean the fixtures using a mild soap and water solution, avoiding harsh chemicals that could damage the finish. Inspect for any signs of wear or corrosion and replace any worn-out parts promptly.

Waterdrop Whole House Water Filter System, with Carbon Filter and Sediment Filter, 5-Stage Filtration, Highly Reduce Lead, Chlorine, Odor and Taste, 2-Stage 5 Micron WD-WHF21-PG, 1" Inlet/Outlet
【Efficient filtration】The impressive 10” x 4.5” PP filter and GAC filter combination achieves a 5-stage filtration, effectively reducing...
As an affiliate, we earn on qualifying purchases.
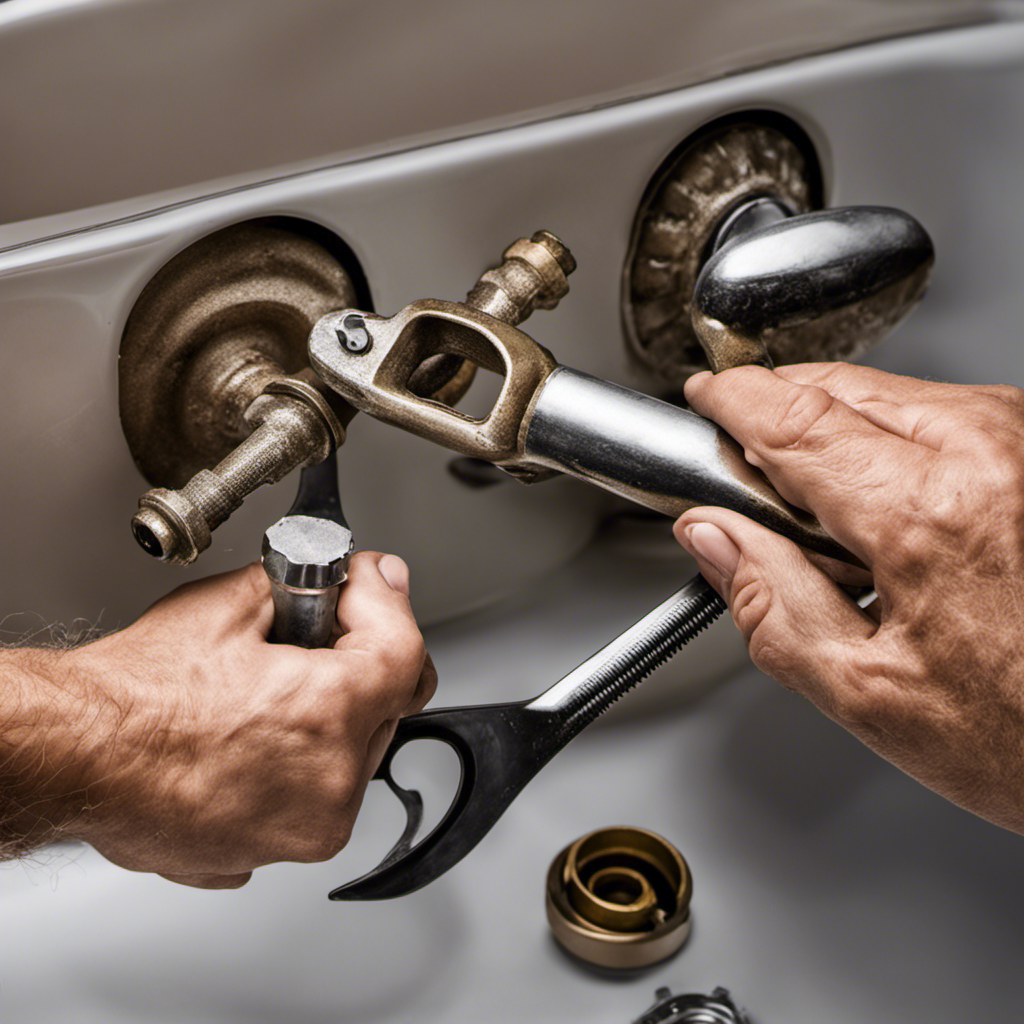
Removing the Old Fixtures
Start by unscrewing the old faucet handles and removing them. This is an essential step in replacing your bathtub fixtures.
Here are some tips to help you through the process:
-
Determining Compatibility: Before purchasing new fixtures, make sure they are compatible with your bathtub. Check the size and type of your existing fixtures to ensure a proper fit.
-
Common Issues: It is common for old fixtures to be stuck or corroded. Use a lubricant, such as WD-40, to loosen them. If they still won’t budge, you may need to use a wrench or hire a professional plumber.
-
Inspect the Valves: Take a look at the valves behind the handles. Check for any leaks or damage that may require replacement.
-
Shut Off the Water: Before removing the fixtures, turn off the water supply to avoid any accidents or flooding.

Waterdrop 3-Stage Whole House Water Filter System,with Carbon Filter&Sediment Filter,7-Stage Filtration Highly Reduce Lead,Chlorine,Odor and Taste,5 Micron WHF3T-PG,1" Inlet/Outlet
𝟗𝟕.𝟕𝟐% 𝐂𝐡𝐥𝐨𝐫𝐢𝐧𝐞 𝐑𝐞𝐝𝐮𝐜𝐭𝐢𝐨𝐧:Our water filter with a KDF composite filter and an GAC filter covered with high-quality carbon...
As an affiliate, we earn on qualifying purchases.
Installing the New Fixtures
Once you have successfully removed the old fixtures, it’s time to install the new ones.
When installing new bathtub fixtures, there are some common mistakes to avoid, and it’s important to know how to troubleshoot common issues that may arise.
One common mistake is not properly sealing the connections, which can lead to leaks and water damage. Make sure to use plumber’s tape or pipe joint compound to create a tight seal.
Another mistake is overtightening the fixtures, which can damage the threads and cause leaks. Tighten them firmly, but avoid using excessive force.
When troubleshooting common issues, such as a leaky faucet or low water pressure, check for loose connections, damaged washers, or debris clogging the aerator.

Waterdrop 3-Stage Whole House Water Filter System,Reduce Iron&Manganese,with Carbon &Sediment Filters,7-Stage Filtration,Reduce Lead,Chlorine,Odor,5 Micron WHF3T-FG,1" Inlet/Outlet
𝐒𝐆𝐒 𝐓𝐞𝐬𝐭𝐞𝐝 𝐚𝐧𝐝 𝐂𝐞𝐫𝐭𝐢𝐟𝐢𝐞𝐝:Tested by SGS, Waterdrop whole house water filter system effectively reduces 95.9% of iron、99.7% of...
As an affiliate, we earn on qualifying purchases.
Adjusting Water Flow and Temperature
Make sure you adjust the water flow and temperature to your desired settings before using the new fixtures. This step is crucial for ensuring a comfortable and enjoyable bathing experience.
Here are some important considerations for water pressure control and troubleshooting common issues:
-
Water Pressure Control: Check if your fixtures have a built-in regulator to adjust the water pressure. If not, you may need to install a separate pressure-reducing valve.
-
Temperature Control: Test the hot and cold water separately to ensure they’re functioning properly. Adjust the temperature using the fixture’s handle or a separate mixing valve.
-
Leakage: If you notice any leaks, tighten the connections or replace faulty parts like washers or cartridges.
-
Inconsistent Water Flow: If the water flow is weak or uneven, clean the aerator or showerhead to remove any clogs.
With these adjustments, you can now move on to the finishing touches, such as caulking and cleaning up any debris.
Finishing Touches
Now that you’ve made all the necessary adjustments, it’s time to focus on the finishing touches like caulking and cleaning up any debris. These steps are essential to ensure the longevity and aesthetic appeal of your newly installed bathtub fixtures.
When it comes to decorative options, you have a wide range of choices to enhance the overall look of your bathroom. From sleek and modern designs to classic and elegant styles, you can find fixtures that complement your existing decor. Consider factors such as the finish, shape, and functionality of the fixtures before making a decision.
In terms of maintenance tips, regular cleaning is crucial to prevent the buildup of grime and mineral deposits. Use a mild detergent and a soft cloth to wipe down the fixtures, avoiding abrasive cleaners that could damage the surface. Additionally, inspect the caulking periodically to ensure it remains intact and reapply if necessary. By taking these simple steps, you can keep your bathtub fixtures looking pristine for years to come.
| Decorative Options | Maintenance Tips |
|---|---|
| Sleek and modern designs | Regular cleaning with mild detergent |
| Classic and elegant styles | Inspection of caulking |
| Complement existing decor | Reapply caulking if necessary |
Frequently Asked Questions
What Should I Do if I Encounter Any Plumbing Issues During the Process of Changing Out Bathtub Fixtures?
If you encounter any plumbing issues while changing out bathtub fixtures, don’t panic. Troubleshoot common problems by following these steps: safely disconnect and reconnect the plumbing, and refer to detailed guides for specific issues.
Can I Use the Same Pipes and Fittings for the New Fixtures or Do I Need to Replace Them as Well?
You may be wondering if you can reuse the existing plumbing when changing out bathtub fixtures. The compatibility of the new fixtures will determine if you need to replace the pipes and fittings.
How Can I Ensure That the New Fixtures Are Properly Sealed and Won’t Cause Any Leaks?
To ensure proper sealing techniques and prevent water leaks when changing out bathtub fixtures, it’s important to use plumber’s tape or thread sealant on the connections. Tighten the fittings securely, but be careful not to over-tighten and risk damaging the fixtures.
Are There Any Specific Safety Precautions I Should Take When Working With Water and Electricity During the Fixture Replacement?
When working with water and electricity during fixture replacement, it’s crucial to prioritize safety. Take necessary precautions to avoid potential hazards. Ensure proper insulation and grounding, and use GFCI outlets for added protection.
Is It Possible to Replace the Fixtures Without Hiring a Professional Plumber, or Should I Seek Professional Help for This Task?
It is possible to replace the fixtures without hiring a professional plumber. However, it’s important to weigh the pros and cons of DIY versus professional help. You’ll need essential tools and materials for the task.
Conclusion
So there you have it, a step-by-step guide on how to change out bathtub fixtures.
With just a few tools and materials, you can transform your old fixtures into shiny new ones.
By following the instructions and taking your time, you’ll be able to remove the old fixtures and install the new ones with ease.
Don’t forget to adjust the water flow and temperature to your liking, and add those finishing touches to complete the look.
Now go ahead, take a relaxing bath in your newly upgraded bathtub!